How To Correct Your Over Bleached Frontal Or Closure Without Staining The Lace | The Tastemaker
- Posted on 08 April, 2018
- Lace Closure
- By Anonymous
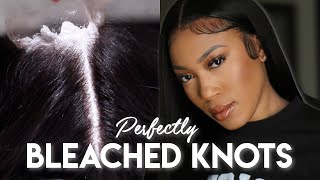
Have you ever bleached the knots on your frontal or closure? Chances are you've also over bleached it and the roots of your hair are now blonde! No worries boo that's an EASY fix. Today I will show you step by step how to correct this common mistake without staining the lace.
T O O L S
Mannequin Head
T-Pins
Mixing Bowl
Tint Brush
Double Sided Edge Control Brush
Paddle Brush
P R O D U C T S
Clairol Semi Permanent Dye in Darkest Brown
Adore Semi Permanent Dye in Black Velvet
Chi Iron Guard Spray
It's A 10 Leave In Conditioner with Keratin
Biosilk Silk Therapy Oil
T E C H
Lusana Studio Softbox Light Kit
iPhone6 ( Camera )
iMovie (I edit on my MacBook Pro)
S O C I A L
Snapchat : Lxvedom
Instagram: DomTheTastemaker
C O N T A C T
Business Inquiries: [email protected]
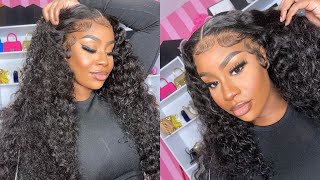
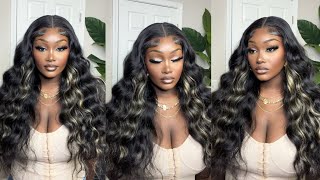
Hey what's up, everyone is to tastemaker, and today I'm gon na be showing you guys how to correct your over bleached frontals. It is so annoying when you have a frontal and you are attempting to bleach your knives and instead of bleaching your knives. You end up bleaching the hair and over bleaching your roots and your frontal, and then you're sitting around, like, oh, my god, like how am I gon na fix this without messing up your lace, because you don't want to end up standing. Your ladies, even though you're trying to crack your roots, so today, I'm gon na show you how to do all of those things, and you guys can use this tip not only for over bleach roots, but you guys can also use this tip on any kind of Hair dyeing process that you have for your closures or your frontals, so you can definitely use these tips on multiple occasions and, as you guys can see honey, the lace is looking real good like okay, that's what I'm looking like! I'M looking like! Oh okay! So if you guys want to see exactly how I did this didn't just continue watching so when you first get your front, so obviously this is what you're looking like you're looking crazy, it's all blonde! I have already done this process before and right now, I'm just gon na show you guys how to do it, since I am touching it up. So the first thing that you're going to need is a mixing bowl. You'Re also gon na need a double sided edge. Control brush we're only gon na use the comb side. I also use this brush to do my baby hair. The next thing you're going to need is a tempting brush for the hair dye that we're going to be using today, and we also are gon na use. This brush to mix the dyes together so you're also gon na need this semi-permanent dye and darkest Brown and you're gon na need this dye in black velvet. So the first thing that you're gon na do is take your mixing bowl put in that semi-permanent dye. We'Re gon na use the brown ones and the black one and we're just going to mix both of these together. So now that you have both of those and they're you're gon na go ahead and mix those together with your tinting brush, just go ahead and stir that around keep stirring it, so that both of those colors are mixed in well together and then next you're gon Na take a towel and put it over your wig stand. I like to do this just to prevent the wig from moving too much once I do put it on here, because that whole is like a one-size-fits-all, but we all know that's not accurate. So now that I've placed this on here, we're going to start the process. So the first thing that you're gon na do is comb all of those hairs back and out of the way you don't want any of the hairs in the way. So right now I'm just parting it and then I'm going to section off the hair really quickly and just brush everything back. The next thing that you're gon na do is take your mixing bowl and your brush and you're gon na dip. The comb side in there make sure that you dab all of that dye out. You see, I have. It dripping everywhere, try to prevent that by dabbing, some of that off inside of the bowl before you actually put the comb up to the hair. So now I'm just going to literally take the comb and comb the roots. Don'T worry about it getting on the lace, because, even though it seems like it's gon na get on there, it doesn't. I don't know what it is about this little magical comb, but it just doesn't get on the lace. So even like that part right there, where I dripped it, you see that part in the front once you comb it through. It'S fine see it's perfectly fine. It'S not getting on the lace now you will see some spots that are on the mannequin head, but that isn't on the actual hair. So it's not going to lace it off. So I'm just combing the dye through the hair and I'm gon na continue this process throughout the whole entire frontal. So no need for me to talk anymore. You guys can just watch this process so now that I have all of that combed out of the way. I'M using the excess dye that I have and in the tempting brush and then I'm just brushing over all of the frontal just to make sure that the color is not only on the roots but kind of going throughout the hair, so that there is no line Of like demarcation - and you have like dark, hair and then brown hair, so I'm just pretty much using the excess dye and putting that all over the rest of the hair. This is optional. You don't have to do this, but I just suggest to do it so that way everything is cohesive, so I'm just brushing all of that dye through really quickly that black piece that you guys see right there, that's actually stained on the mannequin head. That'S not on my lace. Oh no worries, don't worry. I didn't make a whoopsie it's just on the mannequin head from the last time that I did this process so now that this is done. I'M gon na go ahead and rinse all of this dye out and in the next clip you guys will see the finished look. So this is what the Front's will look like once I've rinsed all of that die out, as you guys can see. I have nice jet-black, hair now and no more blonde. This is what it originally looked like on the left, and this is what my roots are looking like in the front and now so, as you guys can see, it is a complete change. There is like a sandy brown roof ish kind of thing going on here, but I actually like that because it helps it blend in better with your Scouts. So you guys that is the finished look. It was really easy to do and I hope you guys can mimic the same thing and correct your friend so the next time that you over bleach it hey guys. So I went ahead and did was rinsed out all of the dye in my hair. Once I finished rinsing the dye out of my hair thoroughly, I went ahead and put in this leave-in conditioner real quick though, when you are rinsing out, the color in your hair make sure that you are rinsing your hair out with cold water. It is very important to do it with cold water, because if you use hot water, it's going to cause the dye to bleed out of your hair. So basically, all of your hard work would be have like be for nothing at this point. So it's very important when you are doing that process that you are rinsing your hair out with cold water. So all I did after that, once I rinsed it all out. I just got like some conditioner and then I went ahead and just like rinsed a hair out with conditioner just to make sure that all of the hair was nice and like clean innocent, but also that it didn't have any more of the color in there. So once I went ahead and rinsed out the conditioner and everything I went ahead and used this bad boy right here, this is called the it's a 10 miracle, leave-in plus keratin, and basically it's just a leave-in conditioner. I use this on my natural hair. Whenever I wash it in, my hair is wet before I blow-dry it, so I use this it's a 10 while the hair is wet and then I go ahead and blow-dry the hair on a medium setting. Typically, I would just let my hair air dry, but I have videos to record, so I don't have time to wait for it to air dry and you guys all I did was blow dry, my hair and look how nice this hair is. This hair is from bhf hair. I am doing a review on this Harris if you are interested in purchasing it. Don'T worry, because I have a full review on this hair, so the other product that I have in my hair right now is this chi spray. Now this is something that I put on my hair also to protect the hair from heat damage, so I use this. This smells so good. This spray reminds me of just like a really hot guy that just smells really good. Like that's what I think about when I swear this in my hair, it smells so good and the last product that I have in my hair is the bio silk. The bio, silk: silk therapy oil - you can use this. If you don't have this, you can also use this. This is my organics. This is the coconut milk oil, so once I've done all of that, I go ahead and put the bio silk on, and I just put like a little bit in my palm. That'S a little bit low. It goes a long way because this product is, you know, and it just gives your hair like a nice shine, especially when you guys are about to flat iron, your hair. So this is what I like to put on there. I only like to put just like a palms worth of it on because I just like, don't like my hair to be weighed down by a lot of products. So that's something that I do and then you just want to go ahead and comb. All of that or brush it into the hair, it just gives your hair a nice and Lester, and it really helps with like flyaways and everything, so I'm just really bothered by this. I hate that my foundation, it's like messed up right there, but other than that. That is all you guys, so, the next time you guys see me you guys will be checking out how I do my baby hairs on my wig, because right now I don't have any baby hairs on this hair and it's driving me insane. So I'll see you guys in a little bit. Thank you guys so much for watching this video and I'll see you guys next time.
Comments
ChiChi_Knows_Best: Thanks for this video! You know what works even better?! A mascara wand girlllll ♀️ Please continue to keep these videos coming xoxo
Jana T: I followed this tutorial to fix my over bleached knots on my hairvivi wig. So helpful and easy!! This is my second wig from them and they definitely have stepped up their game up since my first order however, I still had to go in and correct the roots. I used semi permanent color as this was my first time and I was unsure but it came our great!
MsAshley Nichole: Thank you for this video!!! I watched it and went to Walgreens at 3 am and did this and my frontal is flawless ❤️
The Tastemaker: You guys asked for it so here it is! I hope you all find this video helpful and don't forget to share it with a friend! xoxo Dom
saudi Saudia: I over bleached my lace but I actually like it but Im going to fix it though thanks for the vid
Nia B: This is a really helpful tip especially for a new wig person
misses235: Is there a specific reason why you used that certain type of semi permanent dye instead of just jet black?
Arielle Marie: Thank you for this video. I was stressed!
Aleisha.: Will this need retouching and if so how long would you give it before doing this process again?
Jackie’s Vanity: Now I can correct my neice's because I'm sick of looking at it
All things Renee: Yay Cuz, I’m so glad you made this... my closure was looking like yikes! Lol..
NOimTaty: Where is the hair from? Looks very natural and pretty❤️ Edit: BHF Hair *waits for review*
Sherica: Can you use shampoo to rinse the dye out and then conditioner
Nonty BotiqueCouture: What if I make a mistake n colour part of the lace black,how do I fix that?
CIMAN: How long do you let it sit on the hair ?
g. pearson: Great video
Demii Lovee: No lie that hair is bomb where u got it from ?
Mya Reeves: This is so smart
Peachwater48: OMG! I JUST PURCHASED TWO WIGS FROM ONLINE AND THEY ARE A NATURAL COLOR WITH BLEACHED KNOTS AND IT IS PRE-PLUCKED. I NEED TO COLOR THEM BLACK BECAUSE THE NATURAL COLOR DOES NOT LOOK GOOD ON ME....
T: Are you gonna continue to vlog?