Closure? Or Frontal? Natural 5X5 Closure | Detailed Full Tutorial | Vipwigs
- Posted on 18 November, 2019
- Lace Closure
- By Anonymous
Closure? or Frontal? NATURAL 5x5 Closure
| DETAILED FULL TUTORIAL | VIPwigs
✨ THE DIFFERENCE IS... THE RESULTS✨
(HAIRSTYLIST: Franshon Aka FRAN)
https://www.thedifferenceisboutique.co...
Location: Atlanta,GA
☎️Contact: (404) 784-1420
Don’t forget to follow me on Instagram: @The_Difference_Is and on Facebook @TheDifferenceisFranshon
TO PURCHASE PRODUCTS--------LOG ONLINE
#PremiumBeezWax $12.99
#PressingComb $14.99
Free Assemble, Use Coupon "BF20" Save $20. CW002
Buy Here:
https://www.vipwigs.com/5-5-closure-wi...
Info:
HD Lace 5*5 Closure Length: 18”
Bunldes length: 20" 22" 24"
Lace Material: HD lace
Texture: Straight
VIPWIGS SALES:
---Get 1 Wig Free For Over Orders $ 400 OR
---Use Code
"BF20" Save $20(Black Friday Sale)(CW002, Mix018)
"A25" Save $25 (over $300)
"A15" Save $15 (over $200)
"A10" Save $10 (over $100)
(Excludes clearance items)
♫♫♫♫♫♫♫♫♫♫♫♫♫♫♫VIPWIGS♫♫♫♫♫♫♫
CONTACT US:
E-mail: [email protected]
Whatsapp: +0086 139 6394 1511
Skype: +17078207987
Website: https://www.vipwigs.com/
FB:https://www.facebook.com/VIPWigsOffici...
YouTube: https://bit.ly/2NFmWFC
Music Credit: Thank Me Now ft.Drake
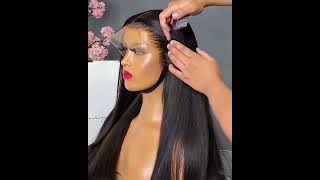
You could take me now go ahead. Thank you, lady yeah. I know what I said but late it doesn't always come so instead, hey guys thanks for Tony answer this tutorial today today, I will be doing something that I have never done. So this is a very detailed video, my client, she love love, love, love, love, her hair work, it girl get it get it. Okay, anywho! Today we are working with the VIP wigs. They also sell bundles you guys, so you just don't have to just purchase a wig. If you guys are interested in first purchasing any bundles get hit they line up, they are, they have really really good hair. Now, the methods that we're going to do today is actually the method as far as how the frontal is installed. This is the new way that people are doing the closure, and I really love it this way. When you guys finish seeing this look, oh my god, I did the out disclosure stay tuned. This is a very detailed to square you. As you can see, it's almost 20 minutes long. I wanted to do the step by step for those that have never done this before like me, so as you can see, we're going to just do the same method as if this was a front tool. We'Re going to put the ball cap on to the ball cap method, but only in the top portion of her hair, because that's not only portion that the net is going to sit on so we're going to go ahead and shake this out. It doesn't really matter if it's too big or if it's oversized it's okay along, if it's enough, that's left out to cover up the hair. This closure that I actually have is a six by six closure. I love this closure because it's very wide and open it gives you that whole front survives anyways, so I'm just going to start with the first bundle, which is the 24 inch straight hair that we have. We have three bundles, I'm just going to start with the first one. I'M normally just sewing just the first bottom half and then I will actually proceed on with laying the the closure down. So I am double-tracking the bottom portion of her hair. So keep that in mind, I am double sewing both tracks together just to speed up the process. Okay, before you glue anything down, sew anything down, you want to make sure that the measurements are correct. You also will need your clients existence. As far as holding the lace down in the front there's a lot of different tricks about this, because, sometime when you're sewing down the closure, the front might pull back. Sometimes, when you're sewing down the closure, it might get a little blocky it might. The middle part. Might not be as flat as you can see it's pulling back just a little bit. So even when you're sewing this, you don't have to be like super super tight or super pulling it. You just want to make sure it's down and it's tech in because once again the closure does shift and it does move as you're sewing it down. So, as you're sewing it down periodically, you want to just check and make sure it is in the same spot, because when it's time for you to glue that lace down, you don't want it to too far back where it's like. You got to take the whole thing down and reposition okay, so we got that tech on down, so I dig off-camera, I'm sorry. I proceeded with the second bundle, which is a 22 inch. I basically anchored it right on top of that closure and a u-shape, and then I kind of like you know, followed the pattern of the braids going on the round, so the first one you do want to anchor it on that closure, if not on it, like Right next to it, like literally like right there and then just follow suit with the rest of them. Only because you don't want the gap or you don't want to space or anything in between the closures and the bundles. You want everything to flow, quick, little tip right here that people don't normally tell you that last little track that youso right up against that closure. You want to make a little bit of space, not a big space, not a you know, just a little bit of space left so that when you brush that closure down, it won't have a hump, because in order for it to have a hump that mean you Place that track right on top of it, so when it was time for you to brush that closure back or that frontal it'll leave a hump sometimes so that's just a quick fun fact actually blow dried it, because the hair was wet for me bleaching. The knots I am using got to be, I believe, I'm not really a frontal person, so I haven't really should I say, purchase any new glue. So this works just fine for me and my client as I'm learning and as you guys are watching it does the job just perfectly I am. I will be applying two layers. It'S just the same method as if you are doing a frontal, you will want to apply the glue two times. Wait till it dries just the proper steps of doing the front. So you would do the same as for the closure. Okay. So for those that might be wondering, I am opening up the part a little bit more. Some people might like really really tight parts, but you want the hair to look as measure as possible, so you want to open up that part song and the best way to do that is by plucking it so you're going to pluck that part either in the Center or going side to side, you don't want to overly pluck, but you do want to make sure that it is smoothly. Even as far as now I do press it pressing, it will actually open it up as well. Just so, you can see what's going on, get those flyaway down kind of like flatten that hair, so each step that I'm doing is actually very very imperative, so you actually want to pay attention now, when I go through the part like this and press it, that's Only because just to you know, make it as flat as possible, you can't also treat just closure or a friend so as if it was your real hair, so I'm just want to go through it and just press it down just so. I can give me that flat smooth surface now I am going to be creating just a little bit of baby hairs. This closure babay looks so real is giving me life. Yes, mommy. Yes, yes, yes, look at that! Okay, you can't tell me this ain't hurt here. You cannot tell me that this is a closure. Now I did a survey on this. I posted the picture of, and I asked my subbies to. Let me know if they thought this was a closure or her real hair or a frontal, and a lot of you guys did say frontals only because I mean that's the world that we're living in today, who is leaving a hero right? Oh okay, anyways beibei's! Thanks on to this complete finished, look because when I tell you, I lay this closure to the guard for those that are probably wondering why that I leave that braid out on the side. This is the difference, is quick, little tip and method. Okay. Now I have a lot of people that be like they wanted to pull it up in the ponytail or maybe one to pull a hair behind their ear and they can't because it'd be like that big or that you know that small size braid right there. So when I normally do my installs, I leave that first little braid right there out that braid I mean it's not really necessary because in it end up coming out anyway, after for so long, so what I just did I left that perimeter out on both sides. I created a little sideburns for her and if she did want to throw it behind her ear, she could, if she wanted to throw it up, throw it back and a low ponytail and the size not show she could. I mean it's a lot of different ways. You can play with just a small little portion of your hair being left out, so I wanted to keep that in mind. You guys are watching this tutorial on how healthy and how natural it makes the hair look like she is like ecstatic right now. She just loved how natural her hair looks like you can see it all in our face, and this is what you want from your clients when you get done blowing their hair, you want them to feel some type of way where they be like


Comments
samara williams: I absolutely love this continue to slay on boo and the model is pretty❤️
Candoscious B: Ummmm, this was PERFECTION!! ❤
Jamison Adventures: Looks gorgeous
Tea is Blount: Blessings 2 you SIS have a blessed Thanksgiving holiday keep us looking beautiful SWEETSNYC
Asia&Monty: Post notifications on
ShaShaNeka TheChosen1: Lovely
Glory C: Yesssss
KamrynAlexandria: When does the beeswax go on sale?
Nefe: Did you double the lace for the whole head ?
Charnise Forestal: Did you do her makeup? It's nice