How To 4X4 Lace Closure Wig | Gardenia Mastermix 4Pcs 18"/20"/22"+Closure | Beautyby
- Posted on 19 November, 2020
- Lace Closure
- By Anonymous
Hello Guys, Check out this video to see how I made this Beautiful Copper red Wig using Model Model Mastermix 4pcs one pack. Please enjoy and leave comments and questions you have for me down in the comment section Below. Thank you Beauties for watching and please SUBSCRIBE &
❤️Follow me on Instagram @beautyby_nah❤️
https://www.instagram.com/beautyby_nah...
Watch more Hair Tutorials Links below:
DIY 4x4 Lace Closure Wig | Model Model Gardenia Mastermix | BeautyBy Nah https://youtu.be/f7wQw-0mqxY
How To HD LACE 42” Inch Human Hair Blend Wig Install + Review | BeautyBy Nah https://youtu.be/y1WiusHaXsA
Hair Used:
Model Model Gardenia Mastermix 4pcs 1pack
Color: OTCOPPER
Length: 18”/20”/22”+CLOSURE-Local Beauty Supply
Styling Products Used:
Instant Control Edge & Braid Gel-Local Beauty Supply
Paul Mitchel Sculpting Foam-Local Beauty Supply
Instant Control Edge & Braid Gel Maximum Hold Local Beauty Supply
Nars Sheer Glow in the color Syracuse-Sephora
Lace Wig Grip-Amazon
Tools Used:
Canvas head with Wig stand by Lihue-Amazon
Hair Clips & T-pins by Lihue-Amazon
Double Sided Edge Control Hair Brush-Local Beauty Supply
Eyebrow razor by Twinkle-Local Beauty Supply
Weaving Thread, Scissors, Needles, Styrofoam Head used as a T-pin, Needle & threaded needle holder-Local Beauty Supply
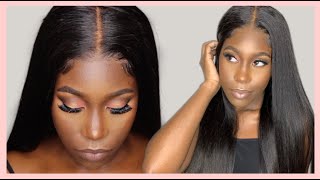
Hey guys it's na and welcome back to my channel in today's video, i'm gon na, be showing you guys how i made this wig that i'm rocking, if you're interested in how i created this wig, please continue to watch. So i use a gardenia master mix. Four piece pack to make this wig got my done cap on my canvas head and i pre-threaded all my needles to make the process much faster. So i started sewing on the bundles and i started with the longest length which is in the 22 inches. So i'm going to be doing the fold over method, i'm not going to be cutting my wefts. This also helps to prevent shedding when sewing down my webs. I make sure that they are super flat, so i have a flawless wig. I had to press rewind because i forgot to install the lace frontal. You must install the waist front toe first to make sure that you get a nice flat laying frontal and now i'm just measuring the frontal to make sure that it's centered, i'm putting in the t-pins just to make sure that the frontal is laying as flat as Possible now, i'm going to start sewing down the lace closure and making sure that i'm sewing it very close together to ensure that this lace closure. This lace frontal is length as flat as possible beauties. I don't know how they slipped my mind. I just started sewing these bundles and forgot about the frontal the closure come on. Now, let's get it together. Good thing, i only had about two wefts sewed down, so it shouldn't make too much of a difference. So i sewed down my lace, closure from one side and worked my way around the perimeter and this lace. Closure is a 4x4 closure, so i'm going to get really great um parting space. I can part it in the middle put it on the side. The lace closure is 16 inches in length, so i'm definitely gon na be getting a really great volume. Look out of this hair being that it's two inches in difference from each bundle. So when i sew my wefts down or my closure or my frontals down, i like to hold my thread in place to make sure that it does not get tangled. I hate that so much, especially when you're, using very long thread that you've threaded um it can have a tendency to get tangled. So my little tip and trick is to hold the thread in place with one hand before i actually knot it. So that way, i'm sure that it does not get tangled. So this closure is almost completed and sewed down and now we're gon na move on to sewing down the rest of these bundles. Okay, i have not finished off the longest length, which is in the 22 inches, so we're gon na get back on track and finish these bundles. So this closure is looking good. It'S laying flat, thank goodness for that, so i'm gon na wrap it up and continue with the sewing of the bundles guys. I love this canvas head, i'm so glad that i purchased this. I told you guys about this in my previous videos, but it's you for me, but i'm getting the hang of it and i love it. It makes sewing down your wigs so much easier. Oh, my goodness, i'm telling you i used to use a um styrofoam head and let me tell you big difference such a big difference. I love this kind of head. I will leave all the details of the products and the tools that i use in the description box below so usually, when i'm sewing down my wefts towards the back. I do sew them a little more closer together and then, when i get to the second bundle, i tend to sew it a little more spaced out and then, when i get to the top, i try to sew as close together as possible, so to prevent any Like gaps showing so when my thread is completed, i make sure that i secure it. I tie the knots about three to four times before i grab another needle and thread just to ensure that it is anchored and it is secured and, as you guys can see, i am doubling the wefts um. This actually helps with the spacing that i am going to create to make sure that nothing is showing through you're not seeing any of the dome cap or anything like that, and we are almost finished with sewing down this wig guys. I was getting a little bit nervous because i was running out of some hair, but i managed to make it work and i basically just when i was pretty much done with sewing down all of the hair. I just made sure to bring the gap between the wefts and the and the closure. I made sure to kind of bring them together. So that way you wouldn't you won't see that gap. So this wig looks like it's coming out great so far and as you can see, you see that gap there i got ta bring. I got ta merge the frontal and closure and the wets together, because we don't want any gaps. We don't want it to be. Looking crazy, i want it to look cute and flawless and black okay, so now it's time to cut out that weave cap, where the lace should be showing. We have to cut that part out, because we do not want to see a black weave cap. We want to see some lace um, giving you some scalp vibes and guys. I don't know what happened. My video just cut just be careful when cutting out that unnecessary weave cap from the lace. So this is the wig cap that i'm going to be using. It'S a suede and lace material. So, let's see how this wig is fitting. Okay and no got to be glue, got to be spray okay. So let me cut off the lace and lay these big baby hairs down. So i'm going to grab a pair of scissors and cut down the center of this lace and after i'm completed cutting down the center of this lace. I'M going to grab my eyebrow razors and i'm going to just take my time and cut off this lace and just you know, kind of move slowly, but just ensure that i'm removing the lace and then i'll do the same. The other side, any excess lace that i can't cut with the razor. I will use the scissors and i'm just cutting it in a um, not a blunt way, but i'm cutting in a kind of like jagged way, so that the lace will look more natural. To my hairline - and i really love the texture of this hair, it's like a spiral curl, they called it citron curl and this gardenia master mix, it sure, is a lot of hair. You wouldn't think that it was looking at the package, but what it when it's all put in it is a lot of hair like i was like pushing it back and again falling down in my face. I was just the way, so i can get this. You know lace cut, but it's okay, it's a part of the process and beauties. This is not easy. Cutting this lace on camera, it's so difficult! I have my mirror to the side. That'S what i'm looking at just to make sure i don't mess up this lace and guys. I forgot to mention that this hair is synthetic hair and i am loving it if you like to switch up your look a lot. This is the way to go. Gardenia master mix, they have a lot of different versions and different curl patterns and hair colors to choose from, and this particular one is in the color ot copper. It'S like a pretty reddish color and it's a two tone. I think it's like a like a 1b or one in the roots, so i'm grabbing my paw mitchell sculpting foam and applying it to the roots of my hair. Just to make my wig lay a little more flat. I do like the volume in the wig, but i just want it to be a little more smooth and flat on the top, not completely flat just a little bit flat, i'm going to take a clip just to help make the wig lay a little more flat. So i'm going to grab my favorite instant control, edge control to lay down my baby hairs and guys. I don't know what happened to the footage, but you guys can't really see me do it from beginning to end, but it's okay. You guys, i think, got the gist of it of how i laid them down. I didn't do too much to this closure. I just you know, put mousse on my hair and instant control, i'm adding more mousse, as you can see, just to help lay down the wig even more but um. I kept it pretty simple with this one just to see you know what it can do without really like you know, tweezing it and trying to like super perfect it. So this is kind of is what it is situation, but i'm loving it. So i grabbed my nars foundation in the color syracuse and i am going to apply it with this brush and just put a little bit on the parting space and wherever the lace is peeking through just to help to camouflage the knots ooh. It looks like i was getting a little bit too foundation happy, but it's okay, it's a long night and we're gon na just you know, wipe off the excess with my finger, so i'm just gon na be putting a little bit on the front of the lace. Just to help to conceal the knots this is synthetic hair, so we're not going to be bleaching it. So this is what we got to do. So i wanted to see how this headband looked with this wig. I know that the headband trend is really in style. Now, and thank you guys so much for watching this video if you liked it, please give me a thumbs up, and let me know in the comment section what you guys thought about this wig and bye.


Comments
BeautyBy Nah: Hello Beauties!!! I had fun making this 4x4 Lace Closure Wig by Gardenia MastermixLet me know what’s your favorite synthetic hair company?