Aaliweya Hair | 5X5 Closure Wig Install | Im Back!
- Posted on 06 July, 2022
- Lace Closure
- By Anonymous
This video is not sponsored by Aaliweya Hair. This wig was purchased by me!
My sisters channel: @Alexis Arlette
My moms channel: @Gina Renae RN Budgets
Social media tags
Instagram: @ItsAriB_
Twitter: @TheLifeOfAriB
TikTok: @itsaribforme
Camera: iPhone 13
Lighting: Medium size ring light
Editing: iMovie App
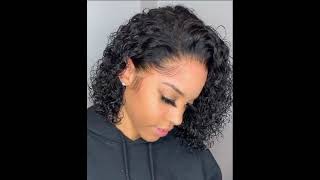
Aaliweya 5x5 HD Lace Closure Wigs Human Hair Body Wave Lace Front Wig for Black Women Brazilian 100% Virgin Human Hair 5x5 Body Wave Human Hair Wigs Pre Plucked with Baby Hair 150% Density 26inch.
Hey y'all, we back we're back we're back we're back. Okay, so today we're doing a big install. I did order this wig off amazon, so i will put the link in the description so here i'm just showing you a little goodies. They saying they sent me some little eyelashes that i will not be wearing because who, okay, they sent you a little uh detangling brush, it's usually for wet hair, but you will see me use it in the video okay. They sent some wig caps. These are a little dark for me, so i won't be using those, but you know okay. So this is a 26 inch and i say that lightly, because there's no way this is 26 inches, but we're not gon na complain. Sis a 26 inch, 5x5 closure wig. If you're wondering why i smelled it, because when wigs come from china, they kind of have like a little smell to them, so you know just had to make sure it was good. The knots uh were small, which is good for plucking, and then the lace was like medium brown. Okay, so now we are going to start with bleaching the knots you're going to be need. Some got to be glue spray, a rat tail comb, bw2 bleach. This is the bleach powder, a mixing bowl and then a series of brushes of different sizes. Now y'all see. I forgot that developer, but it's gon na show up in a video later. Don'T even worry about it. So the first step you're gon na do is you're gon na spray that got to be spray on the hairline. So you can comb all those flyaways back, because you don't want none of the hair getting in the bleach, because then your hair going to turn blonde and it's going to look real stupid. So you want to spray that got to be on the hairline comb. All them baby hairs back autumn, flyaways all that stuff you're gon na comb, those back and let it dry a little bit. So now that you have the wig flipped inside out, you're gon na straighten it as much as you can, because you want it to be. As flat as possible, but baby, it's a wig, so you know so here: i'm gon na take like a half a scoop of bleach, because this is a closure. So you see the lace. It'S not a lot of lace. It'S not like a thirteen by four they're gon na develop right girl, um. It'S not like a 13 by four. You have the lace ear to ear, so i just use the half a scoop of the bleach now child. Look at me trying to use the cap girl if you don't just pour that developer now. You just want to pour little by little because you want the consistency to be like a really thick cake. Batter, because you don't want it to seep through the lace because it because if it seeps through the lace, you're going to bleach your roots. And then it's going to be a mess, so you want it very very thick, but you also want to make sure all the powder is combined. You want it smooth, but thick like me, okay, so you see me here, mixing mixing missing and you want it to look just like that. Like you know, when you're baking it like stiff peaks yeah, you want to be the same way now ghetto advisory. Okay. So what had happened was i thought i was going to run out of bleach and i was not making no more so what i did was. I went ahead and bleached in a tea. So, like i bleached the whole front because that's where you're going to see and then i bleach down the middle, where the part is, but i didn't run out of bleach, so i ended up bleaching the whole entire thing. I just didn't show that so don't mind it. Okay, so anyway, you're going to take light very, very light, strokes and you want to place it all over the lace. Now, in the event that you feel the the bleach is seeping through the lace. I want you to stop what you're doing and take a rat tail comb and lift that hair off the lace so that it does not get bleached okay. So here, like i said, you want to really really focus on the front. Look at that! Look at that! Okay, so i let that sit for like 30 minutes and now you're gon na use some neutralizing shampoo and some silicone mix. For this part here, they're gon na brush y'all. Now the neutralizing shampoo um. It stops chemicals from processing. So you want to use a shampoo like that, so after you rinse all the bleach off um, you use that neutralizing shampoo to stop the chemical reaction. So stop the processing. So you don't over process your lace now at this point you do want to use some blue or purple shampoo um. I did do that. The next day i didn't have any at the time, so you won't see me do it, but i did do that because you want to tone that yellow. So you can see. You know right now that it's a lot of yellow underneath orange, whatever you want to call it baby. This trickle in this bathroom was disrespectful like it was given. Is the water on? Did you pay the bill? Mom, like what so um you're going to see me struggle rinse out a whole wig with that little trigger of water. You see that faucet is completely on anyway, so you want to use the neutralizing shampoo on the lace because you want to, like, i said, stop the bleach from processing um. This specific one is color alarming, so if it turns pink, you know that you still have chemicals in your hair or wig and for in this instance, so you want to keep washing it until everything is completely white, so um for my wigs. I don't shampoo them because i just don't because they dry out fast depending on the manufacturer, so i tend to just shampoo the lace and then i'll go ahead and deep condition the entire wig. So you won't see me like vividly shampoo, the wig i may brush it through. You know the excess, but i'm not going to sit there and shampoo big. I just don't do that. Okay, so you're going to go ahead and shampoo the lace and then you're gon na go ahead and bring your wig out towel dry it and then you're gon na put on the silicone mix and let it sit for 30 minutes okay. So this is like two days later. I know y'all like how do we get here, so what i did was i went ahead and let the wig air dry overnight, and then i also put a rinse on it. It'S like a red rinse, but you can't really tell for real and i went ahead and plucked the closure, so i'll do an in-depth video on those two things. Maybe another time i just did not want this video to be so long, okay and then we'll do a ball cap method too. Just don't worry y'all. I got y'all so right now we're going to put on the wig test it out. You know you know fit it onto our girl, something was in there. I think it was the from the wax stick from hot comb in the closure backwards. Bug girl, whatever we not gon na trip on that, so you want to go ahead and fit your wig. Make sure that your ears are uh out of the way you don't want. Your ears covered up, they'd, be hurting, make sure it's clipped in the back um. Usually at this point you would sew it down, but because i'm bald, i have nothing to sew it too. So you know so i'm just placing where i want the wig to lay and the reason why i'm cutting the lace in half now is because it's easier to apply when it's time to lay the lace down on the glue. So, but it's up to you, you don't have to do that. It'S just easier for me! So you're gon na go ahead and clip that lace out of your way, because you're about to start gluing. So now, just you want to keep your wig in place at all times. You don't want to take it off, put it on because then you start messing up so just go ahead and slide it back, but you still want it to be in place all right. So you're going to clean your hairline with alcohol, i did that prior, so i was just showing y'all what i was using and then you're i'm gon na get your lace glue. I'M using eben's active extreme hold glue, i don't like it, but okay and i tried the wonder bond by even the lace spray i see on tank top, so you want to go ahead and dot across the front of your wig wherever your laces. That'S where you want to place the glue - and you also want to place a little bit on the cap a little bit on your forehead. So you want to do both because you want the cap to stay laying down. You don't want to rip it up with the glue, and you also want to cover enough surface area so that your weight does not lift. So this is the perfect amount you're going to spread it evenly and you're going to do four layers after the fourth layer. Go ahead and spray a little bit of the spray. This is optional. You don't have to i'm just trying to spray because i never used it. So i want to see what it was. What it was hitting. You know what i'm saying. Okay, so at this point you now want to girl wipe that off. Don'T don't be like me and leave that on there, like that anything dripping down your face, wipe it off, because it's gon na get stuck to the lace and you're gon na, be there for hours, okay, okay! So at this point you want to go ahead and start blow drying, because you want it to dry clear before you lay it girl. I don't know how i ended up with my stepmom's blow. Dryer grandma bring that back, because this is not mine. I don't know how i ended up in my stuff, but uh i'm gon na bring it back okay, so you just want to blow dry blow dry blow dry until that white turns clear. It'S very imperative that you wait till it turns clear. Do not be like me, i'm very impatient, so i find myself correcting myself a lot when i'm doing this stuff like this, because i don't know how to wait. So don't be like me and just lay down like like i'm about to do it. Don'T do that? Excuse me so now go ahead and pull your sides down make sure your back is you know, clipped up and ready to go and you're going to take one side at a time and you're going to lay it down into that glue and press it in with A comb now, like i said, do not be impatient like me, because it's not very easy to finesse. How i do so wait till it's clear and do the exact same thing. I'M doing pull one side down comb it into the glue, the other side down comb. It into the glue, okay, it's it's important! You push the lace into the glue because that's how it's going to stay, if not it's going to be lifting and it's gon na be purposeless. Now don't worry about the cap on the sides. We'Re gon na get rid of that at the end, so you won't be able to see that so go ahead and blow dry. That um i blow dry it on high and hot heat for like 30 seconds, and then i blow it on high with cold air. To kind of set that glue in so i know it looks crazy right now, but y'all. I promise you. It will not look crazy. Okay. So after you blow dry that you want to put the hair out the way and you're going to get your got to be free spray and you're just going to spray exactly where you laid the glue because you're going to that's how you're going to melt the Lace, i know you'll hear that a lot, but you don't understand what i mean um so then go ahead and get your elastic band um to melt your lace. This one i got is already connected, usually the ones that you get you have to tie in the back, but trying to do that by yourself is really hard. So i get the ones that are already connected and you just you know, put on like a headband. So you're gon na lay your elastic band over where you just sprayed the got to be spray and the glue and you're also going to blow dry that for a little while, i would suggest letting this stay on. As long as you can go. Do some other stuff go clean up, go highlight kids, whatever um after you blow dried a little bit, so it's dry to the touch. I will let this sit as long as possible, because you're going to not regret it in the end. Okay. So after taking the elastic band off, this is what you want your legs to look like you want to look like your scalp like it's not there. You want to look melted whatever term you want to use. This is what you want to go, for. It looks like anything else: y'all you're, going to start over, so we're going to take an eyebrow razor to cut the lace. You can use scissors, but it's very hard to make it look really natural if you're using scissors, because scissors are so precise and it just looks like a straight line when you cut it. So i use the eyebrow razor because it kind of makes it makes it choppy um, if that makes sense, and just makes it look a little bit more natural, so you're gon na cut each side off with the eyebrow razor um. For that natural kind of look. So next you're going to use this tinted lace powder in the color medium brown. By kiss this is my first time using it. It'S uh, it's okay, um! I used it underneath the lace before putting on the unit, and i also used it here. I know it looks a little white and crazy, but you know as we progress you will see, that it does make a difference, and i just have a regular powder brush from my makeup kit to apply that to the front of the lace. And, of course, if you put a little bit too much, you know taking a little towel with some 99 alcohol and you just clean that off of your scalp. So the next step here is that we're going to part and part out our baby hairs. Now this takes some practice. Y'All like this is not something you could just get doing it one time i still struggle with it like i'm, not the best baby. Here person like, i think, they're cute, but i also don't like the over dramatic baby hairs that, like are flipped backwards, flipped, seven different ways - i just i'm just not a fan, but i do like some baby hairs. So trust me, i'm still working at it. So don't mind me, but i'm going to go ahead and just do a simple middle part and i'm going to part out some baby hairs on the edges of the 5x5 lace. And you will see me do that here, foreign okay. So i didn't get everything, because this video would be super super long, but i did go ahead and part out my baby hairs and i cut them with the same razor brush that i used razor brush, y'all eyebrow razor that i used for the lace and now I'M going to apply this wax stick by even just on the perimeter of the closure because of the style that i'm choosing to do i'm doing two cornrows parted down the middle, so i did part the edge of the closures just to cover the tracks. So i'm taking the wax stick to lay it down to make it real smooth and i'm also going to hot comb those baby hairs just to kind of keep them in place as well: okay, so off camera. I went ahead and laid down my baby hairs and i had my mom: do the cornrows because y'all i cannot do cornrows. So if you want to follow uh gina renee, rn budgets, she can do your braids y'all know i was playing. Please don't hair up uh. She will curse me out so um, but i went ahead and laid some neck strips down to lay the baby hairs. I used a lot of body foam to lay the baby hairs and that's it y'all. All i did was press the hair with my flat iron. I didn't do too much: no curls, no layering. No, nothing like that. So thank you all for watching i'm going to do some more in-depth videos of different parts of this install. Let me know what you guys want to see. We have plenty more beauty coming up. So, thank you for watching love, y'all bye. You


Comments
Mary B. Deans: I want to see a makeup tutorial cause your face is always beautiful I didn’t think it was easy to install but I didn’t think it was that complicated Great job baby girl
Gina Renae RN Budgets: Already liked because I know I will love it plus you mentioned me!! Let’s go!!!!!!!!!!
Alexis Arlette: I am learning so much
Derryl Rivers: why you smell it like that lol but who knew to lay down a wig it took alot of time but care tio get it right the first time great job on the tutorial
Alexis Arlette: I ain’t know you be gluing these wigs to your head !
Adama Conteh: Is the wig cap small?
Mary B. Deans: Giiiirrrrlllllll that was Niiiiiiccccceeeeeee
Jamal Jackson: Yessirr man