How To Slay & Melt Down Your Lace Front Wig // Step By Step
- Posted on 25 August, 2022
- Lace Closure
- By Anonymous
Same hair in the video ➤https://bit.ly/3lSt2C6
Hair detail: 13x4 Glueless Lace Wig Straight Hair Lace Front Wig 20 inch
How to slay & Melt down your lace front Wig
Hey loves,
So on todays video I will be showing you guys how I manage to slay and melt down my lace front wigs everytime. I hope you find this video informative and helpful.
LOVE,
SPECTRA.
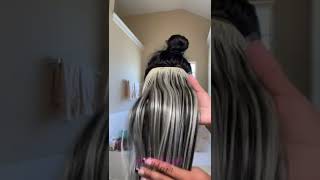
Hey guys welcome back to my youtube channel so on today's video i'll be doing a week, install where i'll be doing a start. To finish, video with you guys to show you how i slayed and laid this hair so tune in till the end of the video to see how we achieved this. So the hair came in in this cute pink dust bag and it's coco here, which was so so cute and they're kind enough to give to me a comb and two makeups which i'm wearing one right now and two cute cute clips, which came in handy during The install and a thank you note with an instructional manual at the back, telling you how to handle your hair, while washing and, of course, the hair itself. Okay, so the details of the hair are written here. So it says it's a 20 inch, um 14 by 4 front lace, wig and it's 180 percent density. So the hair comes compact in this thingy to make sure the lace sits. Well, you know so here i just came in to show you guys how the lace is looking straight out of the box. It came pre-plucked. They also did my baby hairs for me, so i didn't have to struggle and do my own pre-planking or my baby hairs. They really did all that for me, which is a sigh of relief. Honestly, it came in um with these four combs, of course, with a band to ensure your hair sits well on your head. This hair came in so smooth. It was so bouncy. It was giving everything honestly from the lace to the body of the wig. I love this wig. I love it so first things. First, i like to fit my wig to know where i'll be cutting it out when it comes to the measurement of the ear to ear. As you can see, it's overlapping my ear, so i need to cut it out so now that my wig fits me now, it's time to go to the next step, which is now tinting, the lace i'm taking my foundation and my brush and i'm being so light-handed On it, i don't want a lot of product clogging on my list, so i'm being so light-handed and careful and you need to use a foundation. That'S very much your shade to make it look as natural as possible, and here you can see you can see how the lace is matching my skin color and complexion after the lace tinting. So here i'm just cleaning my forehead area using 99 of alcohol to remove all the excess oils from my body and that to just make sure my lace is sitting on a clean area. So now we're going in with the got to be glue. I like applying my glue in layers reason to that is to make sure my wig is laid for the time i will have it on to make sure my wig doesn't go anywhere, so i apply the first layer, let it dry and then i apply the second Layer again and let it dry and then that's when now i put my wig on after everything now is dried out. For this part, i didn't have a blow dryer with me, so i had to improvise. But if you have a blue dry, the blow dryer will do the job. It will work perfectly for this. So now that my glue is now tacky, i'm going to carefully place my wig on my forehead being very, very careful with it making sure to place it on the right place. What i'm doing now is i'll. Take my comb and use the other side of the comb and sort of try to brush into the hair. What i'm trying to do is i'm trying to make sure the lace um gets into the glue the the lace um sticks into the glue. This will ensure, like there won't be no lift and to make sure the lipsticks perfectly into the glue. Then i'll go back with my got to be to just make sure there's a perfect hold and everything is laid in nicely and then i'll. Take my comb and just repeat the process to just make sure everything is sitting in well, then i take my silk scarf and tie it top it up all over there to make sure everything blends nicely to make sure my glue melts into my lace and everything. Just sits perfectly so now i want to flat iron my hair, but before we flat iron, i'm going to go in with this hair serum that i bought from jumia. Basically, what it does. It just protects your hair from heat damage and also helps your hair like holding curls. If you want curls, so i'm going to spread it all over my hair yeah. So let's do that and see how it will come out. It'S giving scalp it's giving scalp. So now i'm putting away my hair to just make sure um it doesn't interfere when i'm cutting my lips - and let me just say at this point, i'm already amazed at how my lips is looking, i'm amazed. So now i'm partitioning the lace into three partitions to just make the cutting process easier for me yeah. So this is my first time cutting at least guys, don't judge me i was i was. I was fighting for my life. Cutting this lace literally, i didn't know where to begin or what to do. I was just too tense, but i'm an aged and honestly it was such a challenge for me. So i decided to go with my eyebrow razor and it actually kind of worked for me. So yeah, if the scissors doesn't work for you, you could try the eyebrow razor. So after cutting the lace, it's quite obvious that you'll be experiencing some lifts on some areas. So what i'm doing right now is i'm going over the lifts where the areas which had lifted with some got to be and just making sure and trying to make sure they're laid and they're, not lifting. So now, i'm back with my makeup done. Looking like proper hotness and we are going to remove the silk and, let's see the magic, wow wow, i say, wow look at that. Look at the whole how it melted into my skin and all that forgive the harsh line, i'm going to go over it with my brush, but just look at that melt. Guys! Look at that melt! So now what i'm trying to do! I was going for the middle part, so now i'm going in with my hot comb to try and make that pattern. Um, perfect yeah, but it's looking good. It'S looking good! It'S looking, i'm so happy at this point. So next we're going in with my concealer and a brush to try and make the pattern look as natural as possible. I'M going with the concealer in my exact shade and going through the whole um part till the middle of my head. So it all looks kind of natural. So now i'm combing out my baby hairs in which they really came like with the hair, so i'm taking them out from both sides of my head, and one thing i want to tell you guys about baby hairs is the longer you cut your baby hairs. The more dramatic they'll look and the shorter you cut your baby hairs, the more naturalistic they look. So i kind of lost footage on how i cut my baby hairs, but i cut them pretty pretty short. To make sure i have the naturalistic look on my baby hairs, that's how i like it so yeah. Take that into consideration, and now i'm going in with my hot comb to just straighten um the baby hairs and then i'll go ahead and cut them. I use the regular um nice and lightly styling gel to swoop my my baby hairs and, as you can see, they're looking nice they're looking so pretty. I love that this so far. I love them. Then i'm going in with my wax stick to just make sure my hair like lays flat as possible, because that's how i like it, i like my hair flat at the middle, so the wax stick. It really helps you to achieve the flat looks it. It really helps you to also um deal with phrase this flying hairs, and then next, i'm going in with my hot comb to make sure that um waxing just melts into the hair and everything is straightened and now we're out back with my silk um scarf to Just lay everything down, including my um baby hair and the wax stick that we just applied a few minutes later i come back and remove the scalp and i say: wow wow, look at my lips, honey, wow and my can you see the middle? The middle is flat - it's just wow, oh my god, wow, so guys. What i love the most about this week is the lace cause it's giving scalp it's giving my hair it's giving everything it's supposed to give. So you guys should really really really invest in hd lists because, as you can see, it's giving scalp it's giving scalp and it was quite easy to install i'd really advise you to go for the hd lace. Because for me for me right now going forward. Hd list is the mountain i'm willing to die on cause honey. You can't tell me this is not my hair regarding ordering and all that about this hair, the details about the ordering and shipping, so i ordered this here in july 18th. On july 18th. I ordered this help from miss coco, hair and they're. Having like a sale, it was really going for a good price. After i saw zara doing a review on it. I was like i must get a hair mask so yeah. I got it on july 18th and i shipped it to my appointee address in the us which it arrived there on july 26th, so roughly eight days on shipping, okay. So after that i from uh up until now, i received that on july, no not july. Sorry on august 10th, anyway, guys - i do hope you enjoyed this video and i do hope this video was helpful to my beginners and all that and all that, so this was a really really easy install for a first timer. It was a really easy install for me and, as you can see, we played that we really did so. The information about this will be down in the description box, make sure to check it out and don't forget to subscribe to this video and i hope, to see you on my next video bye, guys.


Comments
Isadora Scarlett: Babe you slayed this look kabisaa. Plus I love how you've explained the whole tutorial well.
Odrine Akinyi: Absolutely love this❤️
Mwitah Bettie💕: Amazing ❤️
Ashley Hannah: Lovely ❤️
Charlene Mich: Definitely getting this hair
Martin Sadi: Wooooooah ❤️ never been dissapointed since I subscribed
Shirley Joyce: Finally Been waiting like forever for your next video ❤️
Hillary Sau👸: Looove this
Frida Odunga: Ain’t I just inspired to try out wiggggggssss It is giviiinnnnnnnnggggg Uuuuuffffffff
mercy donald: ❤️❤️❤️
Wahome Tiffany: ❤️❤️❤️❤️❤️
Gracy Oketch: hit me up when ordering the next .....loooooooooove
Mercy Dalizu: Sallyyyy
Alphonce wayne: Sema tu unataka drinks, ati alcohol to remove toxins
Titus Auka: Mirror mirror on the wall