Let'S Make A Wig | Body Wave Silk Top Lace Frontal & Bundles | Qd Charming Hair
- Posted on 05 September, 2016
- Lace Closure
- By Anonymous
Let's make a wig with my updated wig techniques. Check out this Silk Top Lace Frontal from a vendor called QD Charming Hair off Aliexpress.com. I am loving this hair! Watch in 720 HD Quality - MyLovelyRoots - Expand Me!
Intro & Updates 0:00
Bleaching the Frontal 0:33
Rinsing out the bleach 2:00
How to get rid of brassiness on 2:19
Let's Make a Wig 3:03
Sewing down the Frontal 3:47
Sewing down the Bundles 5:37
Curving the track & a quarter done 6:55
One bundle sewn in & half way done 7:14
Close up on sewing bundles in 8:12
What the wig looks like & almost done 8:59
Close the wig 9:10
Wig Finished! 9:40
Sewing in more bundles later if you want more density 9:53
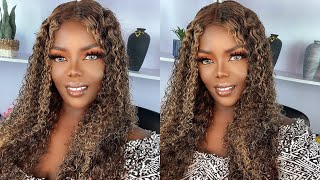
Pictures of Unit 10:23
__________________________________________
Silk Top Lace Frontal & 2 Bundles
Body Wave
Color #1
16 inches
Show & Tell | Silk Top Lace Frontal & Bundles | Body Wave | QD Charming Hair
Store:
Qingdao Charming Hair Products CO., LTD
http://www.aliexpress.com/store/933739...
qdcharminghair.com
__________________________________________
IG: MyLovelyRoots
Email: [email protected]
Music: I Hate Regrets - Freeplay Music
MLR
Welcome back lovely, it's my lovely roots, I'm here with the update video on how I make my lace front, of the wigs using hair sent out to me by cutie, charming hair company, say you don't want to watch the whole video you want to just jump to Certain parts such as hey how I make a wig or how I died, the frontal check the description box below I have timestamps on all my newer videos. Now, if you're interested in how I made this gorgeous body weight, wig stay tuned first off, you want to start off by bleaching a lace frontal using your favorite bleaching powder and volume developer. You want to mix it to a very thick consistency. That is something like Greek yogurt, I'm using a eyebrow brush in order to apply the dye to the lace frontal. This just allows me to control what I'm doing, and it's just really better to use a smaller brush during this process. Before I will pin the lace, frontals mannequin here and then bleach it, what I'm doing differently now is I'm using lighter strokes. I will apply a little bit of the beach on to the hair and then I will push it through the lace and what you're seeing me every time like when I'm flipping over the lace frontal, I'm looking to see if the bleach is um being pushed through. The lace this is what's gon na help get those little black dots that are on the lace frontal off so as you're applying it. You want to make sure you push it through slightly and then check it every so often just to make sure you're not pushing too much bleach through the lace frontal for this step to work properly you have to have. Thankfully you cannot have a running bleach. Here'S a close-up and, as you can see, the roots are completely saturated with bleach continue on to the other side, exact same thing when you get to the center portion, where the lace meets the silk top, you want to do the same exact thing you want to Push the bleach through the lace. What you want to do slightly different, is you want to make sure you push it enough through, so that it comes in contact with the silk top, so that way, it bleaches those little knots that are tied on the silk top cover the frontal, using some foil To help with the processing and check it every 10 minutes, I let it process for about 25 minutes, and then I rinse here's the frontal after rinsing off the bleach, as you can see, the roots are completely dyed, I'm loving it. The only thing now is it's super brassy and a way of getting rid of that is using the shimmering lights using the blue purple color one you're gon na want to work the product through and let it sit for about 10 to 20 minutes. Once you apply it make sure you really get it in rub it in and then flip it over and work it in on the hairline as well. Okay, say you rinse the lace, pronto BuzzFeed breathy action is still going on. You can use her fabric dye in order to tint the lace front, but the products are about 10 20 minutes and then rinse now for what you all been waiting for. Here'S the lace, frontal itself. As you can see, the knots are completely bleach and I customize the hairline and, as you can see, there is no grassiness and it looks very natural. I use T pins in order to pin the frontal down before sewing before I will take kit measurements using a white pencil and all that jazz. But, as I got more familiar with lace, frontals and I customized my mannequin hand where it's already the same size. As my own head, it makes it much more easier to just take the front hole with the wig cap and pin it down to start just making my lid using this alligator clip. I just Excel recently, which I love I'm using it to clip the hair out of the way, so I can start sewing process and I'm using a c-shaped needle. You want to start off by creating this. You knots - and you do this by taking the tail end of the thread, wrapping it around the needle and pulling it through, and I just do a few of those and then I start the stitching process this. This pattern I use, is very universal. You pretty much see it all over YouTube. What you're going to do is when you start stitching you're, going to stick the needle through and through the loop, that's caused by that you just going to take the needle right through the loop every single time. So that's! What'S going to keep your stitching neat and also uniformed and was really gon na, give you that necessary foundation which is going to be needed when you're sewing down the front? Here'S a close-up of highlight stitch the lace frontal down on the sides. I pulled out a few baby hairs and I just went straight across and then I started to just continue on the back side of the front. Now this frontal doesn't have any garden so make sure you do not cut the lace so that you can better secure your lace frontals down. So now, I'm completely done sewing down the lace front row onto the cap. I really liked how the lace onto his Lane super flat, there's no pumps, so I'm going to continue on with cutting thread and sewing on the bundles, starting from the back here of the bundles they've, been shampooed and conditioned and left to air dry up. The last two days and I'm just breaking my fingers through and as you can see, they have a very loose wave pattern. So sometimes, when you're sewing on tracks on to any any type of cap, the importing of the tracks on time slips off. So what I'm doing is I secure the track with the thread first and then I start the sewing process on the actual pet. I create a few knots about two or three and then I continue on sawing the track down and then, when I get to the opposite edge all I do and use the fold over method, and I continue this all the way across back and forth. I'M about 1/4 done and, as you can see, I curb the tracks. This is something new I've been doing. I didn't do this in the past and I think it's really gon na make a difference in hey. If I put the hair in a ponytail or I choose around my fingers through you're, not gon na see the tracks very easily. Now it's only being sent to bundles. I had to pull a miracle because I don't have that much hair and I didn't want to run out of here, and I also didn't want to use any other hair from my hair box. So what I did I put a lot of spacing out. We Lisa inch worth of spacing in between the tracks in order to get the hair to last a little bit longer and as you can see, the hair is very cool, so you can't immediately just see to the nettie. So it's been working out pretty good. Now this is as far as I got, with just one bundle of hair on with the 1 inch spacing in between the tracks. I got one more bundle to go so going about how much I got done with the first bundle. I think I have enough in order to finish off the way now with only having two bundles. It was definitely a challenge because I was worried about fullness, say hey. If the wind blows, you can see my tracks pretty much, so I was really worried about that. But I happened to work with only two bundles. I learned a lot I got to say I had to change up the way I showed up two bundles on, because I couldn't do it the same way. I do my other wigs because I usually have three or four bundles of here so working with this making this week, I definitely learned adopt a lot and at the end the wig didn't come out very cool and very flat. So I was highly surprised at how cool the way it came out at the end. Now I'm completely done with wig I'm gon na cut the thread. I was left with about seven and a half to eight inches of track and when I'm gon na cut it off and then I'm gon na sew that tail piece into the wig. One of the reasons why I did not panic when I was sent these two bundles alone is because in the future you can always just go in those one-inch, spacings and just sew tracks in so. If you're worried about hay running out of here, use the one-inch facing and then later on, when you buy some more hair, cut pieces of track off and sew it into the wedding stations. Here are a few pictures of the way I will be layering, coloring and styling this unit. So don't forget, comment rate and subscribe for all those videos and until next time,


Comments
Lulu Marieth K: Quick question, when you are sew the tracks down do you put your needle throught the weft? If not how do you make sure hair is not tangling into the thread?
marquita83: coool vid you do a great job glad i found your channel! tfs!
JeneanScene: I've been looking for a silk base frontal, would you recommend this frontal and this hair? Great vid!
Kristyn King: If it has guarding do you sew threw that?? BTW tfs!!! Great vid!
Honeycutt: 1980