Full Sew In No Lace Closure Ft Ula Hair
- Posted on 04 June, 2021
- Lace Closure
- By Anonymous
☆☆☆☆☆☆☆☆☆☆☆☆☆#ULAHAIR☆☆☆☆☆☆☆☆☆☆☆☆☆☆
♥Save $$ coupon code: PC10
♥Product information : 100% Raw Human Hair Straight Bundles 26’’ 28’’ 30’’
♥Hair bundles link: https://bit.ly/32LGgXE
♥Highly Recommend Hair:
Cheap No Lace No Glue Headband Wigs: https://bit.ly/3sgvunV
Hot Popular Undetectable HD Lace Wigs: https://bit.ly/36YDRL8
Affordable Short Lace Frontal Bob Wigs: https://bit.ly/3cpP4an
Hot Trend Highlights Color Frontal Wigs: https://bit.ly/35RZlK9
Wholesale Big Promotion Hair Deals: https://bit.ly/2IZzO9i
♥Check all items on Ulahair Store: https://www.ulahair.com/
♥Follow ulahair for giveaway:
Instagram https://www.instagram.com/ulahair/
Facebook https://www.facebook.com/ulahumanhair/...
Youtube https://www.youtube.com/@ulahair
Tiktok https://www.tiktok.com/@ulahair
♥Contact for wholesale:
Email: [email protected]
Whatsapp: +8618924029739
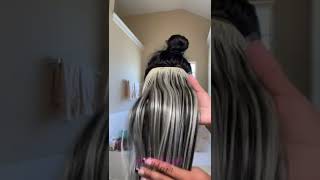
Hey guys welcome back to my channel, so i received this hair from oola hair. It came in this black bag um, the shipping was by fedex and it takes very like two to three days working days and in the back there is some eyelashes, and i always have these nice rats still comb and yeah. This is what the lace closure look like. It'S a 20 inches lace, closure, it's nice and well plugged, but i need that to like you know: um bleach it. You know to get a matching uh color to my hair, my hair's cap, and so the three bundles came like these and they are very soft, tangle free and this hair is amazing. You can see how i can comb through it. The um length of this hair is 30, 28 and 26 inches and while the lace closure that i went ahead and bleached is 20 inches all right, so this after bleaching it - you know the part, the part came out very well and yeah. This will match my hair, but after i finish bleaching this hair and prepared it, i decided not to use it at all, so guys, i'm going to just try another and in another method i've never tried on this channel before and um. You know if i like it, i didn't read it or i didn't you also know and so um. Basically, what i'm going to do is to do my braid pattern. I have a video on how to do a braid pattern on this channel. So that's not a problem. If i don't, if i don't show everything and yeah that is basically what so, if you are new to this channel, um you're most welcome and please don't forget, to drop me a comment and don't forget to subscribe. Don'T forget also to like this video and share with your friends and family, and just let me know what you think in the comment section. So when it comes to the braid pattern, i'm keeping it simple, i'm just doing the basic cornrows and these bit cornrows can be done in any ways you want. You can use hair extension to hold your hair down. If you feel your hair, it's not strong enough. You can also braid only your hair and sew on top, but for you to give it enough strength, just go to use braiding hair, you know to braid your hair and honestly i didn't have any black hair, so i tried to use the hair i have so. I am, i didn't mind the color, because definitely it's going to hide under the wigs when i saw it so yeah so i'll quickly show you what i did with the bread pattern and then i'll come back and talk to you guys. So so all right. So this is what my braid pattern looks like honestly. It'S a big mess. I didn't have time to like do the kind of braid pattern. I usually do like honestly guys as time is going honestly, you're good. I don't have time now. This is like just like. Let me just braid it anyhow. I can sew on anything like it doesn't really matter all right. So now, i'm gon na start with the bundles and i'm gon na start with the longest i'll stay 30 inches and, of course, i'm doubling my wefts. So i'm going to pass my needle through the boat weft and then i attach to the back of my head and i start to sew - and i hope you are enjoying this video so far and don't forget to subscribe. If you're new, don't forget to press the like button and don't forget to share this video and so yeah, when i'm sewing, i'm going to pass the needle through the weft for the first time to you know for it to be secured, i pass it through the Weft and then afterwards i pass it under the weft. I don't know if you understand that so now, i'm gon na pass it under the weft and because my eyes are not at the back of my head. I don't um usually like worry about what my sewing will look like at the back, because, to be honest with you, i can't see what i'm actually doing right now. I don't have any mirror whatsoever to check what i'm doing at the back. I'M just using my mind and my heart, you know to like guide myself and my hands together and i just go, and so sometimes it could be messy. Sometimes you know the thread could be tangled, and so i kind of find my way out of it. But um, so if this is one of the issues you're having when you're trying to see your head by yourself, don't worry i'm not alone. I go through all that, but you know is. My point is like i just rectify the problem and i just continue. You know so don't give up. If that is what is the problem with you just continue practicing, and you know every time you do a new one, you get better and yeah. That is basically how you know. I started doing my own hair. You know so yeah. You see, i have now sown like two tracks now and i'm going over to do the third one until i finish the first bundle so foreign, so all right, so i finished sewing and this time i'm cutting off the weft from the way i finished now. So this is what it looks like. This is what it looks like so um, i'm trying to you know, do a method i saw on youtube here um and i'm hoping that this would come out really nice at this point, because i wasn't sure i have other methods on closing this kind of hair. If you want to use the closure, i have a video if you want to use a crochet. I also have a video. If you want to do the invisible parts sewing. I also have the video so this time around, i decided to do the glue one, and so this is what the space looks like. So i'm going to go ahead, we've got to be cool and just try to like spray on that side. First then, i allow it to dry and i use my um hand dryer to dry it first. Then afterwards, i'm going to go and use my glue, i'm using this glue. This is a bun gel um. I can't remember the name right now, but i'm going to put a name in the description, so this is what it looks like it's white, so i'm just going to like apply a little bit all over there and spread it out all right. So i'm cutting off from the weft the remaining hair, i'm cutting it out like that, and i'm just cutting enough hair that i can use to do the closing, and so, with the help of my my um rat to um comb, i'm gon na just like press It in like so then you know i just continue. You know adding hair and going like that and drying it, and now you can see it's covering it um, but you know when you're feminine, you think you're like covering everything, but afterwards on your editing. You see that that's some part that was not really close. It'S because guys. I can't see the top of my head honestly and i don't know how to use mirror at the same time, my camera everything just like there, but this is the idea. So if you are doing this on your customer or on your friend, you know what you're doing you can you can do better than me. You know for me, you know myself. Honestly, it was actually fast, it's a fast method, but i would prefer to do um. The crochet or the invisible, the invisible so in is very hard. Actually is harder. You time consuming and you'll be tired, so guys i went ahead and just put my foundation, you know so yeah and then i went ahead and used the rope that came with the that tied the bundles, and i used this color fixed spray and i just spray You know to reduce the line to make the lines slimmer and yeah guys. That is ah, so, if you see any any worth showing just ignore that i wasn't seeing it while i was filming to be honest, so yeah. This is what it looks like and at this point i am tired, so i went ahead and just like you know, straighten this hair a little bit. You know to give it a nice bone straight, look that it has and yeah basically guys. This is the length. Remember is it 30 inches, 28 inches and 26 and 20 on the top? Oh sorry, i didn't use the top all right guys thanks so much for watching and see you in my next video bye,


Comments
Common Sense Sisters: The braid pattern looks really good and we've learnt a new style today thanks to you. Wow you're amazing with the blackhead sewing 6:07 and here too 9:26 thanks for your encouraging words too. Great technique We have a question... does the glue not damage natural hair and scalp?
Chinese by Tyler: I love the braid pattern. It looks so cute
APH: You always make it look so natural. And I love the dance at the end. you got it girl.
Tatia Ana: Amei ficou lindaaaaa
Miller's Language School: Wow! So beautiful!
Nancy Erigbuem: Beautiful
Movie Maniac: I'm def gonna do this.... ur great on doing hair, I love it... thanks
Beautiful Dreamer: Hey ... did the glue damage your natural hair? How long did the center path last? Was there shedding from the center path?
Peace Anaja: Learnt a lot from your videos
moffat Watts: That's a lot of work , I salute u women
Makeda: Can't find the name of the glue??? How long did this last? Did you get alot of shedding from the hair you glued in, when you brushed it?
mochachocolate: Did the bonding glue directly on your hair did pull your hair out?
Kiki K Darling: Awesome!!!
Coca Cola: Good hair topic
seata barnett: This is bad very creative love it. Mad
Ese's Cabelo: Is very nice
cynthykay obi: this soo good sis, you look great
Picaboo76: Nice!!!
That Fashion: If you're going through alot it's because the Lord has placed something so great and special over you. The pain won't compare to the joy and victory that's coming your way.
Coca Cola: I like your dancing at the end
Pearleta Hudson: Very good job..
Dr Amidath Ondo: Waouhh very good job. Fast
seata barnett: Please send me the crochet video
Nadir Conceição: The best a favorita