Beginner Friendly | Easy 5X5 Hd Lace Closure Install Ft. The Glam Mafia
- Posted on 10 February, 2022
- Lace Closure
- By Anonymous
Happy Thursday, Golden Gang!! In today’s video, we are going to get installing a 5x5 lace closure, if you liked this video then don’t forget to; subscribe, like and comment. Stay golden! Xoxo
HAIR DETAILS:
▼▼▼HAIR DETAILS ▼▼▼
Hair Lengths: 18’,20’ and 22’
613 Bundle: https://www.amazon.com/STRAIGHT-613-Sh...
Lace Closure: 5x5 16’
Direct Link: https://www.theglammafiabywhitney.com/...
Custom Wig Made By: https://www.instagram.com/jorjorcreate...
PRODUCTS USED FOR HAIR:
* KISS ALL MIGHTY BOND LACE GLUE: https://www.amazon.com/Mighty-Front-Re...
* EBIN WONDER LANCE BOND SPRAY: https://www.amazon.com/Wonder-Lace-Bon...
* KERA CARE STYLING WAX STICK: https://www.sallybeauty.com/hair-care/...
* STYLE FACTOR EDGE BOOSTER EXTRA POMADE (Pink Sapphire): https://www.amazon.com/Factor-Edge-Boo...
* FANTASIA SPRITZ MEGA HOLD SPRAY: https://www.amazon.com/Fantasia-Spritz...
* RUBY KISSES HD 2 COLOR FOUNDATION + CONCEALER (Level 14): https://www.amazon.com/FACE-CREATOR-RD...
**** ENDED CUTTING HAIR INTO A BOB OFF CAMERA. ***
#lacefrontalwig
#oreowig
#woc
#theglammafia
_________________________________________
STAY CONNECTED & FOLLOW ME:
Instagram: https://www.instagram.com/saphinetv/
Business Inquires: [email protected]
Stay golden, babes. xoxo
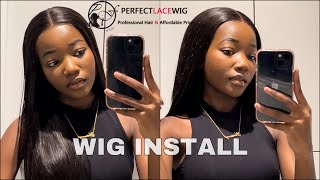
850., hey guys, welcome back to my channel, so we're just gon na hop right into it. If i sound very nasaled, i'm actually under the weather right now, but i do want to record and edit this video for you guys. So the first thing that you guys saw me doing was, i went ahead and took my spray bottle that had alcohol in there and i went ahead and just wiped the surface area. I did not do a ball cap method. This is just a 5x5 closure and, honestly, if you put makeup on the lace um, either with a foundation, stick or just a regular uh powder, you'll be fine. You won't see the the black stocking cap underneath so the wig i'm installing today is a 5x5 uh pre-made wig. Well, it's not really pre-made, it's a custom order, so it didn't come like this from a vendor or anything um. I have my friend george. She does two wigs um. She does it for the low. So if you have any wigs um any bundles that you need to make it to wig, i will leave her information in the description box below. I think she only does it in the texas area, but i'm not 100 sure, so i will leave her information box below the hair is from um all the black bundles are from the glam mafia. The the 613 bundle is just a beautiful bundle. It'S not it's a synthetic fiber, so i knew i was going to wear this hair straight, so i just decided to just do that. If i was going to curl it, i would actually get a six section bundle. But personally, that's not something i'm going to do with this hair, i'm thinking of cutting into a bob actually so right here i in the beginning parts that you just saw me all i did was just make sure there was no hair on the stocking cap and That stuck it on the lace um. So that way, when i laid it down, it would just lay seamlessly. So what i did i went ahead and took my kiss all my tea lace glue. I love kisses um lace glue. I really feel like it dries quickly. It lasts and it stays like. I use, i believe, two layers in on this install only because, like i stated before this is a it's just a 5x5 closure. I didn't want to leave it for that long, but i did want a little bit more color um. I have just been wearing black hair and i forgot that i had this wig, so that's why we're enjoying it today. So what i did is i added that first layer and um, i let it sit for like a couple of seconds and then i use my blow dryer to blow it down, and i know that we're supposed to you're supposed to make sure that everything is completely White before you did that, but it was late and personally once i laid my lace down, that's the white cast isn't going to show anymore. So i just added another layer, and i used the back of my round tail comb, and i went ahead and just smeared that over where the lace will be laying this is, i feel, like a 5x5 closure, is the best um version for beginners. It'S an easy install, especially if you already have it pre-customized. You don't have to do much all you have to do just put on your head and spray glue, whatever you may feel the need to so, while i let that dry, i was trying to figure out how i wanted to do my hair um. I didn't know if i wanted to do: keep it in the middle part, because it's a 5x5 you can um, you can, you know, do different parting spaces, but i'm really into middle parts this year. So i'm gon na continue to do that so right here again, i'm just making sure there's no excess hair lingering, because then it won't lay properly. Now before you actually smush the lace into your forehead with the comb. You need to figure out where you want it to lay so i, before i even started with the comb, i tried to make sure i like the position of the lace where it was laying that's the most important part to a 5x5 closure. That'S the important part in regards to a lace closure at all, especially if you're using glue or anything to adhere to your head. You want to make sure that you, like the position before you start to use the comb and pressing the lace into your um skin. You really have to press the legs into your skin because again it is to make sure that it's looking it's giving that scalp vibe it's not giving so much of a wig vibe, especially with the fiberfly closure, because it is not a full lace around your hairline. You can have that, so i just blow dried that and then after that i feel like i was satisfied, so i tied it down with my elastic band for 10 minutes. Obviously, you guys are going to see a little quicker than that, but it was just for like a 10 minute 10 to 15 minutes um, just depending on how long you wanted to lay, and of course i let it sit now we're back again. You can't even see the lace yo like i'm sorry like i'm just so amazed by this lace, front tool. I mean lace, closure by the glam mafia, again i'll leave the information in the description box below. If you guys are interested in purchasing any hair from them. They are uh in the texas area, but i believe that she does do uh worldwide shipping or i'm not sure. So i will leave her link and then you guys can check it out. Um again i leaving i live in texas. So it's easier for me to just purchase from her and have it delivered to me um instead of you know in a different state, but, like i stated before, i really enjoyed this hair. I really love the lace, um closure, it's really giving hd and i'm pretty sure it's hd. So what i did here is i split the lace into three or four parts, so that it'll be easier for me to cut with my razor. I do not cut with the scissors i cut with the razor. I got this razor from my local beauty supply store. They normally have it at the front front counter right as you're checking out that's normally, where they'll have their razors. I recommend, even if you're doing a lace closure to use a razor to make sure that you are cutting it in jagged edges. Sometimes you can get away with the cuticle scissors or with the axle scissors, but i know for me personally. I realized that the way for my lace to look like scalp, i need to have less lace on my my head. If that makes sense, because i feel like, if you have too much lace, it's harder for you to melt down, especially as a beginner, because you're trying to maneuver it and make it look like um scalp. So i would recommend cutting not so much off but cutting a good amount of lace off where it's there, but it's not really there. As you can see, you can see the lace right here, but you actually have to zoom all the way in to actually see my lace. So that's what i was referring to, especially on the closure. You do want to make sure that you don't have too much lace, because it's just a closure. It doesn't need to have that much lace. It'S not going to be that detailed you're only doing it for across your head in a small section. So right here i decided to go ahead and move forward, adding baby hairs. I was trying to figure out if i wanted to add them or not, because um i'm still learning when it comes to baby hair. Sometimes they hit. Sometimes they don't so i didn't know if i really wanted to, but because this is a fresh install, i decided to just go ahead and do like the two little baby hairs in the front. Again, it's a closure, so i didn't really have to do a lot of baby hairs um. So that's also another positive. So what i do is i kind of like slap, my comb or the rat tail part of the comb and make it into a a try. Not triangle um yeah yeah a triangle shape, so it's easier for me to uh, so it just kind of lays flat. That'S something that um i've been trying to perfect when it comes to doing my baby hairs um again. Sometimes it is amazing. Sometimes it's a miss. So in this one right here, i didn't want a large chunk of baby hair and i felt like that's why i continue to like try to find a good amount of hair because for your baby hairs, you want them to look like baby hairs, not grown hairs. Not adult hair like it's supposed to give off a baby hair, look um. My baby hairs itself are pretty not that super thick, but they're thick enough, so i tend to try to get the hair on. When i wear wigs to kind of mimic how thick i would have my real hair with baby hairs um. So that's just kind of something that helps me out and i'm just clipping the hair away so that it doesn't get messed up because i'm about to spray with my even hair spray. Now i use this to basically fully lay the lace down. I use this on my frontals as well, but i feel like this even hair lace. The red bottle is the one i use. I want to try the black one, because people said that's more of a saphir hold, so what i would do. First with the even hairspray i go ahead and spray it down. Then i use my finger to kind of press. It press the lace into my skin and the product as well. I know you're not supposed to really use your fingers because of oil, but i haven't really had any issues. So it's just a quick tap. It'S not like i'm fully using my finger to fully submerge the product, so once i do a little tapping tapping motion there i'll i do when i do this, i pull the baby hair down, as i am laying the lace, because i'm not really worried about the Baby hair, i'm really more worried about the lace. So then, i take my rat tail comb and like like basically like again smash that into my head, like that sounds really bad, but that's basically what you're doing you have to make sure it's fully uh pressed into the skin in order to give you that scalp, Like finish so, i took my blow dryer again and i'm blowing my hair just to make sure that everything is blown dry and like just right here watching this video. You really cannot see where the lace is, and i that is why i love this. I love the glam mafia and i'm gon na continue to buy purchase hair from her, because it's just it doesn't ever really disappoint. I'Ve never had any wig or hair from that company where it disappointed me and i didn't want to purchase anymore um. I'Ve been rocking with them for like two three years now so again, i would recommend now i did leave that elastic band one more time for another 10 minutes just to make sure again that it's giving that scalp. Like finish so now that i took the elastic band down, all i'm doing is making sure to uh, get it as flat as possible. Am i using my carra carrot, wax stick to go ahead and mold, my my part, as well as putting that on the edge at the very top of my baby hair, where i will have my baby hair um. Personally, i don't like this like stick. I feel like it's not worth 20 something dollars compared to the even one that i've been using now, of course, since i spent 27 in a wax, stick, i'm going to use it, but i feel like the even rock stick, the one i showed in my first Video is a much better buck for your buy and that's not it's not even super expensive. I feel like i got the tiny one it was like two dollars. I think he goes up to eight or nine, so just um don't spend that much on the cure. Cast wax, especially if you're still learning you don't need to spend twenty dollars on like stick. I i don't even know why i got it. I think sometimes i just be in the mood to purchase stuff, so i just start purchasing things so um here. I'M just fixing again fixing that part making sure the hair lays flat, because since this is a customized wig, sometimes they come off bulky and it's not even just because of the person, that's creating the wig, especially if it's like a handmade. Just you doing the not using um any type of machine you're doing it from hand. Sometimes it does get bulky at the top. So that is why i believe that this is the best time for you guys to really smooth out where you how you want your part, if you want a middle part, a deep side part. However you're trying to do, you lay your hair um. This is the perfect time to go ahead and use the hot comb and you know, go between hot comb and also the wax stick. So once i was done with that, i just basically tried to feather out my baby hairs with the the hot comb and then i took my razor again. I did a large chunk just to see where it would fall. I always do a large first and then i take some stuff off. Just keep that in mind. Don'T have lar, don't start off with tiny baby hairs, because once you cut it off, it's done there's no way you can fix it. So i always kind of start off thick and then what i do is i use my hot comb to like basically blend that not blend it, but make it easier for me to maneuver and create those baby hairs. I'M trying to create, and now i'm cutting again on a shorter stance. Now, i'm taking this baby flat iron that i got from the beauty, supply store and i got - and i also have my edge booster. I know previously i've been using the gossipy, but for some reason i really enjoyed the edge booster because i installed a different wig. It was a curly wig and i used the edge booster and i loved how that looks. So i wanted to try it again, but on some, like you know, straight hair um, i'm not a pro baby hairs, i'm still learning when it comes to papers, i'm still learning in general. Everything is a learning process. For me, honestly, i have a few youtubers that i watch and i try to keep. I try to mimic what they're doing you know again, because i'm still learning just like you guys are so right here, i'm not going to talk, because i do work on these baby hairs. For like a good little minute, i had to actually cut some footage off because i worked like i had so much of me just doing my baby hairs. So basically, i'm just molding the piercing my liking cutting using going between cutting anything extra, as well as using my um toothbrush that um for baby hairs that i have. I got from the supply store as well, and i'm just going back and forth until i am satisfied, i'm gon na be quiet. Let you guys jump down to the music um and just watch me. Do my baby hairs i'll come back whenever there's anything significant? That has changed. I'Ve done, but i think for right now i pretty much just do my hair so talk to you guys soon. This just want to quickly hop in and just say what lace, what lace yeah, what lace! There is no lace! Okay, i'm done so now. I just grabbed um my eyebrow brush that i have and again tried my best to feather those baby hearts, so they look so harsh and so thick with that. I'M still learning like i said before, so i actually liked how they came out um. Normally i hate my baby hairs. It takes me like it takes me, like maybe two three times before i actually like them, but this one is not that bad. It'S it's! It'S doing what needs to be done like it's, it's giving what it needs to get it's not too crazy, but it's not too um hard, either harsh. Looking so yeah, that's pretty much it for that part, and now i'm taking my spritz um and i'm just spritzing that area again, you don't have to do the spritz part. I really don't know why i did this part now. The outcome is very amazing, like you guys will see at the end of the video but um you don't really need to do this. You could either use the event or the spritz i use both and i just fix my baby hairs um, make sure that they last because i'm going to wear this wig all week. I am going to take this off at the end of the week, but i don't really feel like fixing my baby hairs every day this week, i'm not even gon na lie to you. That'S just too much work for me. No i'm not doing on that. So i tend to when i do my baby hairs. I tend to try to keep it for a good amount of time, and now i'm just using my blow dryer to blow that down again to make sure that the baby hairs and the lace are not lifting, because i did go ahead and use products on creating Those um baby hairs i normally use when you use glue, you don't really have to worry about lifting, even if you use a side to use mousse. But if you use sprays, i know a lot of people do spray their wigs down. That'S not something! I do because i wear my wigs every day like at least for that week. If i install i wear at least a week, so i don't really use a spray because that the pieces of purpose i don't feel like having it lift either. So now i'm just going to go ahead again, making sure that everything is molded um. I let that lift. I said that for five minutes now, you're seeing me just finish doing some facial touches, so i am using the um ruby kisses. Uh powder foundation is in from the beauty supply as well. It'S really cheap. I just use that to do my middle part and as well as adding some of my color to the lace where my baby hairs are now right here. I do not have a spray. That'S the black spray that most hairstyles have so i'm just using a liquid eyeliner in black to just go ahead and fix any areas where i feel like my parting space is too large or any areas where i want it to be darker um, it's just it's. Just a little titsy little things here and there that make your install look a lot better, even as a beginner um. You just have to learn tricks and traits here and there, and then i use my hot comb and just make sure that that product is smeared into the hair, because i don't want it to be a weird cast um. If you look too close. So that's pretty much what i'm doing here, um the the tutorial is pretty much done honestly guys. All i'm doing for the reading of the tutorial is just adding some finishing touches here and there, but it's it's pretty much done um. I do really like this install. I loved how it turned out it looked very seamless. It looks like it's going for my scalp, so yes um, you guys will see the finished finished product. Just now hope you guys stay golden, don't forget to like subscribe and comment have a just day.


Comments
Joy Osemwonta: Great job looks nice
GlamicalChey: slaaaayeddddd
Ian: ᎮᏒᎧᎷᎧᏕᎷ ?