How To Make A Lace Closure Wig| Highlights | Lolly Hair
- Posted on 24 March, 2019
- Lace Closure
- By Anonymous
Aliexpress Lolly Hair
328 Biggest Promotion
Up to 65% OFF
Can get a $5 Coupon: https://goo.gl/MH18sZ
➤Lolly Same Straight Hair as video: https://goo.gl/6n6UD4
➤Lolly Hot Recommend Bundles with Closure
Lolly Straight Hair: https://goo.gl/iuUAk2
Lolly Body Wave: https://goo.gl/seDLsP
Lolly Loose Deep: https://goo.gl/NEmDij
Lolly Water Wave: https://goo.gl/9z1oMC
Lolly Kinky Curly: https://goo.gl/n8YbmF
Lolly Yaki Straight: https://goo.gl/NqBtyR
Lolly Loose Wave: https://goo.gl/GzGTmq
Lolly Deep Wave: https://goo.gl/QtmtgR
➤Aliexpress Lolly Hair Website: https://goo.gl/pz7y1n
Follow #lollyhair on social media
Instagram: https://goo.gl/F1HLvP
Facebook: https://goo.gl/9VQTce
➤Want to Promote or Wholesale Lolly hair?
Contact US: Email: [email protected] Mp/Whatsapp: +86 166 0374 0822
Music Credits
Raining money throw some more
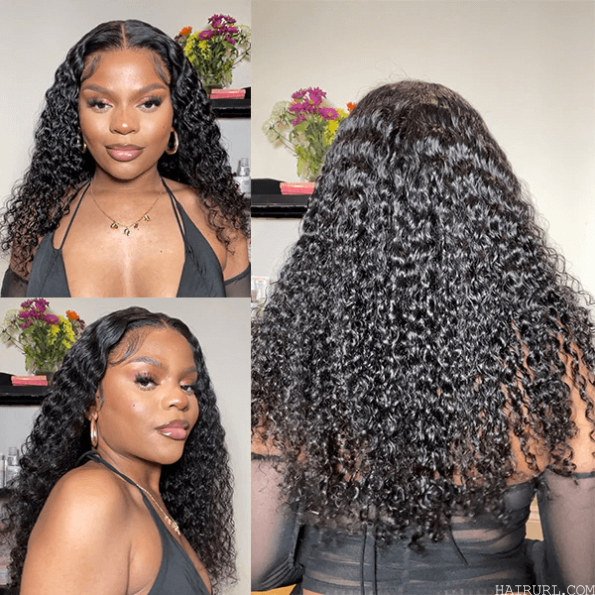
Hey you guys, thanks for tuning in to my channel today today I will be working with lolly hair. We have four bundles of this Brazilian straight to 22 inches and to 24 inches. I also have this transparent closure that is 20 inches today I'll, be showing you how to make a wig on this neck. Most of you guys might see it be made on a dome cap to me that kind of like suffocates your natural hair and it doesn't really get a chance to breathe while it's under a stocking cap as well as that big dome cap. So I'm just going to show you a little another proper method on how to do a wig on its beautiful neck. As you can see, you will need some sand pins and you also have this net that has the drawstring, where you can tighten it up. Let it be so stay tuned to this tutorial. Okay, I have sown the first bundle n, which is the 24 inches of the straight Brazilian hair. Me personally, I like to start with sewing in the first window and the back. Then I like to double back and sew in the closure, so stay tuned. Okay, now I'm going to sew down the net when you're making a wig. You always want to make sure you have your ten pins on point so that you can hold that closure down. Just brush their hair up and sew it down. I felt this side down, so you guys can see what I'm talking about now, I'm going to actually show you how I saw the closure down me personally as a stylist from making wigs and just doing hair in general. Sometimes, when you start from the front of sewing the closure down it kind of like shift back, because you know a stylist, we kind of sew a little tighter, we might might pull or you know, snug on the hair and the closure sometimes get pull back. So me personally, I like to sew moving forward, so I will start from the back of the closure and I was so moving to the front. So that gives me the control that I know that the closure is not scooting back or sometimes I have made wigs and the closure has shift, and it kind of gave me this on uneven flat base, just a little side trip from just being a stylist going Through the ups and downs yah halves excuse my little babies eat. He just could not help, but to get some camera time. Isn'T he so handsome all right, we're all finished with this week we're gon na take the ten pins out. I wanted to show you guys this because sometime this is left out on certain videos and you might panic, so I just want to show you that sometime when you're making a week, sometimes you might sew a little bit on the cloth part of the mannequin, which Is always fine, but I want to show you guys that you know just you don't have to actually cut it. Just graze the scissors up against it and it'll just pop right off. You guys won't mess up anything needles or thread or anything and we're gon na go ahead and cut this closure part out. So it's gon na look more natural. Now, if you guys did not bleach the nuts, you can always throw some concealer on there, because it I mean it is just a closure or foundation whatever you guys put on there, I personally, I did bleach the nuts um, so I just wanted to spice up The the wig a little bit - you know it's spring now, so we're gon na just do a little pop of color in the front, so just watch how I do this highlight in the front. Yes, I use foil when creating this look. I do want like a blonde hyper brownish color, and I wanted to take a little quick, so I am using aluminum foil after you. Let that sit for about 30 to 45 minutes when it's the color that you desire go ahead and wash it out me personally. I did blow-dryer and then I just got like overwhelming was just like taking too long, so I let it air dry for the entire day. So just FYI I mean there's no difference. Okay, this is what it looks like air dried. I didn't put any type of flat irons or anything to it. I probably just brushed up a little bit so now, I'm going to just flat iron, this, I'm probably not gon na, do it on camera because it just like took forever. Oh there. He goes again. So, thank you for toning answer this tutorial. I hope you learned something if not nothing, I'm actually gon na try this wig on and I'm going to show you guys how it looks. Let'S get into this balance. Baby yeah, yes, once again, is hair, is by lolli hair. If you guys are interested in purchasing the link is in the description box. If you, ladies, are interested in purchasing a wig for me or getting a wig made, you can feel free to text call or email me either way you can get to me. Thank you guys as honey in this tutorial. We'Re gon na have a little fun with this wig this weekend have a good day.


Comments
samara williams: You put lashes and a necklace on the mannequin got sis looking like a snack lmao. Anyway you did great like always boo i like the splash of color
Brianna Chima: It amazing!
Karamela Beauties: Where do you get the wig cap from?
God Active: Great tips
Fatima Turay: Amazing
Kersha Beaver: Very helful. Nice job
Valerie Davis: Slay