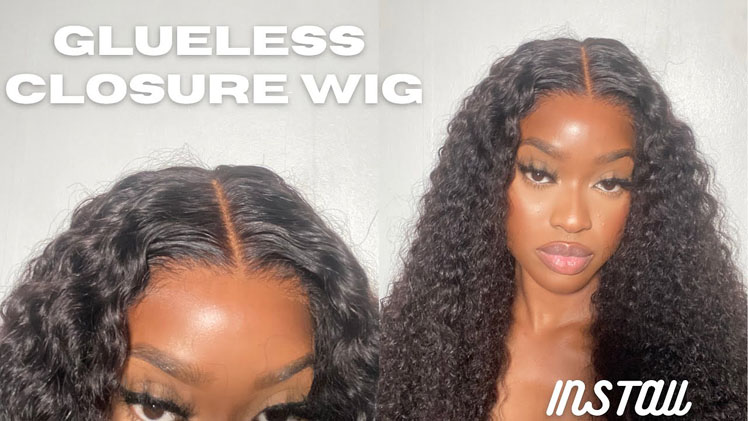
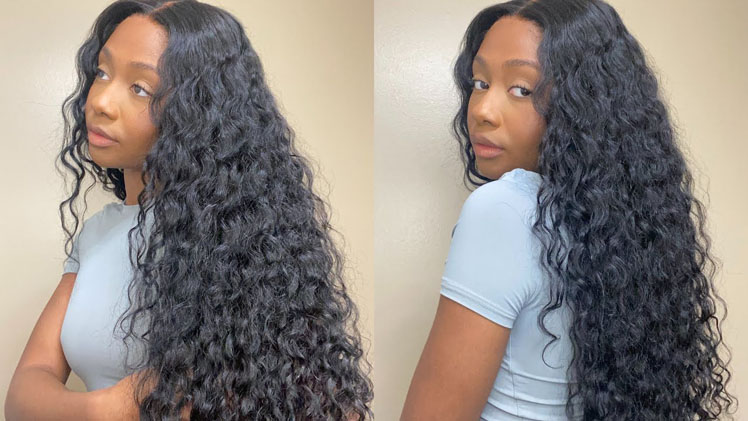
How To Make A Lace Closure Wig
- Posted on 02 September, 2017
- Lace Closure
- By Anonymous
Step by step tutorial on how to make a lace closure wig like a pro! Done by ROYASTOUCH
TO KEEP UP WITH ME & THE LATEST HAIRSTYLES FOLLOW ME ON INSTAGRAM
Snapchat - princesssroya
Music - www.nocopyrightsounds.com
ROYASTOUCH - is also virgin hair supplier / professional wig maker .
(1917 679 3836)
You really really love me. Welcome back guys, it's Royce touch today, I'm going to be showing you guys how to make a lace, closure, wig. So first you're gon na need a canvas. Cork mannequin today we're gon na be working with this handsome guy Jabari yep. Oh nah, hell nah, he's falling asleep, so you're gon na need a dome style. Wig cap. Normally I use mr. do-rag, but today I'm gon na be using this one. This one is a dome style. Wig cap guys you're gon na need weaving thread. Not the thread from out of your mom's sewing pan. Please get weaving thread. You'Re gon na need T pins and you're gon na need. A pair of scissors now go on ahead and remove the dome cap from out of the box. You'Re then gon na go ahead and remove the cardboard from out of the dome cap. Go ahead and gently observe the dome cap by stretching its elastic. Remember it is okay to reach inside and feel the deepness stretch. The dome cap proceed to place the dome cap home, I'm Han Jabari guys. Please make sure that you place the cap diagonally on Jabbar EES head again. Please make sure that you place the cap diagonally on Jabbar EES head. This is the incorrect way to put the cap on your Barbies head. Please do not do that. We'Re going to proceed to the back and we're going to make sure the number is 22 or whatever numbers are on the back of your mannequin are covered and in the center of the two lines. If, then, I'm gon na grab two t pins and place one on each side. You'Re gon na go ahead and go to the front and do what you did in the back to the front. Just playing get your closure it's time to put your mojo on nah. I got a free part closure. That means I can part anyway, I'm free to part anywhere. There is no permanent part on disclosure, meaning I can part anywhere. That is why it's called a free part closure we're gon na go back to the front of the head and we're gon na remove the pins that we placed there earlier we're gon na place. The lace closure, then we're gon na use the t pins to keep the closure in place and remember what you do on one side. You'Re always doing the other notice that the separation from the baby hairs and whether he actually starts from the closure is where I lined it up with the beginning of the dome cap, we're going to go ahead and start our first stitch. We'Re going to stitch through the top layer of the dome cap and not through the elastic band again do not sew through the elastic band, because once you do that, you will prevent the cap from being able to stretch once your wig is done. So you're going to repeat this dish all the way around the perimeter of the LEAs closure, and once you get to the other side, we're going to knot, it cut it off and begin to sew the tracks on the back of the head. Alright guys. This is exactly what your wind should look like at home. Alright, now it's time to get to the back. It'S already secured we're gon na go ahead and only make a track straight across we're not gon na curve it and we're not gon na stitch through the elastic band. So first I put my needle through the weft, and then I put it through the cap. So we're gon na go ahead and make a track all the way straight across now. This is gon na be a short track. This is not anything. Long is very short, because this is the nape. The nape is the very back of your neck, which is kind of small fYI, I'm actually not sewing through the West. I'M actually sewing underneath the West, I'm not sewing through the width. I am sewing underneath the West, I'm just pulling my cap down. You don't have to do this, I'm just pulling mine down because my cousin's head is so huge. I need this to fit because I'm not doing this over and she played herself giving me just a she bundles, like I was so close to putting Nivea on ease all right, I'm at the end of my stitch. So I'm gon na cut the track and I'm going to not that there's one second, I'm gon na start another track like about a half an inch above the track that I just did and I'm gon na do another track straight across. Look at my nails. Aren'T they so cute, so vibrant and glossy shout out to Selena she always hooking me up all right. Y'All we're gon na start a horseshoe-shaped track. If you guys don't know what a horseshoe is. Oh, my god, the True Religion thing. That'S the shape. We'Re doing right now, so we're gon na place it very close to the closure, but not on the closure. We want to leave a little bit of space, so we're gon na begin right here by the lace and do not forget do not sew through the elastic band. I I'm over here playing smart. I don't know if that's a centimeter or not, but I look smart doing that so you're gon na continue this stitch in this pattern. All the way around up until you reach the top, when you reach the top you'll still be doing this same u-shape. Now the little gap that we left out - that's where you're gon na stitch this last track, and this last track has to be a single track. It is not doubled, like anything else that we stitched on the back or in the middle, or anything like that. This is a single track and we need it to be single, so that is flat once we're ready to style it and wear it. So we're going to do this all around the perimeter of the lace closure. This is a terrible angle. Do not hold this against me, please! This is a lot of work. All right, I'm gon na show you guys how the parting looks when you are using a free part closure. Well, now that I can actually part with a comb, because before I was just using my fingers to show you guys, so this is what it looks like I'm gon na move it down a little bit, so you can see. So this is one part. That'S another part and another part, another one yep, so this is how it goes again. This is how the free part closure looks when you are parting, it. It looks nice, whichever way you part it now. This is what the finished product looks like on the inside, and what we're going to do is we're going to cut off the dome cap from underneath the lace only from underneath the lace, I'm going to show you right now and we're actually going to cut it In a u-shape, so that's what I'm gon na! Do you don't want to see the perimeter of the closure so make sure that you do not cut that much of the dome cap off you're only cutting a u-shape like this, and you should not be able to see the perimeter of the closure. So I'm just showing you guys a transparency. I have not bleached this. I did nothing to it. I'M not really huge on the gimmicks. If the lace is not good, it's not good. This is a great lace. You can see right through it, whatever color you put under it. That'S what you're going to see. So when you have a good lace, you do not need to bleach the knot. Thank you guys for tuning in thanks for watching. I love you guys subscribe comment. Share. Do all that good stuff,

Comments
NikKnows: Lmaoo the Nivea part had me weak!! And yes thats a fab wig, thanks for showing me how to do it and you right bout that lace stuff. So where can I get one like that?
Maria Reid: Lmaooooooo u play too much.. son