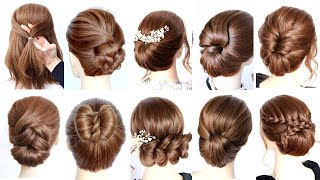
How To: Middle Part Lace Closure Sewin | Blunt Cut Bob
- Posted on 26 June, 2022
- Lace Closure
- By Anonymous
WATCH THIS FLAWLESS LACE CLOSURE BOB SEWIN! IT'S A MUST SEE..
- - - -
Hello Boys and Beauties,
Welcome back to my channel. Today I will be showing you ..
HOW TO: MIDDLE PART LACE CLOSURE SEWIN | BLUNT CUT BOB
- - - -
⬇️⬇️CLICK LINK TO SUBSCRIBE⬇️⬇️
https://www.youtube.com/channel/UCTgGk...
⬇️⬇️ITEMS USED IN VIDEO VIDEOS: ⬇️⬇️
Inches of Envy Hair (24in, 22in, 20in, 18in):
USE CODE: KELA15
Comb:
https://rstyle.me/cz-n/gd6g2edpwmx
Scissors:
https://rstyle.me/cz-n/gd6hv9dpwmx
Blow Dryer:
https://rstyle.me/cz-n/gd6iacdpwmx
Remington Flatirons:
https://rstyle.me/cz-n/gd6jdsdpwmx
I hope you guys enjoy the video! Be sure to follow me on social media:
⭐️CONNECT WITH ME ⌚️⭐️
Instagram: https://www.instagram.com/themarkelata...
Facebook : https://www.facebook.com/MarkelaTarran...
Business Inquiries : [email protected]
⬇️⬇️ CHECK OUT MY LATEST VIDEOS: ⬇️⬇️
DIY| STEP BY STEP| BLUNT CUT BANG BOB
HOW TO: DO A SILK PRESS ON SHORT THICK NATURAL HAIR | TUTORIAL
DIY |STEP BY STEP| QUICK WEAVE BLUNT CUT BANG BOB
"40 INCH" DISTRESSED EXENDED FAUX LOCS JANET COLLECTION 2X MAMBO NATURAL BORN LOCS TUTORIAL
PROTECTIVE QUICKWEAVE | BLUNT CUT BOB
PLEASE SHARE BELOW WHAT YOU WOULD LIKE TO SEE NEXT!
Thank you for watching. Do not forget to hit SUBSCRIBE ! See you next time .
We are going to go ahead and get right into it. Welcome back to my channel, for those of you who do not know me, my name is marquila terrance and for those of you who do know me welcome back, so we are going to go ahead and get started. I will be doing a middle part bob as you all can see, i'm going to go ahead and start off by parting, my hair down the middle, and i am using a rat tail comb just to try to make my part as crisp as possible. I'M not doing a leave out or anything. I am doing a closure um, so i'm just going to go ahead and just use my comb to kind of clean up my part and just go ahead and get started braiding with some braiding hair. Now, quick waves are what you make them. So if you want to sleep your hair down in a ponytail, you can, if you want to put some braids in them, you can whatever works for you, i would say: go ahead and try it um. I did go ahead and oh actually is this a quick leave? No, this is a sew-in girl. What are you talking about girl? This is the whole sewing. Sorry y'all, so i'm doing a sew-in. So if you are doing a sew-in for the first time on your hair, you can use braiding hair to kind of help seal your hair and kind of make the sewing last little longer or if you feel, as though your hair is thick enough by all means. Just go ahead and braid your natural hair either way either way work, so it doesn't even matter so i'm just going to go ahead and start braiding. My hair, i'm braiding my hair downward. I know some girls do like the beehive, but i feel like any time you do a closure. It'S just easy for you to just braid your hair downward. So that is what i'm going to go ahead and do i'm going to go ahead and speed this up, because it does get a little repetitive, so i'm gon na go ahead and meet you guys once i'm finished so is is okay. So now that i am done braiding my hair, i am going to just go ahead and braid all of the braids that i braided down. It'S going to put it all in one braid and then i am going to take my needle and thread and i'm just going to sew it up. This is super easy um. I don't really think it's super hard or anything you're, literally just braiding, all the braids. You can braid them like in a cornrow going to the side either way or you can just braid them downward and just sew it up. Whichever way it honestly works, whichever way you do it um, so i am actually sewing my hair under. I honestly think that is the best method for me per se and like if you're doing this by yourself and you are doing the under method, you can feel where the needle goes versus you like sewing downward. You can actually kind of like nick yourself, and i did that a few times in the past, and i was not trying to do that again. So this is the method that works best for me um. So once you finish doing that it really gets pretty easy from there. The hair that i'll be using today is the inches of envy hair. I love their hair. I honestly think that i actually reuse this hair yeah. I do think yeah. I reuse this hair because in my last video you guys can go see. I did a quick weave, so this is the same hair and i'm actually just cutting it. I always try to get like too good wear out of my hair. If not more, you know what i mean um so now that i'm finished with that, i'm just going to go ahead and cut that, and this is what the hair looks like it's super soft. I think this was a body wave and the closure that i'm using is a store-bought closure. I went ahead and i put an elastic band on top of it just so that it'll be easier for me to sew it down, and then i just went ahead and i place it around my hand. So if you are doing a sew in closure, if you're like sewing your closure for the first time, i highly recommend that you do this method because it makes life so much more easier. So i'm just adjusting the band just to make sure that my closure is laying flat once it is, then i just go ahead and i do the under method and i just go ahead and begin to sew the closure down. So this also gets a little repetitive, of course, as you guys can see, i'm literally just um sewing my closure down. I don't put the glue or anything on my closure until after i made sure it's already in the right place and that is sewed down and like there's, no lumps or bumps or anything so that it can look as natural as possible. So i'm going to go ahead and i'm going to let you guys continue to watch this part and i'm going to catch up with you guys once i finish sewing the clothes alrighty. So we are done with the elastic band, and now we are going to go ahead and get started with sewing the weave. Now, with the elastic band, i meant to tell you guys you guys can certainly cut it if you want to, or if you want to make sure that you have the extra security, then you can just leave the band as is or if you're a real pro. You don't need the band at all and shout out to you girl, because i be needing that man, but now that we're finished with the elastic band, we are going to go ahead and start sewing in the weave. I am doing the same exact method that i use when i did the elastic band um. I i don't think that i cut my wips um, i think being that i had already used this hair. Some of the hair is already cut, so i did not cut it anymore. I personally don't like to cut my hair when i do sew-ins i like to do the folding method because, like i said, i like to reuse my hair over and over again, but if you are the type of girl that likes to measure the track and then Cut it or cut it before you put it to your head, do what's best for you, everybody does things differently. So whatever works is whatever works for you, but i am certainly sewing this hair down um. I did want to go ahead and zoom up and show you guys just a little bit better so that you guys can see how i actually sew my hair. Now i know you guys are thinking like this girl said that she used the under method. Yes, i do use the under method, and sometimes i do the over method. When i get to about the left side of my head, because of course my hand can only do so much in the same motion and i want to make sure that my hair is secured throughout my entire head and then when we get to the elastic band. I always sew through the band and then through the web, so that the hair is extra secure. I do not want any slip. Ups, if you know what i mean, i don't know if y'all ever had any slip ups, but i had a slip up and who wants to keep adjusting that track. No ma'am, let's just get it right, the first time. So that's what we're about to do um! So i'm literally just taking the thread through the weft and also through the elastic band and, as you guys see, it lays down super super flat. So i highly recommend, if you have the band just make sure you put the needle through the elastic man and then through the weft, and i'm pretty much doing this throughout my entire head. So i'm gon na go ahead and speed this up, and i hope that you guys are enjoying the video and i'm gon na go ahead and catch you guys once i am finished sewing in my hair, so so okay. So this is what my hair looks like. I was able to sew everything in is nice and thick, and i absolutely love it so now we're going to go ahead and move on it to styling the closure right. So i always like to take my rat tail comb and part. My closure and i do like to use this edge wax from olive oil um. I use a wax on my hair to just kind of lay my extra strands down and another thing that i do too. Is i section it. I split my hair down the middle, and then i section it again so that i can press out the roots of the closure, and this helps me to get that really flat, really natural illusion that i absolutely love before i even lay down any glue or anything Like that, i always want to make sure the foundation is kind of preset, so that way, when i do go ahead and apply the hair glue, that my closure lays down super flat, okay um, so i did not pluck or anything just yet. I am going to go ahead and begin plucking after i finish um pressing out the roots of the hair. Now this is very like this is not an option. If you guys want your hair to look natural, if you want to make sure that it lays flat, you want to make sure that you plug you can get um the tweezers from a beauty supply store target dollar tree, whatever. Just make sure that you have really good quality tweezers that way, you can part your hair, and that way you can get a clean and crisp part, as you guys see alright. So now that everything is laid, i am going to go ahead and cut my lace right now. You don't want to cut your lace straight across because then it won't really look that natural, but you kind of want to do like a small like little ziggy, zag sort of like motion right um. So when you do that um, then you would go ahead and begin to apply the glue. So i always like to lift my closure up and i think i i use the got to be glue gel right. I didn't use like any lace glue or anything like that, um, because sometimes that stuff be turning white and sometimes it breaks my hairline out. So i had to come up with like an alternative um. So this is what i do so now that is laid. I'M just gon na take some baby hairs out and i'm gon na use another elastic blend, oh blend. I use i'm gon na use another elastic band to just lay down my edges, so i'm gon na go ahead and let you guys see that, oh actually, i use my scarf and i really don't know where that scarf is after i did this video. I kind of i don't know where it is. Nevertheless, i'm going to go ahead and lay it down, and then i'm going to go ahead and begin cutting my hair into a bow okay. So i always like to start off using a spray bottle, and i always like to put water in the bottle and, of course, spray the place where i'm going to go ahead and cut my hair. This is the best method for me, because i literally get the best crisp cut. Blunt cut bob and i feel like if you are a beginner and you kind of just start cutting dry hair. It can look a little choppy versus if you just wet the hair and you cut it straight across. It will actually come out way, cleaner and way better, and you don't have to go back so many times to like recut the hair or make sure that it's, even because, when you wet the hair, it literally makes it super easy, like all of the strands are Straight right, everything is going into the same motion, same direction, and it's just literally so easy like look at that super easy and it just cuts, and then you don't have to worry about having all that hair like dangling on you and stuff, i really cannot stand That when i cut my hair, the wet hair kind of just slides and glides right off, so i love this method um. I really think like, if you're doing about for the first time, you should certainly try it out because it works for me and then the another thing too, is when you're cutting like the back of your hair too um. It can get a little tricky. So i always want to make sure when i'm cutting my hair into a blunt kebab, that i am doing both sides as close to the same length as possible. Okay and then, when i get to the back, i always have a double mirror right. So i have a mirror in front of me and i have a mirror behind me. So if you're in your bathroom you can get a stand-up mirror, you can put it in front of you and you can use your bathroom mirror. That'S on your wall already. You can use that behind you. Cutting your hair in the back can be a little bit more tricky. So if you are doing this and you need a little help, don't be scared to ask anyone for some help. But if you think that you got it just make sure that you are really close to both of your mirrors, if you have to get really close to the back, mirror and kind of scoot, your front mirror all the way up or even if you have to Hold a mirror, whichever works best for you um, so as you guys see, i kind of have like a good crisp clean look. So now i'm just going to take my flat irons and i'm about to just go ahead and just begin flat ironing. Well, i'm sorry not my flattering my blow dryer um! So i'm just going to take my blow dryer blow my hair out, make sure i got everything nice and dry and then i'm going to go ahead and begin flat. Ironing, oh so, is okay. So now this is what the hair is. Looking like, we are just about finished. I love how natural it looks. I love how thick the hair is. I love how fresh and how clean and flowy it is so just to go ahead and make it look a little bit more realistic. I am using a little bit of powder, concealer or um powder foundation, i'm sorry and i'm just putting it on my part. I did i do feel, like i put a little bit too much, so you know tread lightly when you do this part. After that, i just fix my baby hairs and bada bing bada boom. This is the finished product i absolutely enjoy. Creating this look for you guys, please come back, make sure you guys like comment, share and subscribe, and i literally cannot wait to see you guys in my next video, please let me know down below in the comments what styles or videos you want to see. Next, i cannot wait to see you guys next time.


Comments
Rashuan Grundy: OK❤ I love it