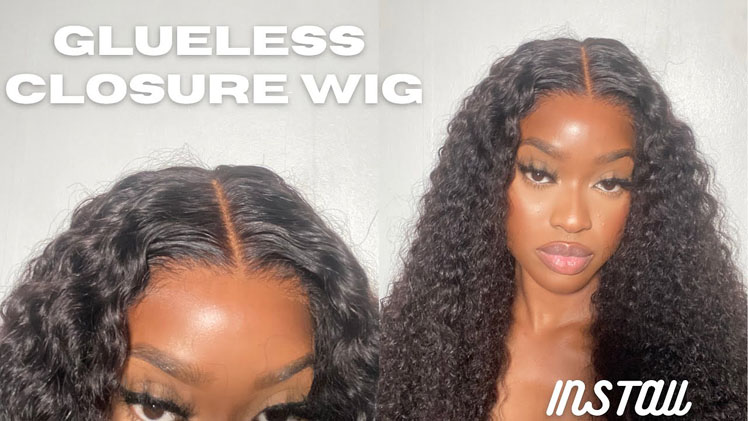
How To Lay A 5X6 Lace Closure Wig The Completely Glueless Way & The Freeze Spray Way |Myshinywig
- Posted on 30 August, 2021
- Lace Closure
- By Anonymous
Hey girl ! In this video I am showing you how I installed this wig on myself. I installed it first with freeze spray and a side part, then I reinstalled it the next day glueless with a middle part.
Social Media
* Facebook : London Tayy
* Instagram: hairpage @thelondontayy
: personal page @londontayysway
* Business only email : [email protected]
Location: US -Columbia, SC
---------------------------
Music by Ryan Little - flew da coupe. - https://thmatc.co/?l=B020E9EC
--------------------------
Products used:
ruby kisses contour palette: http://amzn.to/3sW9bVj
conair blow dryer https://amzn.to/3ypABEb
got2b creme: https://amzn.to/3jcG9h4
got2b spray:https://amzn.to/386S6hP
edge brush:https://amzn.to/2WgCypc
rat tail comb:https://amzn.to/2UHPp3h
shine n jam mousse:https://amzn.to/3sE1raq
-----------------------
Hair Used:
*MyShinyWigs Early To Black Friday Sale Give You The Experience Of What Is GloveFitWig!*
*We promise what you see in the video what you will get.*
Use Code " LT25" will get 25% OFF!!!
An honest brand--A really good quality,realistic,human hair wig that actually looks bomb!
Hair info→Mishae | 5X6 Seamless Lace Closure Wig Tropical Deep Wave Super Glueless
❤Shop same hair (free shipping) in video→https://bit.ly/3mKzFbo
Shiny Glove Fit Wig →https://bit.ly/2XZlFzY
5*6 Super Glueless Wigs →https://bit.ly/3mIJoPb
Affdorable Wigs→https://bit.ly/3Bib6q6
Instagram @myshinywigs →https://www.instagram.com/myshinywigs/...
*5*6 SUPER GLUELESS LACE CLOSURE WIG
*SEAMLESS LACE WIG
*REALISTIC HAIRLINE
*NOPE, IT IS NOT A LACE FRONTAL WIG
Contact Us:
website: https://myshinywigs.com/
Email: [email protected]
Follow US:
Instagram: myshinywigs
Youtube: myshinywigs
----------------------------------
keywords
glueless wig,how to put on a closure wig,closure wig install,beginner friendly hair tutorial,closure wig,no gel,no glue,got 2b freeze spray,glueless frontal install,glueless wig install,5x6 closure wig,6x6 closure wig install,5x5 closure wig install,6x6 closure wig tutorial
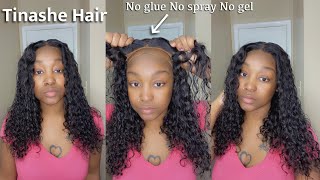
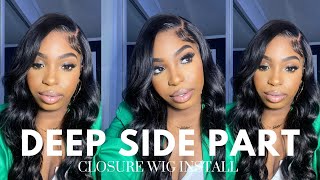
Hey y'all, what's up welcome back to my channel, this is london tay coming to you today with another video girl. Today'S video, i'm going to show you guys how i did this tutorial. It is a glueless wig, install um. I did mold it a little bit um. Just put a little bit of freeze spray, but you can wear this completely glue this. I just use a little bit of freeze spray tie it down, and that is i'm good to go. Okay, i'm going to go that way. This wig is from my shiny wigs. The wig came in a really really really nice little nice little setup where you get to hang the wig when you are done. We love that for us, we love that for us honey because, as you guys can see, your girl be storing these wigs on the wall. So the fact that they sent me a hanger little package to kind of store. My wig, i feel like it's great. This is a 22 inch like an ocean wave beach wave type of um curl pattern, the more you kind of fluff it out the bigger it's going to get, but now the knots did come bleach. However, i did go back and bleach a little bit more because i, like my knots, a little lighter and also the front is customized already plucked. However, i went back and did some more plugging. So if you guys already know, my name is linda tay, but my real name is taylor you're an og subscriber girl. You know we give hugs around this mug when i do personal videos. So without further ado, i'm just going to go ahead and give you guys a hug and we're just going to jump into this tutorial, because i am sure you guys are curious on how i got this look girl. This is a closure wig, so yeah guys i'm going to go ahead and give you guys a hug and we're just going to go ahead and jump into this video. Okay. If you don't already know about your girl, we do give hugs around the smug okay. So yes, guys um. I look forward to you guys, seeing how i did this video, how i customized this wig and i will talk to y'all in my next video. I love y'all all right y'all, so i am starting off with dirty hair girl. My hair is molded with gel all in it and i'm just going to go ahead and braid it down for a wig. I only do two braids for wigs um. So right now i'm thinking like okay, i want a middle part, so i'm just going to put some water on my hair, just to kind of get it easier to braid down and i'm going to do both sides the same way and i'm just going to braid. Literally two plaits all the way down: okay, now that i'm done brightening, two plaits i'm going to go ahead and put a cap on i'm not going to do it where i'm gluing it down or anything just to contain my hair in the back. So here's the wig, my chinese, wigs, it's a 5x6, a glueless lace closure. The lace is supposed to be pretty good supposed to be hd lace, so we're gon na see girl. We gon na see - and i also come with, like a strap for the back - that i did not use and here's the thing that it comes with. It comes in like another wig cap, a calm, you know in a stocking caps and you know just the normal things that they all come with. So my hair was like molded into a bun, so i'm just going to wet the edges with water and i'm going to go ahead and just loosen that gel up on the edges and then i'm going to brush it back now, i'm going to use the ruby Kisses cream contour palette and the color that's closest to me, and i'm literally just going to go through the go under the lace with a little brush and put that cream product under the lace where the parts going to be in the front and as well as The part that's going back here guys, i am cutting off the side tabs, because when you put the wig on, you may notice, like some hard bony pieces under the inside of the the wig and it hurts. So i just cut that off honestly and once i cut those two pieces off, i'm just going to go ahead and put the wig on and see how it fits i'm going to spray a little bit of water because it is curly, hair doesn't even matter. So. I'M going to spray water just to kind of brush the hair back and see how the hairline is looking and i'm really just trying to map out and see how everything is going to look guys. I end up changing my mind and doing the side part y'all. So i was like i'm feeling the style part, because i always do these middle parts, so i end up doing a side part guys and i'm just going to kind of rebraid my hair down to mimic a side part. I don't have to do this, but i just feel like it looks way more natural, so my edges are kind of fuzzy. I'M just going to get a little bit got to be glue cream and i'm just going to mold my edges back and then put the wig back on once i put the wig back on and gets exactly where i want to get it to i'm going to Put some more of that cream product on top of the lace and i'm going to start applying that got to be glue cream. Now i have two ways: how i do the wigs. Sometimes i do it with the cream, and sometimes i do it glue this. So right here, i'm gon na do with a cream and then later on in the video i'm gon na, show you guys how i do it glueless okay! So here i am just cutting the extra lace off and then after i cut the lace off, i'm just going to get some of that mousse and i'm going to just literally put some mousse some styling mousse foam on the hair, just to kind of get it Give it a good hold and get a good curly hold and shine and make it more manageable guys, and then i also just get like an elastic band, and i use the elastic band to tie down my edges just to kind of make sure everything is like. Really really really really flat and melted. In together, i like to use a comb when it comes to wavy hair, because it seems like it streamlines the curls really well, it makes it really really really wavy and really really curly and i'm just using that same cream product on my part, just to define The part area, and then the parts where i over bleach, i'm just going to use like an old mascara that i do not use and just kind of darken the hair on both sides just to make the part cleaner guys. And then, after that, i'm just going to pull a little bit of baby hairs out and then i'm just going to mold that with that same mousse that i'm molding in with and then i am done with the side part guys. So the next clip i'm going to show you guys is how i switch it to the middle part. It is super super easy. I hope you guys enjoyed this part, though all right, y'all, so um. I said that this unit was glued, even though i used got to be glue. I want to show you guys that this unit truly is glueless, so what i'm going to do is i'm going to remove it, i'm going to remove it from this spot and i'm going to put it a middle part. Yeah, it's pretty easy to lift once you do that boom there you go all right so, like i said i want a middle part, so i'm going to take this little hair bow out and i originally had a middle part before so i'm just going to take This braid out, i'm showing you guys like how easy this is to do. I'M going to put a little bit of mousse a little bit moves where the parties, my and really just kind of start, molding a lot of people be like. Oh, i don't want to have baby hairs. Girl, i'm be honest with you. You don't have a lot of options when it comes to that, because, if you're going to wear glue this in this lace, no matter how thin the lace is it's going to. How did i say this? It'S going to show. So if you don't want it to show you're going to have to do certain things in order for it to look as natural as possible, you get what i'm saying like. I always like my stuff to go up and out. Look like people love to act like delicious delay for days and all this a lot of times it don't okay. So whenever you you're doing that, you know you can put some of this mousse on the lace a little bit just to kind of keep everything good. And then you just tie a scarf he's going to let this dry whenever everything's dry. In a couple minutes, i'm going to finish everything. This is basically how it looks. It looks very melted. That is how you get that super super melted. Look if you don't want your baby hairs to be like stuck to the sport to the forehead or whatever you can always just um yeah. I want to comb this back a little bit just refresh these curls a bit so like i said you can either like come out, so i can have more of like a natural look but still have a hold or you can have it. You know stuck. I don't really like the stuck look, so i'm just going to comb them, so they can be very soft, feel so concealer where the part is and then just get a little mascara and just kind of fill in those over bleach spots. You can kind of comb through it a little bit and make sure it's not like super molded yeah. That is basically how everything looking like. I hope you guys enjoyed this tutorial like i said this is completely completely glueless. All you see me was basically like molded with the shine and jam this. If the color is too light for you, you can always right here, like you, can always darken it up. I hope you guys enjoyed this tutorial. I hope this video was informative. So you guys can know how to make a glueless wig, something that's completely removable every night and then, when you lay it back down, it looks very, very natural. But yes guys. I love you guys so much and i will talk to y'all in the next. Video got ta, go bye,

Comments
London Tayy: Hey girl here are some time stamps to help you navigate through this video! 01:45 install with got2b 5:56 completely glueless install
Myshinywigs: Thank you so much, you really slay it
deseraymiles87: