Lace Closure Sew-In Tutorial Ft. Her Given Hair
- Posted on 13 June, 2016
- Lace Closure
- By Anonymous
http://www.hergivenhair.com/coily-text...
Coily Textured Wefted Hair || 12" x 3 Bundles
http://www.hergivenhair.com/coily-text...
Coily Textured Closure II 12"X1
Hergivenhair natural hair extensions/ natural hair weaves/ clip in
http://www.hergivenhair.com/?y=Tierra
Headband: http://www.hergivenhair.com/protective...
HerGivenHair Contact Info:
Blog:http://www.hergivenhair.com/blog/
Instagram::http://instagram.com/hergivenhair
Facebook:https://www.facebook.com/hergivenhair
YouTube: https://www.youtube.com/c/Hergivenhair...
******ABOUT ME******
Hi I'm Tierra: licensed cosmetologist, wife, mom, entrepreneur and college student. I have an in home salon located in Grand Blanc, Michigan. I have a passion for helping women along their healthy hair journey. My goal is to spread hair education and beauty around the world. YouTube is a channel for me to be able to do that. Thank you so much for watching and supporting what I love to do!
******IN THIS VIDEO******
Detailed lace closure sew-in tutorial using my Her Given hair extensions.
******UPDATES******
(no updates)
******PRODUCTS + TOOLS USED*****
-Frutics Curl Nourish Conditioner
-Ecostyler gel
******SOCIAL MEDIA******
Instagram @tierrajbeauty
Snapchat @tierrajbeauty
Facebook Group: Tierra J Beauty
******HELPFUL LINKS******
my website: www.tierrajbeauty.com
my vlogging channel: https://www.youtube.com/channel/UCrV4V...
previous video: https://youtu.be/eSIR7DpmGZg
***HER GIVEN HAIR INITIAL REVIEW: https://youtu.be/eSIR7DpmGZg
******FOR BUSINESS INQUIRIES******
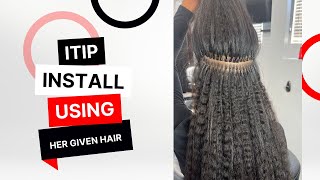
So jumping right into it, i'm about to start my braid pattern and i'm using cantu shea butter. I like using this to moisturize my hair, and it also makes it easier to braid my hair and so i'll just be well. I have my part on the side of my head: that's where i want my lace: closure to be, and i'll just be braiding the braids going down from there, and i just want to show y'all um when i'm halfway down with my braids. I started doing this like on the second braid when i'm halfway down, i add in extensions for braiding hair, and this just helps to create a stronger foundation, and for me my hair is short. So i kind of need that extra hair to um make sure it holds, and my braids you know not unraveling and all that stuff so for the rest of my braid pattern, i'll be using the braiding hair like when i'm halfway done with the braid. So my braid pattern is all done and here's the hair that i'm using it's her giving hair. If you haven't seen my initial review on this beautiful hair go and check that out, and i have three bundles of 12 inch and i also have a 12 inch lace closure that i'm using so to get started. I like to put my closure like beyond my braids just so um. You know i have like some extra room to work with really alex like every single time y'all. I promise i do not set this up every single time. I start recording. Do you wanna yeah yeah, you wan na just steal the spotlight y'all, my child. This is my child, so anyway, um. What i do is just sew down the side of the closure. It'S nothing! Fancy! No science to it. Just literally spoke so down the side of the closure, making sure it's tight, making sure you know you're looping those knots and everything, and then you go to the other side, and you want to do this even tighter. You want to make sure like you're, pulling really tight on it. I can't i can't stress this enough, like how tight you need to make this, because this is gon na make sure that your closure is laying flat and y'all um, i'm a mom okay. He gon na be in my voiceover, so whatever just gon na get used to it, but anyway, now i'm cutting my lace up. I like to do this at this step because when i'm sewing, you know like the rest of the closure on. I want to make sure that my closure is not looking right, so i want to see how it's going to look and right here. I'M just sewing the rest of the closure down to my head going around and you know a little u-shape okay for this next step. You want to pick up some nylon thread um. You want to use nylon because the thread is so thin and you know it won't be noticeable in the front. So what i do and i'm gon na try to explain this as best as i can, but i thread it through the front um the front of my braid and then what i do is poke that needle up through my closure and then when i do that, I put it back through my closure, like almost right, where i went through it and then, after that i just threaded back through the first braid, and that basically, just is a step. I take to make sure the closure you know is obviously laying down in the front. I hope that made sense, but if not just watch carefully at what i'm doing and i'm sorry my video quality was like. Not all of that, because i wasn't like not in the camera that great, but hopefully you get what i'm doing on this part, and then i just do that on this side and then um. I think i make like a few stitches on you know each side and then i go to the other side and i do the same thing now, it's time to sew that hair on so i just want to show y'all um how i do my first track. I did leave like a little bit of hair out in the back, not really for a ponytail, but really just for, because i don't like that. You know the nape of my hair braided up because it kind of hurts so, but i do um my first track. I do it beneath the braid and i got i kind of go like under and around the web and that helps it to lay um lay really flat back there, especially if you got that you know bulky. Well, it's not really bulky, but if you got that big braid in the back, you want to make sure that you know them. Tracks is laying as flat as you can get them, because you know you want your stone to be. You know bomb. So what i do is i just go under, and that makes the track really flat in the back and here's a little tip on how you get your tracks to lay flat. When you decide you know not to cut the weft um when you just fold it back when you fold it, you want to leave like a little extra room and you kind of you want to go through the weft and then you know go around and you Want to make sure after you go through you're going under under under and around, and that makes it lay flat now, with every lace closure sewing. I take a spray bottle with water and i spray it and it just helps you to part it and it helps it to lay flat. So i'm just spraying that down and i'm gon na show you like how i customized my lace, closure and i basically just parted, and i began to rip those hairs out to widen the part to make it look more natural, and i did say i was gon Na bleach, my knots, i didn't, do it y'all. I got a little lazy, so i should have bleached my nose, but i didn't then hey, it's still fine. I think it still looks pretty good and um yeah. I'M just ripping out those hairs. Be careful just to rip a little bit at a time, so you don't rip the lace and just keep doing that until you get it, how you want it so this hair is pretty much already styled and you can watch that in my initial review, video. I'M just adding some more conditioner to my closure because i did, you know, manipulated a little bit and that just helps to set it in and y'all. I love this hair like it is beautiful um. Their information is in the description box, so go and check them out like this. Is i love it me? You


Comments
Janelynnay: this is absolutely beautiful!!! thank you for the tutorial on sewing in a lace front closure!!!!!!
Lailah K.: That curl pattern is really pretty.
ALICIAJ83: IMG it looks so natural!!! you did an awesome job!!!
Vannah Boo: Tierra, Thanks for the tutorial. It turned out lovel!!!!!!.
CANDYLIPS: BEAUTIFUL JOB!!!!
Crafting with Angie: Tierra this turned out beautifully, and by the way, it is okay if your son is in the video voice over. He is just making sure that you don't forget to tell us any important info, lol. :)
NaturallyMani 93: this came out really nice!
Bee Barlow: As always, I LOVE IT! If lived near you I would be sitting right in your chair! Keep the videos coming
Lindsey Jefferson: Hi, I know you just put this video up, but I am considering buying from them. So far is it holding up okay? Would you recommend to a friend so far?
Mel Logan: Love it!
La Sally Williams: so neat and beautiful.. I want this hair!!
Ochuko Okotie: thanks for sharing. how do you maintain this weave and maintain / clean your natural hair beneath ?
Beauty by Jay Morris: You did that Tierra
Libra Lady B: New subbie love your videos!!!
StyledbyDestany: that curl pattern is popping, i would like it longer for myself tho.
Shanice Craigg: Would try out this method thanks
CakeMyLife: Boss moves, this turned out really nice!!
shanice Williams: I love the new look... How much do u charge to do something like that in client's hair?
Keme B: Wow very impressed. Good job
Tiki Hopson: How long did he closure last?
Siobhan Keeve: It looks so natural!! I wanna be you when I grow up lol. Not sure if you said I tried to search so I wouldn't bug you lol but how many bundles did you use?
Jacquise Pernell: YOU THE BOMB T !!!
gramz33: where you ever able to put it on a low ponytail?
LaQuisha Benjamin: flawless install what state are you in im tryna get my hair slayed n laid shoot lol♡♡♡♡
Pauline Nyambeki Nyambeki: amazing
alwayslovehere: Beautiful. your hair grow fast.
Reka The Lioness: I would fly from TX to MI so you could do mine.
Nope it’s just Miesha: Nice!
BigSexy Slim: this is gorgeous
Chey Ismail: wow
Quinisha Harley: Lol I don't care if he is your voice over he wants to get his time to shine lol shine baby shine
Mya Riley: You remind me of Gigi McGuire
tahnaya green: cute girl