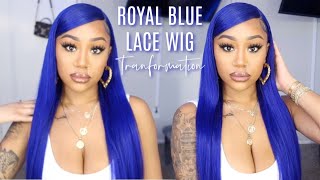
Quick Crochet Wig Install | No Glue | No Elastic Band | Blue Custom-Made Wig
- Posted on 30 October, 2022
- Lace Closure
- By Anonymous
Hello everyone, welcome back to my channel!
In today's video, I'll be installing this custom crochet wig I made from scratch!
Please don't forget to give this video a thumbs up
Thanks for watching and have a blessed day everyone.
✨IG: https://instagram.com/vivianbeautyands...
✨ Email: [email protected] (For business inquiries)
✨ Based in Abu Dhabi (UAE)
✨ My second channel https://youtube.com/c/StylebyViv (Sewing channel)
How To Make: Half Up Half Down Crochet Wig Using Braiding Hair | DIY https://youtu.be/jZKrtAEhsgw
Prepping For A Crochet Wig: Drawing the hairline | Hair Cutting Hooks & More https://youtu.be/9lSJkQGq3yE
HOW-TO: Installing A Lace Front Crochet Wig | Straight Red Hair https://youtu.be/3RywJfRWrUY
✨✨ WIG DETAILS ✨✨
✨ One pack of Xciting braiding hair ( Cut into 4 bundles )
Where I purchase my materials/tools (Aliepxpress Links )
Wig mannequin head https://s.click.aliexpress.com/e/_DdH2...
Adjustable Wig Stand https://s.click.aliexpress.com/e/_DEaE...
✨SWISS LACE NET FOR WIG MAKING✨
1/4 Yard Swiss Lace For Wig Making https://s.click.aliexpress.com/e/_DB38...
Closure/Frontal Lace (4x4'' 13x4'' 2x4'' 2x6 and more) https://s.click.aliexpress.com/e/_DlmM...
3 Pcs Pin ventilating needle https://s.click.aliexpress.com/e/_DEA6...
Small/ Tiny Latch Hook https://s.click.aliexpress.com/e/_DBiT...
✨✨CAPS✨✨
Mesh Dome Caps (Small-Large Size) https://s.click.aliexpress.com/e/_DFz7...
Spandex Dome Cap (Small-Large Size) https://s.click.aliexpress.com/e/_DdAZ...
Thick Mesh Dome Cap (Net Free Size) https://s.click.aliexpress.com/e/_DmBQ...
Elastic Band https://s.click.aliexpress.com/e/_DFZw...
AMAZON LINKS
Swiss Lace For Wig Making https://amzn.to/3tiErPJ
Small/ Tiny Latch Hook https://amzn.to/38U5Kc2
4 Pcs Pin ventilating needle https://amzn.to/3tk64Yz
Spandex Dome cap & Mesh Caps For Wigs Making (Small-Large Size) https://amzn.to/3NYCxLU
Black Elastic Band For Wigs https://amzn.to/3NpendS
#quickandeasywiginstall
#doityourselfcrochetwig #crochetwigwithlacefrontal
#howtousetheventilatingneedle #customwigmaker
#handmadewig #bluewigondarkskin
Click here for
✨ DIY: Lace Front Wig Cap For Crochet Braids Wig https://youtu.be/tSfUbhaWX-E
Click here for more videos!
✨ FROM GODDESS BOX BRAIDS TO FAUX LOCS WITH CURLY ENDS https://youtu.be/PMUalZLX_hU
✨HOW-TO: Add Colored Hair To The End Of Braids | Neat Blend https://youtu.be/pRpOzz4GMc4
✨ How To Make A Lace Frontal Crochet Wig | Yaki Straight Hair https://youtu.be/3PMboDarNCs
✨ DIY Afro Crochet Wig With Kanekalon Hair https://youtu.be/IM-nMtb4EFc
✨DIY Ash Blonde Goddess Box Braids With Kanekalon Hair https://youtu.be/pnCB93ddHOU
How To Make: Half Up Half Down Crochet Wig Using Braiding Hair | DIY
This video is not sponsored. The links above are affiliate links. This means I'll make a small commission if you make a purchase using any of these links
Quick Crochet Wig Install | No glue | No Elastic Band | Blue Custom-Made Wig
Foreign guys and welcome back to my channel if you're new, here you're welcome - and I hope you are doing well so in today's video - I'm going to be installing my custom crochet wig. So with that said, let's jump right into the video. So if you haven't seen the main video on how I make this wig, the link is in the description box. So you want to learn how to make your own crochet wig wig go ahead and click on the link in the description box. Okay, so for today's video I'm not going to be using Foundation to tint the lace. Instead, I'm going in with this lace, tint spray in the shade medium dark brown. So I'm taking that and I'm spraying it on the lace part of the wig. So you can see right here and spraying it all over the lace area. So next I'm going in with a hand dryer to help dry the the product quickly. Okay, so also I'm not going to be using elastic band today, instead, I'm going to be using a wig comb and I'm going to be placing two combs at the back so right here, I'm going in with a small needle and a clear thread, and I'm using That to sew the the Combs to the edge of the cap, so once I'm done sewing it down, I'm going to tie a knot to secure it in place. So next I'm going in to cut out the lace around the ear part before putting it on the mannequin head. Okay, so right here, I'm going ahead to cut out the excess lace from the front of the wig following the headline on the wig foreign cap. So here is the crochet wig is inside, as you can see right there. Those are the uh the Combs, so I just went ahead and place the wig on so right here, um, first of all, making sure to place the wig where I want it to sit, making sure all the curves and everything are mashing, where they're supposed to be, And also on the back and right here, I'm going into clip the comb in place. So here is how the wig is looking. Nothing is holding it down apart from the Combs that are in the back, no elastic band, and it's sitting perfectly right in the front of my head. Like perfectly, I love it. Okay, so now that that is, you know, out of the way I'm going to be securing the wig down using this got to be spray. This is not glue. Okay, this comes off with water, I'm not brave enough yet to use glue on my hair or hairline. Like not anything close to my hairline, I don't want any glue, so I sprayed in the got to be spray where I want the wig to see so next I went in with the hand dryer to blow some air in it. So now that the spray is a bit sticky right here, I'm going ahead to place the wig on top pressing it down. So next, I'm using a rotate comb and I'm using that to push the edge of the lace down into my skin. Just kind of help. Push hide the edge of it, so I'm going to be doing one side at a time. So now that I'm done with the forehead, I'm going ahead to work on this side going in with a yellow spray spraying it where I want the wig to sit again going in with a hand dryer blowing in a little bit of air, filling it to make Sure it's a bit tacky before going ahead to place the wig on top so right here, I'm adjusting and placing the lace where I want it to sit again going in with erotic comb to help push the edge of the lace down to help kind of help. Melting down in a way going back in with a hand, dryer blowing some air on it. At the same time, I'm using the ratty cone to press the edge of the lace down. So I went ahead and repeat the same thing on the other side, as you can see right here again, go in with erotic comb. The ratic comb is really really handy, so you're gon na need it. So now that the front part of the wig is secured down, I'm going ahead to walk on the back of the wig. So doing the same thing and spraying they got to be sprayed following up with the hand dryer before going ahead to press the the wig down, so the Combs are already secured in place. So here's how it's looking so far. I did half of the baby hairs. Already in front just um mini baby hairs; okay, so I'm gon na be cutting the other side, creating the baby hairs, and to do that, I'm going to be using a razor comb right here, I'm going to be using the short side of the razor comb. So right here I'm gently going into trim and cut the baby hairs, I'm cutting it really short, because I don't want it to be too long. Okay, so next I'm taking the eyebrows pulley and I'm spraying a little bit of the gut with spray on it. So right here, I'm going into brush down the baby hairs just like that. So next, I'm following that up with uh, got to be styling gel for ages. So this is what I use for my natural hair edges. So I'm just adding a little bit of that into the spoolie and I'm using that to kind of help to shape the baby hairs on the wigs. So now that that is done, I'm gon na take a hair band and I'm gon na wrap that around the edge of it to help keep it flat. While I go do my makeup, so I went ahead and did that off camera and remove the Hair Band. Also off camera, so here is the final result. I love love, love it. I love the fit of this wig. The mannequin head, increase that I use while making the wig is again changer. Okay, a game changer, the wig fits perfectly. It sits perfectly it. It didn't slide back at all, there's! No, it's not too tight. It'S not too big. It'S just perfect perfect! Oh my goodness, and I'm loving it um yeah guys. So this is it. This is the final result right here. As always, don't forget to give this video a big thumbs up and also, if you're new to my Channel, please don't forget to hit the Subscribe button down below if you already subscribed. Thank you so much for subscribing. Thank you. So much for watching and I'll see you all in my next one

Comments
Raven Guichard: Blue on dark skin, loving it ❤❤❤❤❤❤❤❤
J Mac: Awesome job ‼️
Yvette Saunders: Girl you did that
Melodie Musique: Super jolie ça vous va a ravir
Grace: Pls who did you curl it? Love this wig❤
Mrs D: Lovely but how did you achieve the curls
Mrs D: Lovely but how did you achieve the curls
Ice Saphir: What colour is the hair omg?? It looks amazing against your skin
Tina Patrick: U are good ❤❤
David golv: First