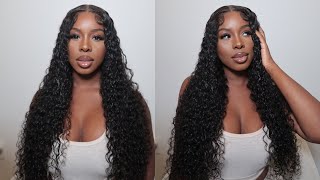
7X7 Lace Closure Sew In
- Posted on 21 August, 2020
- Lace Closure
- By Anonymous
Hi Beauties! Guess who's back and better than ever? Lol. I know I've been M.I.A., but I'm back and I'm coming to you all with a 7x7 lace closure install. I thank you guys for continuing to rock with me. I appreciate each and every one of you. Don't forget to like, comment, share, and subscribe. I hope you all enjoy, and always remember to Be Blessed Always. Muah!
Follow Me. I'm Social!
Instagram: @theperfecttouchbeautybar
FB: Janisha Perfect Touch
For Bookings:
https://theperfecttouchbeautybar.as.me...
What'S up beauties hello, i am back. I know i've been gone for a long time, but please don't come for me so jumping right into this video. I am doing a 7x7 lace closure install. So we got the big closures going on over here. I already braided down her hair and, as you can see, i am going and i'm stitching that ball cap. Just in the area where i know i plan to lay her closure and, as you can see, i'm going ahead and i'm finishing up uh how you guys doing how you guys been. I know it's been a while now after that, i'm going to go ahead and i'm going to place some gel along the front of her hairline um. I was trying out different products to see which products i know that has less alcohol in it. So i use the eco styler gel as well as i use the got to be glued um mega hold um. This new mega hold uh spray and, as you can see, i have the closure there. I am now placing the foundation on to her ball cap. Just to blend a little bit more into her skin and give that that real, bald effect. And then i'm going to jump in with that closure. And then i'm going to place that closure on the front of her hair. Just to make sure that it's matching and as you can see, that thing is matching, it is melting and it looks amazing, as you can see here so now, i'm going to go ahead and i'm going to stitch. Well, i'm sorry before i stitch that down. I'M going to cut off the two tabs, i'm just ripping and running. I'M gon na cut off the two tabs on either side just for the closure to lay more flat to lay more seamless. So it can really like you know. It doesn't need like that. Hump or that bump, when i'm going to lay down her frontal, i'm oh i'll go later her closure. So now, as you can see, i have her holding it just to make sure she keeps it in place and it's flush to her head and then i am going to stitch the back and i'm going to stitch from the middle and i'm going to work. My way out on either side just so that way, i can guarantee that it lays nice and flat in the front and in the back and now i'm gon na show you guys how long that part. Look at that. Look at that and look how i'm just doing different parting styles. I should show how long it is and show how scalpy that looks. Oh look! How far back that part goes. Can you imagine i am living for these bigger closures, so here you can see. I am cleaning up her hairline with some 91 alcohol, and here i am using a lace melt by beautiful hustler. You guys can check that out. I absolutely love this blue um. I you can get it. I think - and i beat that i think it's at ibh slays.com, yes and i already placed on the layers. I went ahead and i put about four to five layers and now i'm here just melting it in to i'm melting, the lace into the glue and i'm taking my comb and i'm using that to kind of just really push and melt them both together to kind Of marry, the lace with the glue, so you can just lay nice and flawless, and i'm going to take my hot comb and i'm going to go in she's, going to run it from it. I'M not going to go with the hot comb and i am going to further melt. It uh melt the lace into that glue just so it can lay nice and flawless and also i'm gon na. You know straighten out the hair as well. Here i'm tugging and pulling on the lace just to make sure that it's all tacked down and it is not going anywhere. We have no loose ends or anything like that. Now i'm going to take a eyebrow razor and i'm going to use that to cut off the excess leads and i'm using that just so, you can give it a more jagged edge, so it can look more natural and more flawless and more melted into the skin. Here i see a few areas that i need to fill in with some more glue that didn't quite get tacked down. So now i'm going to take a little bit of that glue and place it. On the back of my hand, i'm just going to take the tail of my comb and just go ahead and brush it on in the areas where i feel needs that excess glue. So now i'm taking the comb and i'm just going to go ahead and press it in to the hairline just to go and push that lace down into the glue to also make it look, nice and flawless here, i'm just parting out a little bit of her Baby hairs because i'm just going to give her a little baby action today and i'm just going to take the hot comb and i'm going to smooth the baby hairs forward, basically force them forward in the area that i want them to be. The area that i wanted to lay so i went ahead and i separated it from the um, the hair itself from the rest of the closure, and i am forcing it forward as well as pushing the rest back and, as you can see that looks so. Nice and melted and flawless, and i'm gon na proceed after that and just go ahead and tie down her hair with an elastic band just to further melt that hair. What am i saying just prefer to melt that lace in to the closure guys it's been a while, and i already came back and i'm messing up so further melt that lace into the skin to look more scalpy as if it didn't look scalpy already. So i forgot to mention that i went ahead and i um sprayed um the hairline first before i went ahead and tied down with the elastic band and i sprayed the hairline just so when you spray that and when you spray that hairline. Let me tell y'all when you spray that hairline and you tie it down with that elastic band baby. You cannot tell me lace. Is there, okay, that they look like straight scalp all right? What i told y'all about that scalp, you see! You see that scalp baby anyway, i went ahead and i stitched in the back of her hair um. You guys. Let me know if you want to see a detailed video on me sewing in doing a sewing. I just kind of just stitched in the back of her hair, just to kind of you know, run through not to make the video too too too long, but, as you can see, i went ahead and then placed down my wax stick. My bed head wax. Stick on her hair, and now i am going in with my hot comb to further smooth it out and to make it lay nice and flat here you can see i'm now taking that same razor that i cut down her lace with and now i'm going to Take it and just cut her baby hairs and prepare them just i'm making them like really really short, probably like an inch or so just so, they can be easier for to style and they look a little bit more on the natural side. So i'm going to go ahead and take my nairobi foam and i put it on the back of my hand, and i really i'm sorry if i kind of you know i'm standing kind of in the way in the camera. But i also take like you know: a good amount, a good amount and i place it all over on the baby hairs and i really can't use to be quite honest. I really cannot use that baby hair comb. I just can't for the life of me. I don't know if my fingers are too fat or what it is, but i just can't get my baby hair swept in how i would like to if i use the baby hair comb. So i just like to use a nice little rat tail comb and i like to put a good amount, so it'll be easier to sweep the hairs in, but i'm also very, very, very gentle, like extremely extremely gentle, when sweeping the hairs in because i don't want To disturb the lace or disturb the glue to move the lace or anything, but once you are doing it very gentle and you're doing it quickly, then you have no reason for the lace to lift or move. Now i'm going to go ahead and proceed to tying down that um. All of that work that i just placed down there. Sorry i'm getting tongue tied all that work that i just placed there. I'M gon na go ahead and tie it down and i'm gon na set her under the dryer for about 10 to 15 minutes, uh generally about 15 minutes. Just so her baby hairs could get nice and dry now that we're back from the dryer, i'm just going to go ahead and remove that sanic strip and then we're going to look at these nice baby hairs that we place down there, nice and cute anyway. So we're going to go ahead and comb them out, because i do not like crunchy crispy baby hairs. I like them to look real real soft, so i'm just going to go ahead and comb them out and from combing them out. I'M also going to take the tweezer and pluck out anywhere that i see that looks real real, thick and heavy just to make them look a little bit more sparse and a little bit more natural. Looking, i really don't like to see when the baby hairs are just excessively heavy um, so i'm just further going in and just clean them up whether it is to trim whatever um the baby hairs that are too long or whether it is to pluck out the Ones that are too thick, i'm just gon na go ahead and do that right now: okay, moving right along we're, just going to go ahead and just give her some nice curls, i'm first going to take my biosis um oil or my bias: silk, um, smoothing serum And i'm just gon na place that all over her hair and throughout the hair, the hair is a little bit thinner towards the ends. Um you're gon na see when i am giving her hair a little bit of layers, but i'm just gon na go ahead and just curl it, and you can look at that and you see how nice that looks. I'M just going to speed through this, the portion where i curl it i'm just going to take my baby's marshall irons and just give her some nice soft barrel, curls all right. So now that we're nice and curled, i'm just going to take my camera. My camera volumizing spray and i'm just going to go ahead and spray that all over the hair and i'm going to proceed to combing out her curl. As you can see, i already went ahead and i put some layers in the hair to give it some more volume and i'm also taking that black spray and i'm just further cleaning up her part and i'm being very careful not to get on that hairline or In that area, because maybe if you get black spray in the hairline, throw the whole lace away because it becomes an epic mess unless you go in and you shampoo it out, and i'm also going to go ahead and put um the concealer in her part. And then here's the finished look, and i really hope that you guys enjoyed i'm so sorry that i was gone for a while. I was really busy, but i am back. I want to thank you guys so much for watching and you can go ahead and follow me on all my social medias and my booking site they'll all be listed down below in the description box. I want to thank you guys so much for watching once again and i will catch you guys in my next one love. You guys a girl,
Comments
myla sue: I love me a good 7x7 closure
Brittany Smith: Listen !!!!! YOU DID THAT SIS ♀️. And that’s on period pooh ♀️
Charneece Alexander: Girl you slaaaaaayed her hair!! You hear me?? Slayed honey, beautiful wow
Harmony Ellis: This is so bomb !!!
Mischief Managed: How many bundles did you use for this ?
Tye Taylor: I need to book a appointment because you are the best
Maiah: Where did you get the 7x7 closure looking for one
Paige Henderson: Is this closure from your own hair company? I’m not seeing anything listed in the description
Flawless Farah: Where did she get her hair?
Erin Housley: Where are you located