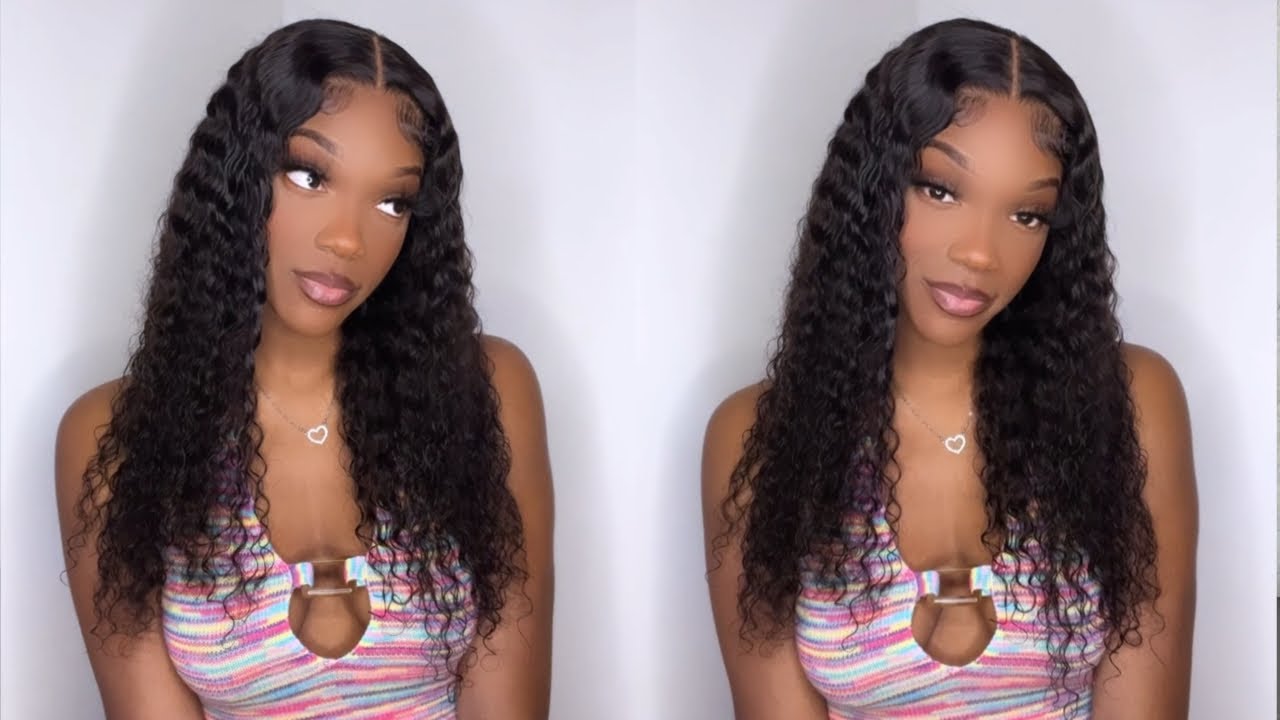
How To: Invisible Lace Closure Sew In + Styling!
- Posted on 01 July, 2017
- Lace Closure
- By Anonymous
Tutorial of lace closure sew-in...enjoy! Please leave questions and comments below.
Hair Used: 3 Bundles 14" Brazilian Loose Wave, 14" Lace Closure
Initial Hair Review:https://www.youtube.com/watch?v=WlfKz-...
Thania's IG: @touchedbythania
BOX BRAIDS TUTORIAL
https://www.youtube.com/watch?v=T6NAyz...
NATURAL HAIR HACK FOR A BAD HAIR DAY
https://www.youtube.com/watch?v=Px5QZb...
CROCHET BRAIDS FOR BEGINNERS
https://www.youtube.com/watch?v=1k4bp2...
LOW PUFF ON THICK 4C HAIR
https://www.youtube.com/watch?v=ICTB_J...
LOW SLEEK BUN ON MESSY HAIR
https://www.youtube.com/watch?v=a2orbg...
BASIC WASH DAY ROUTINE - TYPE 4 HAIR
https://www.youtube.com/watch?v=7GWKHq...
Sic, hey guys, welcome back to my channel. I hope you enjoyed that lovely intro, so today's video is going to be all about this hair and how this hair was installed on my head. This is the Brazilian loose way from Roseau beauty hair. So I did an initial review of this hair and I will leave a link in the description bar below, so you can go check it out and see what I have to say about ruling the beauty here. So back to this lovely hair, this hair is the 14 inch UsWe from both of Beauty in along with the closure, which is also 14 inches. So I usually do my hair myself, my braids, my wings, whatever I just like doing my hair myself, but I got to a point where I just was not feeling like doing my hair, so I called up my friend touched by Tanya she's amazing, and she installed This hair for me and I absolutely loved it - I absolutely loved the braiding pattern that she used in her technique. This girl is skilled, skilled, I'm going to leave all her information down in the description bar below. So please don't forget to check her out she's on Instagram, as well as I'm used to she's starting her YouTube channel. So you guys should check her out and subscribe to her. She did a lovely job and amazing job. Thank you, Tom and you're. The best hashtag touched by Tanya so for the closure. I actually bleached the knocks myself, but she did go in and did a bit some minor adjustments in some minor tweaks, which I will show you in the video. But if you guys would like to see a video of how I bleach this closure, then let me know down in the comment sections below. So let's get straight into the tutorial. But if you have not already subscribed to my channel, don't forget to hit the subscribe button and it's going to be right here. Thank you all to everyone who has already subscribed to my channel there's also a bell button right next to the subscribe button. Don'T forget to hit that as well, so you do not miss out on any more of my videos. Click the bell button, so you can turn on the notifications and get notified when I post this video, so without wasting any more time. Let'S get straight into this tutorial bye guys, and I will see you in my next video. I would crazy right now, but that's okay, so my hair has been freshly washed and I put in blow-dryer actually left it in these twists to dry up and then came straight over here. So she just combed it through and she's, going to start braiding. My hair down so because I'm getting a middle part, she parted it down the middle and she's gon na braid it around the side. I look at how she's braiding this it is nice and secure. You always want to make sure you have a solid foundation when you're doing your lease, so that your we will stay put sorry guys. I was eating some ham if your Guardian, damsels ooh, that's really good. So I'm just going to do a little spin and show you guys the braiding pattern you see how follow this is. Yes, girl! So now it's time to lay the frontal down, so she had me hold down the front part as she sold around the perimeter of the closure and then she parted a little bit at the front. So she can sew the front part down in between the hair. So here I'm just holding that section down as she securing the closure to the braid at the front. So at this point she just started blow-drying out the roots of the frontal, just to lay it down some more all right. So now, let's begin the slowing down process, she used to flip over method, which is great because I don't like cutting the bundles because it induces shedding on the hair. So I loved that she did a flip over method all the way until the top and at the top she started cutting it so that it would lay down more flat - and I absolutely love this technique and how she was able to just make everything fall down. Where I needed to false so once again, czar sewing it down and flipping it over as she goes and then once she gets to the top she's going to cut it to make sure that there are no bumps around the top so to prep this hair. I actually just washed it out of the package that it came in because I bleached the closure. I actually used that time to also divert hair as well. The hair came in a natural brown color, which I don't think really suits me. So I went ahead and dyed her hair black, so I dyed my hairs on the closure black as well as the bundles themselves, and then once I was done, I just went ahead and deep conditioned it and let it air dry. Until I got here, I will have a detailed video up at the how I bleach the lace closure as well as dye the hair, and he conditioned it and everything so keep an eye out for that all right. So here she is just taken some black eyeshadow and realigning the part, some parts that I bleach. I think I over bleached it. So it's beefed up a little bit on the hair so to correct this. All you have to do is take a small brush and black eyeshadow and just dab a right along the hairline. So now for our hair, she was going through and blow drying it straight first, and this is how it look. You can see that it's a bit layered, but I also wanted to be able to wear this hair as a blunt cut, so I asked her to trim the ends very blunt. This is how it looks like I absolutely love this. I just love how Stewie and sweet is look. I'Ve just been loving that straight sweet blunt look nowadays, so I'm glad that I have the option to wear my hair like this. If I wanted to and guys this hair is super strong, especially when you condition it. Oh child, so at this moment I just asked Tanya so go ahead and do her thing. So she wanted to add some curls over here and I said girl go ahead. Do your thing so she's going through with her curling iron and just calling the hair. For me and styling it, you know adding a little tea touch to it a so. She also uses the got to be free spray to hold the curl, and I think this is a good technique because it holds the curl and it doesn't make it crunchy. And this is the final result. As you can see, the hair is bouncy and luscious. It is not crunchy at all. This is so beautiful. I hope you guys enjoyed this video. I hope you found it very useful. Please don't hesitate to share this with your friends and like comment and subscribe and I'll see you in my next video bye,
Comments
Neena & Nique: I love the length its cute ♥
Daisy Girazi: i love it xo Daisy
Touched By Thania: ❤️❤️❤️