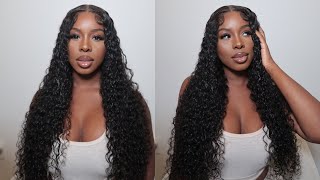
From Black To Red W/ No Bleach || 5X5 Hd Lace Closure Wig || Ft: Divahglam Hair || Antasia Monae
- Posted on 09 December, 2020
- Lace Closure
- By Anonymous
Hey guys !! I hope you enjoyed this video! This was my first time trying HD Lace and I am in love! I highly recommend trying it out ! Check out the DivahGlam Instagram daily to see the deals the owner posts! Also let me know in the comments if you have any questions of the dying process or the overall install. All info in regards to the wig and products are listed below
••••••••••••••••••••••••••••••••••••
Wig Details:
Wig in video: 5x5 elite HD Lace Closure Unit
Main website: everythingdivahglam.com
Instagram: @divahglambrand
SALE WEBSITE : AtHomeFlashSale.com
- Dye used: L’Oréal HiColor HiLights
-Red:
https://www.sallybeauty.com/50%25-off-...
-Magenta:
https://www.sallybeauty.com/50%25-off-...
- Adhesive: KISS All Mighty Bond Lace Front Wig Glue
KISS All Mighty Bond Lace Front Wig Glue Dual Tip Applicator 32mL (1.1 fl OZ) - Instant Drying, ...$19.99Amazon.com - SellerFree shipping
- Lace Tint: Honey
https://shopwigdealer.com/collections/...
- Spray used: Lace Melting Spray
https://shopwigdealer.com/collections/...
- Wax Stick: Wig Dealer
https://shopwigdealer.com/collections/...
- Hot Comb: Wig Dealer
https://shopwigdealer.com/collections/...
*** For Business Inquiries ***
Follow My Instagram
@A.ntasia
(( I DO NOT OWN RIGHTS TO THIS MUSIC ))
** AUDIO **
Thematic
Music by MDMN - Mimosas - https://thmatc.co/?l=F4057FD6
Music by MDMN - Women of the World - https://thmatc.co/?l=4687978B
#BeginnerFriendly #HDLace #Lace #Lacefrontal #Whatlace #lacefrontalwigs #wigslay #frontalstyles #Closureinstall #hairvideos #wigtutorial #frontalslay #ClosureWig #ClosureWig #22inWig #DivahGlam #KissLaceGlue #Scalp
My channel, i know it's been a while, since i've uploaded, but today i'll be showing y'all how i installed this 5x5 hd lace closure unit from diva glam hair. This wig was black. However, i used this l'oreal high color highlights in the color red to get it like this all burnish burgundy color. Actually, this is my first time using hd lace and when i tell y'all it's getting scalp look at this and the glue i used. I used the kiss almighty blonde lace glue and, if you guys have seen my last few videos, you know i don't use glue. This is my first time ever using it. I normally do like a glue. This you know like spray, got to be or my all-time fave the wood dealer lace, melting spray, but this unit is 22. Inches comes like to like the top of my butt and yeah. It'S thick. It didn't shed after it didn't shed before and it definitely didn't shed after. I dyed it, but y'all look at this, and this is where it stops. I'M at the end of my eyebrows but yeah. I hope you guys enjoy this video and you guys need to go shop with diva glam, because her deals. I got this for 290. I think and yeah hope you guys enjoy the video i enjoyed, making it and installing this unit, i'm loving it like. I said it's getting scalp and yeah. If you want to see how i installed it keep watching hey y'all. So this is what the wig looked like before i dyed it like the natural color it came with. So, as for the dye, like i mentioned in the intro, i used the l'oreal high color highlights in the color red and magenta and in total, for the first time i dyed it. I used four boxes of bread and two boxes of magenta and i used 40 volume developer and i used two boxes of color per bowl. I had about three bowls that i used and i just mixed in developer, no specific amount. I just poured what i seen fit for the bowl and just mixed it up. However, i did end up going back and re-dyeing the wig a second time and adding about four more boxes of dye, and here was my setup. I just parted the hair like into rose, and this is what it ended up. Looking like and it came out pretty red. However, i wanted it a little brighter, so here's the second time i dyed it and it came out way brighter and, like i said, i added about four more boxes of dye to get it. This color olive bread, okay, also, here's the unit after i finished plucking. It i bleached the knots and i just gave it a middle part. This wig did come pre-plucked, thank god because i do not know how to pluck, but i did go in lightly and just pluck a little bit just so it can look a little bit more natural and i'm not sure if i mentioned this in the beginning, but It is a 5x5 hd lace, closure unit, it came with three combs, the adjustable strap and like the basic, you know, wig things - and i did do a bald cap method with this, and this is my second time doing a ball cap. So don't judge me because i know it looks messed up, but it came out nice anyway. Okay, so in this clip you guys can see that the wig is on. However, it was looking white, so i took my wig dealer lace, tint in the color, honey and off camera. I just tinted the lace really quick and now you guys can see it matches my skin tone perfectly. However, for the actual install of this, it's my first time using glue so, as you guys can see in a few seconds, i'm going to be using the case. Almighty bond lace glue and i was kind of nervous, because this is my like. I said it's. My first time actually using glue because i'm normally just using like a glueless method and using like a lace spray like my all-time favorites, the wig dealer lace spray, but i was like i'm using hd lace. So let me just see if i can get like the ultimate. You know scalp look with this okay, so to help guide me on where to put the glue. I just took an eyebrow pencil and just put like a little few dots across my hairline, of where i should stop and not like go over on putting the glue okay. So here i'm gon na start to actually apply the glue, and i just did you know the normal, just dot it across your hairline and then i'm gon na blend it out and for this, like, i said it was my first time using glue and i don't Keep my units on that long. I just did two layers and i just let it dry in between and i did go end up using my blow dryer just to speed up the process because i was in a rush, so i can be able to take pictures. Hmm, okay, so after the glue was semi-dry, i pulled the lace forward and i just began to melt it in my skin. I took the back of my comb and just began to press it down as best as i could, and then i just put on my lace scarf that i got from wig dealer as well, and i just let it dry for about 5-10 minutes. Okay. So after 10 minutes i took my scarf off and i noticed it wasn't dry all the way yet like it was just still just a little bit tacky. So i took my blow dryer and i put it on low heat and i just started going over it until it was like completely dry. Okay, so after the glue was all the way dried. I took my scissors and i wanted to cut off the end pieces. I'Ve seen in some other people's videos, they try to cut off that end piece that connects to the track, and they said it helps to make it more natural. However, you guys are going to see. I was struggling because i could not get the end of the track piece to cut off all the way i get. I don't know if it was because my scissors were too small or what, but i just gave up and cut off what i could and then i just went from there. I'M going to speed up this next part as well. However, this is when i start to actually cut all the lace off, so i start in the middle and just cut straight up, and then i'm gon na go on each side and if you guys don't know, make sure you cut in like a zigzag line. As you can see that i'm doing, because, if you cut in a straight line, it's gon na give the real wiggy look so just make sure you're just going up and down up and down that way. Your lace just looks way more natural when you're done with everything. Alright, so right here, i noticed after i cut off all the lace. Not all of it was melted down. So i took the end of my rat tail comb and just put some glue on the end of it and i just went in and just dabbed it under the little pieces that didn't get any glue. So, okay. So in this part, i'm going to show you guys how i do my baby hairs and it's really self-explanatory like take the end of your rat tail comb, if you have one, if not just your regular comb and go across your hairline and right here, i just Took out like the thinnest piece, like the thinnest part of hair, that i could because i've learned that you don't want your baby hairs to look too thick, like the thinner, the better, because then it'll look way more natural. So you guys see. I pulled out one side of hair and then i'm going to do the exact same to the other side and also in a second i'm going to take my wig dealer, lace, melting spray and i'm going to spray. The part between, like the hair and the baby hairs just so i can make sure, like the lace, is just like extra melted. So if someone came up close to me, they could see like it's not. You know the lace isn't coming up in between where my baby hairs and that hair is okay. So these next few parts i'm going to speed up in a few parts on my cut out, because it's kind of self-explanatory, i'm just gon na - be pulling the hairs out, as you guys seen in the last clip, and you guys are gon na see me also Start to pluck a little bit because i learned from our nail our mind that if you pluck out the baby hairs after you, pull them out and get them as thin as possible, it'll help to give that more natural. Look in the end, all right guys. So after i do the baby hairs, this is the point where i'm just basically done and i'm gon na start flattering the wig and if you guys can see like in the back of my hair, like there's a few like ripples in it, and that's because i Was gon na crimp this hair, but i was like i'm not gon na have enough time. If i want to take pictures before it gets dark - and i was like no so i just went through - and i'm just going to straighten the entire wig and go through just some quick passes, because it was basically already straight. I just wanted to give it that nice and sleek look okay, so right here, i'm showing you guys the hot comb that i'll be using it's from wig dealer and she was nice enough to send me the hot comb. The wax stick and also the scarf. You guys seen me use earlier to lay down the lace, and i feel like if you're, using wigs having a hot comb is like a must, because you want your part to look as flat as possible and also like the surrounding hairs. Even if you're just flat. Ironing it's good to just get the roots as flat as you can all right. So this is basically the final look after i finished you know after i dyed it installed it and after i'm done flat ironing - and i hope this video helps you guys out and please like and subscribe, and if you have any questions just make sure you comment Down below and i'll be happy to answer them.
Comments
Alexis Araia: color came out great !!!! Flawless install.
La'Joia Creary: I love the color it’s so cute ❤️
ciara kennedy: can you do a tutorial on how you do the bald cap method?
Kayla Monét: I loveee the KISS lace glue