Slay Your Lace Ep.2| Detailed|How To Melt Your 5X5 Lace Closure Wig Using My Products|Asteria Hair
- Posted on 09 July, 2021
- Lace Closure
- By Anonymous
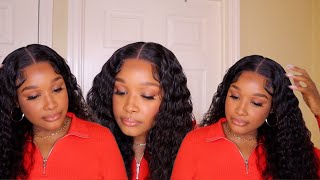
Hair: HD Lace water wave 5x5 closure wig 24'' 180% density
Direct Link https://bit.ly/3qS14bc
More HD Lace Wigs https://bit.ly/3qTU39P
#AsteriaHair ON SALE https://bit.ly/3hnmjhW
#asteriahair30inches #asteriawig30inches
Hair WHOLESALE WhatsApp+8615238065852
Instagram @Asteria__hair https://bit.ly/3xDarOR
YouTube @Asteria Hair https://bit.ly/3m5EBoA
Welcome to IAmBeautifulHustlerTV .
Be sure to SUBSCRIBE & TURN ON YOUR ALERTS
Follow My Socials:
Instagram:_Beautifulhustler
@thebeautifulhustlerbrand
@iambeautifulhustler
Twitter:_Beautifulhustl
YouTube :IAmBeautifulHustlerTV
✨For Sponsorships ,Reviews,& Questions
Email:[email protected]
Contact : 786-571-1313
——————————————————
To BOOK APPTS
TEXT 786-571-1313
To Purchase Hair & Products Www.ibhslays.com
Allow 3-14 Business Days For All Orders
——————————————————
#Youtuber #YoutubeVlogger #YoutubeReviews #Hairtutorials #Miamihairstylist #Miamihair #Duluthhairstylist #TravelingHairstylist #YoutubeTutorials #GeorgiaHair #GeorgiaHairstylist
#Atlantahair #Atlantahairstylist #Celebrityhair #CelebrityHairstylist #SouthCarolinaHairstylist
#thebeautifulhustlerbrand
I don't give a who talk behind my back cause the knew better than to. Let me hear my knee hands on my knees, shaking ass on my thigh hands, on my knees, shaking ass with my thighs. What'S up beauties and welcome back to my channel today, we are back with another video and today's video will be a 5x5 lace closure, wig install and today's hair is provided by osteria hair. They sent me over this beautiful hd lace, 5x5, curly wig and today i'm going to be installing it to teach you guys how to slay your own lace closure. Okay, um. I am doing this slayer lace series for all my beauties. Who do you know who don't necessarily care to do hair? They just want to learn how to install their own wigs. So hopefully, this video will be helpful for you, um. You know as far as installing your closure. Now this is like. I mentioned a hd lace. Closure um. I can't remember what length it is exactly, but i did go ahead and um drop the description details down below now before i actually install this wig. I wanted to show you guys a quick little plucking video at the beginning of this tutorial. So what i did was, i did go ahead and dye this wig black and then i just did like the water dye method. So i did not show that process because i already have video showing that process. But i didn't want you, you know didn't want you guys know that i did, that is with black and i did go ahead and bleach the knots and now i'm just going to show you guys um how i plucked my lace closure. So, for starters, i went ahead and placed the wig on the mannequin head and i will be using some revlon tweezers now um. What i kind of did first, was hot comb, the roots, and then i kind of looked for the center area of this wig, because i wanted to make sure that i did not pluck in the middle parting area, because i am going to be wearing a middle Part so um i didn't make like a perfect middle part. I just kind of like seen where it was and just kind of separated a little bit that way i don't plug directly in the center and then i began to pluck the hairs out now for beginners. I would recommend that you pluck your um laces, while the hair is dry simply because when the hair is wet, it's easier for you to pluck a hole because their hair rips out so much easier, but with the hair being dry, you actually have to put you Know a little more work in to actually pluck the hairs out, but i say this is a good thing that way you don't have to worry about plucking any patches or holes in your lace and honestly, i just like to hold the tweezers i'm going straight forward And back i don't hold them at an angle or sideways, i just hold them straight up and i just pull the hairs straight back and what i do first, is you know, part of the section in the front of that lace: closure, where the front of the Hairline is, and then i start plucking behind that area and then sometimes i even um do another parting behind that hairline um back like one more level and i pluck in between there and then once i feel like i plucked enough in between i comb, the entire You know hairline backwards and then i just pluck a little in between those front areas like on the hairline part. That way it's not so like straight across so um. I hope you guys, you know, find this little plucking part. You know helpful for you and i did show you guys both sides, so i'm just keep watching and stay tuned for the installation part, and once i have everything plucked out, i go right in with my wax stick and my hot comb and just hot comb. The hairline back so it's easier for me to install and i do apologize guys. I noticed after the fact that it was a little out of focus. It wasn't as clear as my tutorials be probably because i did not clean my camera before i record it, but overall i think you guys could pretty much. You know see the difference and see you know what i was doing so now that we have that all plugged up we're going to go ahead and begin the installation process. So, for starters, for this a ball cap, what i did was only glued like from temple to temple of my cap um, because the glue in the air was not necessary, because this is only a lace, closure install and not a full frontal. So i did not even want to waste my time or product just doing that so um. What i'm going to do now is just take that ruby, kisses foundation and i'm going to apply all over the front ends where the closure is going to lay, and i'm also going to take that same foundation, and you know place it inside of the lace closure. Wig and i did go ahead and adjust the straps in the back of that wig, because i want to make sure it fits like nice and snug onto my head that way. It feels more secure, especially because i you know will not be sewing this down on my head, because i'm already gon na wear this for maybe two days three tops i'm really just trying to get this content out so like i'm, trying to have the uploads coming Back to back, you know before i go in for my surgery, y'all, so just bear with me, but keep your notifications turned on because baby, you do not want to miss these new posts, all right so um before i even start gluing this wig down um, i Placed a wig where i wanted to kind of sit, and i took my scissors and cut the extra little thick flaps around the closure. That way when you apply your closure and you go to styling your babies, you know your baby hairs and everything um. The closure install is nice and seamless without that big old bulky track on the side and for my layers of course, uh today we'll be using. As always my beautiful hustler lace mirror adhesive max strength and um. I will be doing three layers. I did three layers today, uh for this install. I think i did was it three or four. I uh. I think i did three layers. I totally forgot - and this is literally the same day i'm doing this and i did this install. But i want to say that i did three layers. If i did four, then hey, but i did three to four layers and after my third layer or my last layer, uh was com. You know clear, i did go ahead and begin to tack my wig down but um. I just wanted to show you guys like in between and, as you guys also seen on, the live. My glue does turn uh clear, pretty quickly so blow drying, and all that is just really not necessary with using my adhesive, because it's going to do what it's supposed to do, um as long as you, you know, apply those layers and you spread it out nice Flat and evenly so another thing i did is i kind of drew like a line with the glue. Therefore, like the size of the closures can be laid down and not just the front, and i also did that because i did cut those extra. You know flaps off the side, so make sure you know you just add your little line on the side to kind of like make sure your closure is glued completely down on this side as well, and, of course, once that layer turns clear, you can begin to Pull your lace down into that glue. I always start from the center uh make sure i push it into the lace and then i work my way from side to side so um. You know - and i just want to take my fingertips, y'all honestly and just really press that lace in with my fingers um. Just sometimes the finger gets the job done too. You know like when you can really apply as much pressure as you want um, because sometimes, if you apply too much pressure on your combs y'all know them things be kind of cheap, they will break easily like we all notice. Okay. So, that's why i like to take that pressure with my fingers and really really push it in, and you know i just use the comb to really comb the lace into the glue and i did blow that hairline uh blow dry, that hairline on the heat setting. But uh, most importantly, you cannot forget that melt bale. I am going to tie that lace down with that melt belt and while that lace is settling in i'm going to start prepping like my styling portion and i'm just doing a simple middle part today, y'all with some baby hair, so nothing too crazy um. So i'm just gon na go in with my wax stick and my hot comb and go ahead and begin to you know kind of pre-prep this out before i do like the finale you know slave touches, but for those who are inquiring about the restock the restock Date that i chose was july 18th, so it will be. If i'm not mistaken, i think that's a sunday um. I will double check, but it will be on july 18th. We will have um the biggest uh. We will have like our full product restock, but i'm still going to keep dropping you know, content until then um go live july, 18 seem a little far away. I might do another restock in between but um. You know just something light in the meantime, but our big restock will be on july 18th. I will have all the details in the community section on youtube, so make sure you guys do have your notification bells turned on and that you are subscribed. So you do not miss out so now that i have kind of pre. You know prepped my hair for styling. I went ahead and removed that melt belt and, as you can see, it's giving us the natural tees, but it is time to cut off that extra lace and uh. Once i cut off the extra lace, i will go ahead and you know um. You know prep the hair for the second step melting process, which will be you know, adding um more foundation, and i did use a darker foundation um in this video, as well as to my previous video, to make my lace blend a little bit more. I like to start off with the lighter foundation, because you know, depending on the lace color, it all depends on how it will come out. But whenever you have a lace that seems a little too light around your hairline just go in with a shade darker foundation and it will give you the best blending results. But i ain't got to talk about it because y'all definitely gon na see it. So i just went ahead and cut that lace off and right now i noticed a little piece of cap like coming out. You know past the lace line, so you want to make sure you do not make this mistake. If you do just please quickly correct this. So i just went in and cut off that extra cap um because yeah it just had to go, but as far as the edges of your lace make sure you do go back in and tack everything down. So i'm just taking some more of my adhesive and just tucking it under those tiny little places that was not completely melted and then i would go ahead and pull down. My baby hair section add that darker foundation spray, my hair line down with that holding spray and once again get into the belt melting process by re-tying down the front of my lace and just another quick tip when you do spray your holding spray to your hairline. Just make sure that you kind of comb you know and smooth everything out that way everything is nice and neat as it melts in you. Don'T have to worry about hair just like all over the place, and i just really like to do that and i just feel like it makes the whole melting process just you know even better when everything is neat which makes it easier for you to go ahead And construct your baby hairs with a nice clean, and you know what i'm saying a nice clean, hairline, so um once again, as that male belt is sitting to my hairline. I just will continue to hot comb and smooth out the top area and then uh once i remove that melt belt, i'm gon na slow it down for y'all, because y'all don't have to see the melt. But let me just give this lace a moment of silence because it just died. Yeah, let's be quiet, yeah and, as you can see, the lace is definitely melted. It'S definitely given what it's supposed to give, and this is what i mean just add a little bit of that darker foundation and just going to give you the look that you need. Okay, so now i'm going to go in and begin to style my baby hairs for my baby hairs. I will be using my um beautiful hustler, a gel um lace, milk, um lace, milk, liquid gel that i am releasing in the next free stock, which will be one next week. Yes, on the 18th, as i mentioned, so this is just my bottle without the label, but i will upload the of course. You know the actual professional bottles of my lace, milk, liquid gel - and this is a gel that is used for baby hairs. You can also use it on your natural hair. If you want to sleek it up and of course it will be used to do your glueless wig installs, which i'm going to show you exactly how it works. Um. You know i'm going to do some glueless installs for you, so you know because every time you always want to just glue your wig, you know. Sometimes we just want a little quick little one tool. You know too little one day, you know, look some just quick sample and sometimes we just want to get home and take these wigs off. Okay, like let's just be real, we don't always want to sleep with a wig on our head. We would just like just wake up and just put it back on. You know what i'm saying so, of course, i had to you know, show some love to my. You know glueless beauties, like i mentioned, we don't always want to wear glue. Sometimes we want to take a break from the glue and we still want our hair to be slayed. So that's what also inspired me to go ahead and get this glueless gel going for my views. Okay - and i know y'all will love it and it smells so. Freaking good, like i don't know what it is, it's like my edge control just smells so good. The mousse smells so got darn going good, and it's like i have this gel the lace, milk, liquid gel and it just oh, my god. I cannot wait for y'all to smell it. I cannot wait if you got to try it out like it makes your hair smell so freaking good, but nevertheless i am using my gel to go ahead and you know construct my baby hairs. Um personally, i like to do my baby hairs across the center and two on the sides. When i'm doing my lace closures, if you're not a baby hair girl, i already dropped that tutorial for you on my last video getting that clean little hairline, it's the same exact steps and process for your lace closure. So if you do not want to do any baby hairs for your closure, you do not have to me personally. I just like to do my baby hairs with my closures but um as you can see, it was melted. So ain't like i needed it enough and i just wanted it, but yes, so uh, let's go ahead and get this top area sleeped on up now. For my final look, i do want my hair to be puffy, but i did want to go ahead and define the curls first. That way when i actually like teased the hair out, it did not look like a big old puffy mess yeah. I know sometimes like when you have curly hair and you just comb it out and decide to wear puffy. It just looks like puffy, but without the defined curls. So i'm going to show you guys exactly how i created my curls using my beautiful hustler define me curls mousse. I never really did like a full tutorial or dedicated tutorial to show you guys how the mousse works, but i'm going to show you guys in this video, but before we even get into that, i did have to sleep the top of my wig and also clean Up their parting area by taking my same foundation, applying it in my part and then going around my part with some black spray and just really cleaning that parting area up. And you want to make sure you take your time with this, because you don't want to be black spraying, a million and one times every time you need to fix your part up or because you laid it down wrong. Just take your time doing knee and just try to really get that straight line going. It just makes the style look so much cleaner when you have that nice clean part. So you know i just touch. You know touched that area up because i kept feeling like it was just one little spot. That was just too light, but i had got it y'all. I had got it. Finally, so before i go ahead and show y'all um, you know how to define a curse with the mousse, because i did not comb this wig out. I just took a little bit of water to just kind of like damp the hair. First. That way, i can really rub my fingers through it and then um, i'm gon na do that on one side and, of course, repeat the same steps to the other side, but as far as getting the curves really thoroughly um like defined and everything i will be Using like i mentioned my define me, curl moves yes from the beautiful hustler brand, so you guys can see how it worked and show you guys the difference on how once i apply my mousse and then like fluff out my hair, it will be big, pretty and Defined so i'm just going to go ahead and go crazy with the mousse. You want to make sure you get that mousse in there from roost to end. Just you know: finger comb finger comb finger comb, you can't use a wig brush, but honestly you can just finger comb like it. Ain'T gon na kill you it ain't gon na rip, your nails off or nothing like that, and i'm just showing you guys, the mousse. The fine curls uh moisturizing foam, let's get into it, get the crust popping and if you love the wet look just go ahead and do you the wet look with the mousse and you know you can just get your curls wet and go. But i don't know like i used to be real big on the um wet looks, but i'm just been feeling like the big puffy. You know. Curly looks, i don't know. I just been feeling it lately, like. I probably like the wet look more. If it's like a side part, but if it's like a middle part, i don't really care for the wet look. I just feel like it should just be. You know like puffy and teased out, but you know to each his own: hey we're not here to judge we all like our hair, different ways, different styles or whatever, like that. I just prefer me personally my middle parts to be more puffy, but then you know for my side parts i'll be do you know i do like little wet looks so. Nevertheless, i did go ahead and apply that mousse all in my hair to define the curls and then um. I want to go ahead and tease it out, but i need to let it you know kind of air dry, first um, because it's still kind of wet. So, in order to get that puffy look, you have to let the hair dry some. So i did wait. You know like about 15 minutes and i let that mousse dry and as you can see as i'm fluffing, the hair out the curls are still popping like it is so freaking pretty, and you know i got to go ahead and do my makeup and then come Back as a bad y'all know how it goes so i did let it dry some more as i did my makeup and i fluffed it out. Here'S the finishing look. Let me know what you guys think down below don't forget to subscribe thumbs up this video leave. A comment and share it. Thank you guys for tuning in, and i will see you on the next video


Comments
Toyia: Heyyyy suga plum. Thank you for this video. I've been loving 5x5 and especially 6x6 closures lately. Great video. My friend ALWAYS slays!!!❤❤❤❤❤❤❤❤❤
Dej Marie: The melt belt and glue understands the assignment and delivers A1 melt down whether it’s a closure wig or a frontal. Definitely not missing the restock
tiffanyjackson521: Yesssssss ma’am my unit been on for almost 2 weeks with NO LIFTING NO TOUCH UPS WHEN I SAY THIS GLUE IS EVERYTHING IT’S LIFE I’VE WENT SWIMMING GOTTEN WET DID EXTRA TEMPERATURE RISING ACTIVITIES AND STILL WERE HERE WITH NO LIFTING will the beauty sleeping bonnets be included with the large restock
tenice0526: Love this look curls is popping
Michi Love: Hey beautiful hustler, I love the way your installs come out! May I ask what brand of spray you used to define your part? I’ve heard of the kiss brand but not the gold bottle you used. Thanks mama
Damngena4: Yessssss BEAUTIFULHUSTLER ON SLAY IM ON WEEK 2 NO LIFTING !
Ayviana Morton: Love love love your videos I swear I learn so much from you !
ASTERIA HAIR: Yesss So bomb on you!❤️
Sasha Matamoros: Your gonna make me come to Florida and get me a wig slayed lol lol love it
Trina G.: Gorgeous as usual
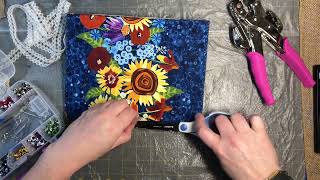
ADoseOfKiyaa: Love the product display
BeautifulDisaster: The lace was lacing and the melt was melting!!
smokeahontas everyday: It looks like everything is well stocked up in the background
SIMPLY MARVELOUS 4: Beautiful sis as always tfs
hotstuff1008: I watch your videos so much..I’m all at my hair store askin for a melt belt and lady likes whts tht...lol I definitely gotta order one on restock ..
Tamar Gamble: love this! what spray were u using again for your parting
Student0fLyfe: Omgggg, yassssss…..we, ‘the beauties’ appreciate u!!! ❤️
NeeNee83: Beautiful♥♥♥
Y’all need healing: If I order the lace glue will it come on the 24 I wanna go swimming in my wig lol ? I love your videos
Nicole Smith: perfect timing
MrsQueen LadyRed: Another Slay Mamacita
Eureka Lee: Love it
DaNya Woods: YassssI love it
Keisha Thomas: Love it ♥♥♥♥♥♥♥♥♥
Jamaican fairy 🧚♀️: Great job as usual you alway slay surgery BBL
Nikki Harrison: Wait sis I’ve been trying to order your glue, but it still says out of stock and I see tons of bottles in the background so♀️ I need my glue sis…I’m all out
UNEEK BEAUTI: I'm walking around looking like a bald head scally wag waiting on your restock so I would be most grateful if you decided to do a small restock.
Riyah Ashley: IM COMING TO MIAMI IN AUGUST HOW CAN I BOOK AN APPOINTMENT???
modelchiic17:
stephine brown: ❤️❤️❤️
QueenTera: Yess shay
Williesha Robins: Don’t ever play with her yesssss hunny ….I think I left ur mind body and soul in that wig chic
deseraymiles87:
Deelkas Jones: What kind of surgery you're having? And where's your dark skin homegirl at???? Haven't seen her in min
I AM PHEE: Fye
Marissa Frazier:
Shakita Brown: sis
octavia little: Yasssssss Shae
Kersha Beaver: Nice
LIFE WITH KAMARI.💗💖: New subscriber
Nichelle Lopez: I need your lace glue!!! EVERYTHING is sold out on your page . When’s the restock ??
Arie L: These wigs all look the same and the baby hairs are a dead giveaway
ADoseOfKiyaa: Here !