Classic Wavy Curlsperfect Body Wave Wig Install | Ft. Yolissa Hair
- Posted on 24 November, 2022
- Lace Closure
- By Anonymous
Business Inquires: [email protected]
●▬▬♛ Yolissa Hair Black Friday Crazy Deals♛▬▬●
Same Hair:➤https://bit.ly/3NZXmrR
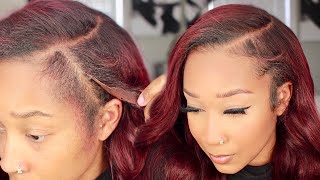
Hair Info:#yolissabodywave 13x4 HD Lace Frontal Wig 24inches 180% density
❤ #yolissahair Official Website:➤https://bit.ly/3fVEqh8
Black Friday & Cyber Monday Sale
$30 $50 $80 Large CouponFirst Come, First Served!
Free Wigs + Free Gifts + Double Points To Every Order
Flash Sale In Lowest Price
2 Wigs In $?9 A Blind Box
Don't Miss➤Over $120 Coupons For New Register
$100 Coupon Package in Yolissa Group:➤https://bit.ly/3momOuu
Follow Yolissa Hair On Social Media
Instagram: https://www.instagram.com/yolissa_hair...
Facebook: https://www.facebook.com/yolissa_hair/...
✔Wholesale Contact +86 15803834514
Hello guys and welcome back to my channel so today I will be installing this beautiful yolissa wig. It is 24 inches, 180 density body, wave HD lace and it is giving what it is supposed to have. Okay, she's absolutely gorgeous and I will be showing you how I installed it from start to finish and just kind of going over some of the tips that I use when installing my wig. So let's go all right. So let's go ahead and install this wig, I'm going to show you guys the things that you will need you're going to need a stocking cap. I prefer to use one that is closer to my skin type. I do not do the ball cap method. I literally put it on. It was a little bit of foundation. You want to use the same Foundation. That is your skin tone, maybe just slightly darker, if you like it that way. Um. You also need some alcohol because you have to wipe the area that you're going to be applying the glue, otherwise it will not stick for this install um. I am going to be using the bolt hold active. I absolutely love this. I feel like it helps to melt the lace just one of my personal faves um, and here is your List's wig. Okay, so I have bleached the knots and it is so so pretty before I put it on my head, I am going to take a little bit of the foundation um I use Nars and I'm going to apply it to the inside of the cap. You know, and I like to go over to like the lace just a little bit just to ensure um that that is covered as well. This is going to lay beautifully. I can tell you that right now, like it's just it's good lace, it's good and I love the fact that Joseph did ask me for the size of my cat prior to um, sending the wig they wanted to know my capsize so make sure that you guys Take your measurements that will help you get the correct cap size to make sure that you guys don't have to do any additional cutting or unnecessary cutting when installing your wig. So I also did add some Foundation to my wig cap as well, but before we go ahead and apply the glue, I wanted to show you guys just how good this wig is going to lay look at that. It'S giving scalp it was giving scalp before, but, like literally all I did was just bleach the knots and because it already came pre-plucked I did not do any plucking and um the the knots were like really really small. So it honestly it didn't need any additional work. I just decided to do some additional work, but it's not needed, which I think is really good for beginners, especially if you don't know how to pluck your wig me um. It'S it's really good. Like I absolutely love it, but anyway, let's go ahead and apply this glue and get started. Okay, we're going to take the glue I like to use a rat tail comb as well and I'll show you guys why, and I also like to work in sections. I do not just go full throttle and go around the perimeter um when you are working with this glue, make sure you are taking your time and just applying thin layers. Thin layers make sure you brush this out really good, because this would allow it to dry quicker foreign foreign, okay. So a thing to remember with the boho is you do have to let it sit for a while before you go ahead and get the styling because it does not. It is not completely dry, which means that the hair is not held or adhered to it. So it's not completely done and it will lift if you do not let it dry. In my personal opinion, I would say let it dry for at least 24 hours, but for the sake of this video, I'm gon na put on my little head, wrap, um or my milk bin. I'M just trying to get the center of my heart right now, but I'm gon na put on my melt band and then I'm going to let it sit for about an hour or two and then I'll come back and show you guys um how we're gon na, Like really styling and get it ready, this is a lot of hair for them to say this is 180 density. I am still in shop because child it feels like more, but what you want to do is you want to get your milk band? I like to make sure ain't no hairs laying down much as possible and um put your milk band on this is also by yolissa hair. Oh, my goodness, it's so much hair. I need to get this out of my way in the back. In order for me to be able to successfully do it all right, look how much hair this is. Oh my gosh - I'm not used to this because, like I said all of my little wigs, they say they're 180 percent density and they are not even close to this okay, so I'm just gon na take it and just make sure it's super well, not really tight, But like as tight as we can get it and just hold that there, I wonder if I want to go in with this silk band as well, just to like really tighten it because I have oh, this is so bad. Let me see this is okay, so I'm gon na go in with like the little silk band, just to give me like a little bit more security, because if there is one thing I like, especially since I have to come back in like an hour or two Because I want to make sure that thing is tight, so it can melt off into there. Okay and now I'm just gon na. Let it sit and then give me about an hour or two. I will come back and we will uh cut the lace and get this to get cracked. So I have to let this sit for about a good hour or so so we're gon na take this off and then I'm gon na. Let it sit overnight and then I'll come back in the morning and style it for you, but I just wanted it to sit before um I'll, go ahead and cut the excess lace off of it all in all, like first impressions of the wig, definitely think it's A beautiful unit like for sure, I think it's gorgeous, and I haven't really had to do like too much to it either, except really get it to do what I needed it to do: foreign foreign foreign, that white line, so we're just going to take some more Foundation same Foundation, we used on the base and we're gon na just fill this in going right over that lace. Once again, once again, I do feel like this is really good lace, because it is completely disappearing. Normally, I could still see it in the mirror. You wouldn't be able to pick up on camera, but like this bro she's she's out of there she's completely disappearing. I love it all right now, I'm gon na take some Ebon. The black can and just kind of go around. My edges just make sure they all on one Accord before I melt this, I'm going to add just some stuff to my part, the 450 by Fenty little concealer. Honestly, I don't feel like this. Hair needs a lot um, because it's just to me, I feel like it is like the best wig that I've worked with thus far. I really enjoyed it super easy foreign, it's so comfortable. This thing is like super comfortable, the headband I have. I normally wear. It'S not this comfortable so and we're gon na just let this sit like I said for 24 hours, and then I will come back tomorrow and finish styling and working with the hair with you guys, all right guys. So here we are. This is the next day. I'Ve already done my makeup and stuff. I'M gon na show you. This is just the hair again in its natural state. I just put a bonnet on. It is so thick. This is the thickest hair I've ever had and look at that. It'S even full at the end, y'all like the hair is amazing, but it is time to take off. Our milk band hurt like this a little bit um. I'Ve had it on, like I said, for 24 hours, so it's it doesn't hurt, but the my ears hurt, if that makes sense, because it's been on for so long, but I'm just gon na brush it and then I'm gon na add some curls into it. To see how it curls, but the lace, look at that the lace is phenomenal. Y'All like it just it's giving what it is supposed to have gave it's giving scalp. It looks great, absolutely love it. Love love, love, this hair foreign foreign guys. So here we are. This is the finished. Look. I hope you guys enjoyed the video if you did make sure you guys like comment and subscribe. I love you guys and I'll see you guys next time.


Comments
maxine: I know this is the most requested video because your hair always slays!!! Thank you!!! Hair and makeup go hand in hand.
CEOofJAZZYBLINKS: You did that it looks beautiful. I’ve been beating for one of these videos from you! You made my day thank you
Brittney Toneé: That install is fab! Love your content
Ali B: Listen you killed this now I’m gonna go buy this loveee the lace & the face is sitting
sweetbaby00000000: Happy Thanksgiving Ari to you and your family. Gurl you slayed this wig it it looks so beautiful on you. The tutorial was just as great as your makeup tutorials. BTW the makeup honey is chefs kiss. Truly a grown and sexy vibe. I give all women their props who can wear, style and look amazing in a wig. It is definitely giving all it is suppose to and then some. You definitely taught me how to install a wig the proper way. Love you gurl and thank you for another fabulous tutorial.
JJ: yes yes we asked and she delivered. Beautiful install Ari
Jiffie Sweeney: You did that sis. I love it.
Kay J: Baby I’ve been waiting for this. Your wigs stay sitting. You’re so beautiful with and without the makeup and wigs.❤❤
Yolissa Hair: Fabulous~Thank you for your sharing
Gina Jaszczuk: Love the hair ❤❤
Tameshia May: I just loooove watching you
Nikki Nichell Hair: what lace???
Cynthia Patton: Really beautiful.. it’s looking jet black. Did you dye it?
Frankela Blizzard:
Lena Gaskins: Happy thanksgiving frennnnnnnn❤❤