Very Detailed Sewing Machine Wig Tutorial + Diy Closure From Scratch | Lifestyle By Kam
- Posted on 29 April, 2020
- Lace Closure
- By Anonymous
Hey loves
Here is a super easy and simplest Sewing machine wig tutorial i filmed also how to make your own closure at home. I hope you love it and Don’t forget to subscribe and share with friends.
► S U B S C R I B E →http://bit.ly/subscribelifestylebykam
(be sure to turn all notifications ON by hitting the bell above so you don't miss any of my uploads!)
——————RELATED VIDEOS———————-
•DIY PURPLE SHAMPOO
•HOW TO BLEACH BUNDLES
•HOW TO MAKE A WIG
-- -- -- -- -- WATCH MY LAST VIDEO -- -- -- -- - -
BATTLE OF THE BLEACHES, BLUE VS WHITE BLEACH:
-- -- -- -- CHECK OUT SOME OF MY AMAZING VIDEOS -- -- -- -- --
► HOW TO COLOR HAIR TO MATCH BUNDLES
https://www.youtube.com/watch?v=s9dI9...
► HOW TO COLOR HAIR TO MATCH BUNDLES
https://www.youtube.com/watch?v=s9dI9...
► HONEST BLONDE WIG REVIEW
https://www.youtube.com/watch?v=hwDCF...
►DIY CROCHET PUMPKIN COLORED HAIR)
http://bit.ly/diypumpkinspiredcrochetw...
► HOW TO MAKE A CLOSURE WIG
https://www.youtube.com/watch?v=RiHA1...
________________________________________________________________
I DO NOT OWN ANY MUSIC USED IN THIS VIDEO
NO COPYRIGHT SOUNDS
TAGS
sewing machine wig, sewing machine closure tutorial
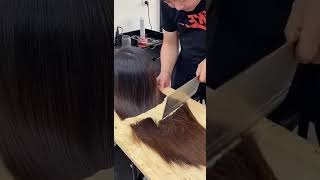
Hi guys welcome back to my channel today. I will show you guys how to make a very detailed in mission week tutorial and also I'm going to show you guys how to make it DIY closure for those who can't afford or maybe because it's content and people aren't shipping, so stay tuned. So we're beginning with part 1 the sewing machine tutorial so yeah I have my four bundles of hair already opened one bundle to see how it was, and then I have my wig cap, which should have this net there. A pencil and my nitpicker also means it's a measuring tape, so I mean to wear my cap on the converse head block and I'm going to pull that back and I'm also going to straighten the cap down so that it doesn't have any crease like the cap. Is flat on the mannequin head? After doing they are going to want to pin down the cap you're doing this mimic the nape of the head and then after doing order, you're going to take a tip, I'm going to pin it from where they lives and then to the end of the cap. To the nib of the cap, I want you to die uh pins, to pin the measuring tape in place so that it doesn't move. I did this and my camera wasn't filming, but you're going to connect lines from each end of the cap using one inch distance. I'M doing it this way so that my wick up appears really uniform and also it's they. The weight of the hair is distributor accordingly throughout the head. So I'm just going to speed that up, because it's the same thing you're going to just who you're going to just draw the lines till you get to the pathway. The list is showing. So this is what you should have and I took of the tip I'm just going to connect the lines now so that we have a seamless line situation going on. I already doubled tracks and I didn't want to film down camera because it came out quite horribly, but I'm going to just trace I'm going to go on my machine and start streaming down the tracks using my sewing machine and then I'm going to double stitch at The end this one should look like, as you can see, it's quite steady. I'M going to continue this on the second track, I'm going to double stitch at the beginning and then follow my outline. I'M going to show the hair down to the cap. Also, you guys should know my nails are going through a lot of things right now so yeah, just if the, if you do not see see, don't tell me down the comment section just move on. Okay, like I know that my nails are busted, I'm going to keep repeating the process. It'S really soft explanatory, like you, take your weft and then you saw it following the outline of the line through the one inch distance you're just going to so that you you reach like the end, but Gary I'm showing you how far I've come and I'm going To keep swinging them down the only thing you need to pay attention attention to it. You need to double stitch it like back stitches at the beginning and at the end, because that is the only reason your hair starts unraveling from so, if you don't want your hair coming off like sometimes after you've won it for maybe a year or something you Have to do that part, and then I cut the weft like at the end. So that way I know that my measurements are really precise. Like I said again, I'm just really going to start suing the hair according to where I pleased aligned and I'm using a zig-zag stitch. I forgot to like, though you can say in the beginning, but I'm using a zig-zag stitch should have when you wear the cap. Zigzag is going to allow your material to stretch too. If you see a straight stitch, it's not going to work, but if it is a zig-zag stitch, it's going to allowed that like there possibility for your captors to be able to stretch and also you do not want to sew on the band's of the captain. Seven all drained in length. I do not really blind the bunch of the cup because you might have to be flexible if your canvas head is maybe big, you can sew on the amount of the capsule that it's like your size, or it doesn't stretch as much. But if you want to have like the possibility of breeding - and you don't want headaches - you should not stop on the band so that that is going to be open for discussion. So this is like the end, as you can see, I'm back stitching again - and this is the inside of the cap - I'm just going to open that up and then I'm going to start trimming and cutting off the excess shreds that are like lying inside the cap. So that it's neat, as you can see, my cab looks very neat. I'M going to go ahead to show you guys the remains of the hair, which I'm going to cut up to make the lace front ow. So that's it for how to make like a really really detailed sewing machine week and yeah. I do have a little bit of other things I do, but this is just like the real basics. If you do not know what you are doing at all, you should definitely watch this or so I'm just showing you guys how the inside looks very neat yeah, I'm part of myself and all that so now we're doing part two, the DIY closure. So this is the hair. I showed you like few seconds ago and yeah my nose look even was in this clip but anyways my patent. This is the hair, green, sticky, fine home and going to come it out and they are going to see that, like most of the hey it's going to come out because that that's like just excess hair or I don't know how to explain it but yeah. You need to come down out so that I can get out. She agrees. She said they need picker and you're just going to pull the hair out and I'm going to repeat the same thing. Don'T fret! I have a video that, like has dispersals detailee explained. So I'm going to link it down, but also I'm going to slow down the clips that you can actually see what is going on, but yeah if you're familiar with crochet, I'm basically using in it, because, like a really really micro crochet tool - and I am just Using that to crochet on the list of the hair, so this is what we have after like an hour or tightening. It said that when you know what you're doing, but this is what we have and yeah I'm trying to show you guys I'm going to pull on the knots it's it actually becomes smaller. So I'm changed my new pika, because the distance from that one to the end of the pin was really long anyways if cut off it. But again it's the same process, like you in, say your crew shipping. You pick on some hair and then you pull it out. So this is a close-up and, as you can see the same process, I just explained you insert the crochet. Pin you pull on some little particles of hair, maybe two or three strands, and then you pull them out and you keep doing that until your list is as full as you want it to be. You can do you can go how far you want or hardly to you one, but this is just like the basics of it. Okay, so we add done. This is what we have now and then I'm going to put some mousse on the hair and I'm going to use a hot comb and just make everything to lay down flat. I know it looks kind of like really spaced again but once you're wearing it ringing. Hey it's something to look like this, so I'm after doing that, I'm going to go in with some hair wax and I'm just going to put that there so that my hair stays in place. It doesn't fly because when you do this Christian method, your hair has a tendency to fly away and if you don't want it to do that after his rules, you can go here with some extra gel and just put that there I'm going to use my drag And I'm going to tie that down to that everything lays flat and that's basically it so just for the purpose of this video, because it's the clients weekend, everything just for the purpose of this video. I'M going to show you guys how it looks inside now and then I'm just going to wear it real quickly, so that you can see that it does look very natural and realistic. So if you do not have the money to spend on a closure, you can do these very easily at home. The only thing is, you will need to invest a lot of time into it and I'm sure that it's like one time period, we have all the time in the world to do all these things. So again, don't be lazy. You can do this if you want to try to experience, but if you don't that is to find so yeah just ignore how what said I look. You know I really I'm really just going through a lot right now, but yeah, that's just for another day. So this is what we have. This is the week and, as you can see, it looks quite natural and the week looks really cute. That'S it for this video. I hope you enjoyed it. Leave a comment down below subscribe share with your friends. Follow me on my social and I'll, see you next time.


Comments
Kelly Pride Che: You make it look so easy. Great work T
Loetitia T: Thank you for this video sis
Lifestyle by Ebony: Good job, you make using a machine look easy.
Lifestyle by Kam: Hey loves sorry about the audio. Hope you learned something interesting today ❤️✨
The GraceFX: The talent jumped out
Babblingcupcake: great vid :)
Bless up with BarbieRedd: I love it
Sharon V: I always get scared with the DIY closures , like im scared after a while it will shed a lot n it will become scanty n not look nice anymore
Minami Extra: Great video Ti
Ayang Elly:
Miss Ebane: This thing is hard oo.. I tried one time.. everything was a mess.
Ngong Bertila: Thanks for his