For Beginners: How To Make A Lace Closure Wig On A Sewing Machine
- Posted on 23 April, 2021
- Lace Closure
- By Anonymous
Whether you have alopecia or a full head of hair, a closure wig hair unit will fit great and it's easy to make once I show you how.
Video Chapters for your convenience:
0:00 - Welcome
0:15 - Why I made this video
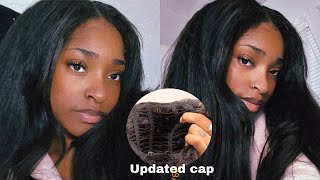
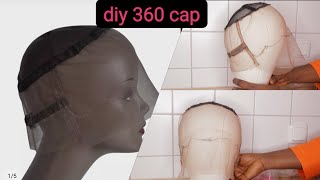
0:33 - The wig cap needed
1:07 - The closure and how to place it on the wig head
3:09 - How to sew on the closure
4:09 - How to make lines on the wig cap for placement of wefts
6:55 - How to sew the wefts on to the wig cap
9:48 - How to join the wefts to the closure to finish making the wig
11:03 - The finished wig!
11:10 - My thanks to you for watching!
#TheMagicWigMaker
Sewing Supplies:
Closure Wig Cap from Amazon.com
https://www.amazon.com/gp/product/B07H...
Sewing machine for beginners: https://www.amazon.com/SINGER-1304-Sti...
Polyester Sewing Thread: https://www.amazon.com/LEONIS-Color-Po...==
Canvas mannequin head: https://www.amazon.com/Canvas-Mannequi...
Sewing ruler: https://www.amazon.com/Measuring-Alumi...
Tailor's chalk: https://www.amazon.com/Fabric-Sewing-T...
Pins for sewing: https://www.amazon.com/ForSewian-Piece...
Seam ripper: https://www.amazon.com/dp/B088SJZQ11?p...
Quality Scissors: https://www.amazon.com/BambooMN-Titani...
I'M wearing a full lace wig that i made for my 64th birthday, that's in a few weeks, but when i tried it on, i loved it, and i decided why wait until tomorrow i had a viewer who requests that. I make a wig on a sewing machine. So i really appreciate her asking me this video is dedicated to her and everyone else who wants to know how to make a wig on a sewing machine. I will show you as least complicated as i can, and i hope that you will enjoy the easiest way to make a lace wig with the sewing machine is with a wig cap. It comes already sized and small, medium and large, so once you've determined your size, that's the cap that you want to order. I will put a link in the description of where you can purchase this cap on amazon.com. You have ear tabs here on both sides. You have an adjustable back, strap and then you have this nape attachment and in the very crown you can see where you have the horseshoe for a closure. I am going to be using a 6x6 closure with natural straight hair and double wefts. But that's going to be easier than you're having to separate single with. Let'S start with your wig head, you don't have to have it marked like mine, but you do want to make sure that the size is comparable to the wig cap you're, using i'm using a small wig cap and a small wig head. You want to put the wig cap onto the mannequin head, adjusting the front where the closure is going to go on the natural hairline like this, then you will put your closure over the wig cap, aligning the front of the closure with the hairline of the wig Cap once you've done that and make sure that it's centered you want to pin the front of the closure to the wig cap and the mannequin head. What you're going to do is to use your pins to attach the closure to the wig cap, but you don't want to go down to the mannequin head. You want to catch that lace and insert it that way and you'll find it helpful to pull the hair up into a ponytail and tying it off with the clip, and now that you have it centered, you want to start from the middle and work your way To the front pulling it as you need it, so that it is totally flush without pucker and then insert your pins through the closure and the wig cap, but not into the mannequin head, because you're going to take this off after you attach the closure with pins And you want to do that all the way around right here where the rim of the closure is you're, going to sew that all the way around the horseshoe formation lift your needle to the highest point, and you might want to take your pin out but hold The closure in place with your fingers and insert the needle at your starting point, lower your zipper foot and as you're sewing, you can take the pins up as you meet them, or you can just sew across the pins. If you feel comfortable that it's not going to break your needle so very close to the edge just the rim, part of it when you get to the end back stitch, a few stitches to lock that stitch and then cut your threads now, we're ready to add The tracks, so you want to put your unit back on the wig head, secure the cap with pins so that you have a smooth surface and there are no puckers you're going to use your tailor's chalk to make your lines for placing your wefts onto the cap. The first place, you're going to put your tracks, is going to be in the nape area on this panel, and you want to make a line going around the bottom rim. That'S where you're going to sew your first track from this point. All the way around to this point, and then your next track is going to be right above it, your third track is going to come from the panel on the side going straight across to the same area. On the other side, your ruler is going to be good to help you make sure that the lines are uniform, we're going to put all the tracks a half inch apart. Measuring from this line, if you're using single wefts, then you're going to decrease the space between the lines, it all depends on how thick you want your unit when you get to the crown area right under the closure, you want to do a horseshoe and you can Use your eye for this, you want to bring your line all the way to the end of the elastic panel. Now, when you get by the ear tabs area, you want to bring your line all the way to the edge of the ear tabs by this time. Your lines should be contouring and beginning to go into like a smile or semi horseshoe when you get at the very crown underneath the closure - and i really suggest that you use single tracks for this, because it's going to be much more seamless, they're going to go Straight across and close together and, of course, if you're using double wefts, they will not be close together and now you're ready to sew on your tracks. We'Re going to place the first track from the edge right here following the contour and stop it right. There lift your needle at its highest point and sew as close to the top of this track, as you can so, there's not a loop, remember to back stitch stitches to lock it and don't stretch the material as you go around just let the fabric flow under The zipper foot at a natural pace when you get to the stopping point on the other side back stitch a couple of stitches to lock it raise your needle and the presser foot and cutting it thread, and this will be your first track next sew. Your second track on the line that you made right above it going straight across now, we're going to start putting on the tracks and you're going to use the lines that you've drawn as your guide, remembering to go from one corner over where the panel is on. The edge all the way over to the other side. Now you can see where we're going with this. You just want to follow your lines and build the tracks all the way up, in the pattern of the lines that you've drawn. Very importantly, when you get to the ear tabs area, you want to allow your track to come about a quarter of an inch past the edge of the ear tab. Also, you want to make sure that you've not sew over those tabs on the side that are for your adjustable strap. You want to use your seam ripper to separate the end of the track once you have done that cut the bottom track, close to the edge of the ear tab and then fold it over and then sew back over that edge. This gives a clean finish to your ear area, and you want to do that for every track that goes across the ear tab until you reach the top of the ear tab. You should be at the point now, where you're ready to close in the area beneath the closure, so you're going to sew from this point to this point and then another track from this point to this point and then the final track is going to go right Under there from point to point for the last weft that goes right beneath the closure, i am going to use a single weft so that it will be very seamless, and i am going to sew from the edge over here all the way around placing the weft And sewing it not up into the hair, but on that narrow edge all the way around and your lace wig made by a sewing machine is ready to cut and style and wear. Thank you so much for joining me. I hope that you have enjoyed how i made this lace wig with my sewing machine and to that viewer who requested that i do so. Thank you so much in no time you're going to be an expert at making your wig on a sewing machine before you leave. Why not subscribe and hit that notification bell so you'll always know when i'm working my magic thanks again for tuning in and please let me know what you think in the comments. I really appreciate it. Take care i'll, see you next time. Bye, you

Comments
simone jennings: hello ms lola ...thanks for this great video ...im so glad im up to see it and gather my materials to get it on the roll ! and happy belated bday ,your an amazing woman w/ great things ahead ! blessings to u and your family and i will hope to chat really soon !
The Magic Wig Maker: I forgot to let viewers know that combs can be added to the crown, nape and sides for a more secure fit. Sorry for the omission!
Jacqueline Haywood: MRS Lola you are so talented I wish I can learn what you do loving it
simone jennings: what kind of thread do you use ? and where can i get it? i wonder will the same thread i use to do the original machine weaves work? they call it cord , but its just strong thread ,anyhow i also want to know where do you get your wig caps also ? ms lola i am so happy ..this was so detailed ! i hope to become a wig warrior and magician like you ,well almost ...you are ms lola the magic wig maker lol
jackey fair: Where are you located? ❤