Diy: Detailed How To Make A Lace Closure Wig | Step By Step 2021| Beginner Friendly
- Posted on 29 January, 2021
- Lace Closure
- By Anonymous
I don’t think i ever posted a closure wig being made so i decided to show y’all how i make my wigs before i start machine making them i hope this video was helpful don’t forget to like comment and tell me what you think ! Trying to be more consistent with uploading so drop in the comment what els y’all would like to see
For all business contact me at [email protected]
Soundcloud
https://soundcloud.com/nunnaa-jahyy/sh...
youtube
https://www.youtube.com/watch?v=VhZCMM...
----------♡ ♡ ♡ ♡ ♡ ♡ ♡ ♡ ♡ ♡ ♡ ♡ ♡ ♡ ♡———————
KEEP UP WITH ME ON ALL SOCIAL MEDIA
Instagram : https://www.instagram.com/_shaniquaaja...
PrettyGirlMinkks Lash Page :https://www.instagram.com/prettygirlmi...
Snapchat : Nunnaa16
Facebook : https://www.facebook.com/shaniquaa.jah...
Twitter :https://twitter.com/_shaniquaajahyy
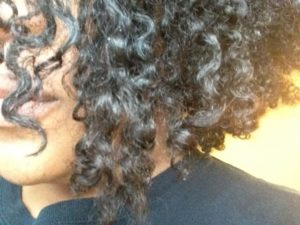
When was the last time, i told you how what's up youtube, welcome back to my channel yeah yeah, what's up youtube, it's your girlfriend and i'm back with another video. So today i'm gon na be showing y'all how i make a wig. This is an updated video because i don't record how i do my wigs anymore, so i felt like hold on. Let me fix the ring light yo, so i felt like this video was needed: okay, because what anyways y'all already bleached in uh, i already bleached the knots already um. I do have a video about that already. If you haven't seen it, it's a video of me bleaching, knots back on my channel, also, i'm gon na be doing an updated version of it so yeah. So, first of all y'all, i already got a safety pin down uh. First, before you jump into this, you want to go ahead and do it an inch apart. I don't know if you guys can see it. Let me pull up close to y'all. So, let's see if you're the focus, okay, okay, so as you can see, i have it hanging off like not even an inch, but i have like a little bit hanging off. This is very important um. This is so that you don't have i have to. I can't break it down to y'all, but just do it anyways yeah. So i have like another little piece hanging off. Some people do an inch some people, don't honestly, i like to do like a half an inch, maybe only because you don't need all of that hanging off there. But when i put on one of my wigs one day, i'm going to show you guys why it's important only because you don't want this part to be here and then you're going to have like two, oh put myself in the eye: bruh. Okay, then you're going to have two lumps. We don't want two lumps on the side of our head um, so basically give it a more seamless, clean, look: okay, that's basically what i was trying to say without seeing it but anyways y'all moving right along once. You do that um. I do like it just a little bit like i said, i'm going to go ahead and pin it down once you got it pinned down we're going to go ahead and braid this out of the way um before you guys ask. This is not my unit, i mean this is not my hair, so i don't know where the hair is from honestly. So, yes for a client, i'm just making the wig for them. Oh for her. You know we're going to go ahead and braid this out of the way until we go ahead and sew okay, so once we got that braided out of the way we can go ahead and make sure everything is seamless and tight on the sides. So i'm just going to go ahead and move this out the way. Okay, once we got that sure - and i don't know okay, then we're gon na go ahead and fix the back pieces, because the back pieces was just to get everything out the way. So now that we have that we're gon na go ahead and throw it back up here, keeping our inches off from right here and then we're going to go ahead and make it seamless on the side. So now i'm going to take it in just pin it down at the top, pin it down at the top. You don't need this here, so we're going to take that one and put this at the top. Okay, then y'all moving forward, we're going to get into sewing so taking my needle it's already prepped and ready to go, take it and fix it up and then we're gon na go ahead, and basically just you know sew this up. So i'm gon na start here boom boom, just like that. Go ahead and open it. This is how i do it. Y'All hold on we're going to open it. I take it like this open it pull it through. Holding this part to make sure it doesn't tangle, because that's freaking annoying go ahead like that, take it and we're going to go ahead and permanently lock that stitch in so we don't have our wigs or frontals or closures flying off. Okay, then we're gon na make sure that this is flat and we're gon na keep going. So this part i might speed up and i'm just gon na keep on going one. Let'S start back as y'all could see. Now i see that i got it to go. All the way here so now it looks clean, sharp it's not too loose, not too tight, but it looks great. I don't know if y'all can see it, but this is how i do my sewing everybody's different, but i like to do mine's close and neat just so that the client here is not all bent up up here and then y'all with. That being said, i'm going to go ahead and move along and do the whole unit. I'M just going to go ahead and wrap it around. So i'm going to go ahead start from here. Go all the way around and i'm going to stop here once i stop here, i'm gon na go ahead and take it up this way, so peace out, okay, y'all, i'm leaving the double wefted. I leave two bundles double left it only because it's a 22 inch dome head, i'm already used to making wigs. So i do two bundles that are going to be double wefted, and this is what i mean by double wefted and then the last bundle will be single, so basically always going to go across start here here and then leave in an inch in between each track. I'M sure you're already familiar with that, if you guys are already starting to make wigs so yeah. This is how i make it easier on myself and then i just go ahead and pin it right here and it makes it easier so, as y'all can see. Starting here and then i'm going to go ahead and end over here hold on when we're done. Let me show you stitch on my wigs and i can't see because the damn ring lights too great, but i'm done doing that and then now i'm just going to keep on going back and forth back and forth back and forth back and forth back and forth And once i get midway through the session well, actually, when i get to the top, i want to come back and show you guys. The finished look so yeah so we're halfway through so now we're just going gon na go ahead and single lift. So i'm just going to keep on going all the way up and making sure i leave a little bit of space right here, because it's very important, so i can go ahead and put like two or three more tracks here before it gets out of space right Here and i don't want it to be lumpy, so i might have to take a track, take a track and just stop here, cut the weft and then go back in come down just so that it can fit here. This part right here is very important. You don't want to over stuff it, because if you over stuff it, then it won't be flat. So yeah i'm going to come back with the finished look and then we're going to get into the styling. Sorry right back um! Oh everyone makes it worse. Is yes, free girl making this wig? I went in and plucked it. I'M gon na do like an individual plucking video, but for now y'all i plucked it um it's giving lightweight scalp or whatever i'm kind of going to go in just a little bit more and pluck some spots. Okay. Moving on now, i'm going to go in with our curacao wax: stick hair care, whatever you call it hope. Y'All can see, i'm going to go ahead and do this side too. Okay: okay, now we're gon na go ahead and we're gon na do each section just like this. I should have been down with this wig y'all, i'm just right. Now, i'm gon na take some clips. I'M using these clips best clips ever in the world like this. These clips every y'all they like got little teeth and - and they close really tight, so we're gon na go ahead and do that and we're just gon na go ahead and put some you don't want too much y'all you put too much. You know messed it up. So make sure you put just enough and we're going to go ahead and flat iron. It i'm not going to go all the way to the end of this and i'm not going to take off the curl root. I'M just doing like an inch flat. Iron type thing, and then i like to do this just to make it more flat. So, as you all can see, let me turn it. Oh we're giving scalpiana too right here, scalpiana or whatever and see now we got it flat. Okay, moving on we're gon na. Do that for every section of the not every section we need wax, but just you know every section you feel like isn't laying down properly so i'm going to go ahead and do it again just a little bit a little bit a little bit a lady okay, Because if you do one too much, it's gon na look really greasy. Let me fix the lens okay, and we don't want that. So, okay, as y'all, can see i'm not taking away from the curl, i'm just doing like an inch and then after that, i'm going to wet it. And it's going to fluff up and it's going to be so pretty and all like. Okay and i'm just going to keep going and keep going. Okay is yes. Okay, now, as y'all can see, the curls is coming back y'all. So this is the finished. Look for this wig um to the finished. Look for this unit, um, i'm just gon na. Let it keep drying and once it gets dry, it's gon na look really pretty um. These are the products that i used on it. I used my noodle head. I'Ve been using this for a while, so this keeps the curls defined and then i use hair mousse from aphro g and i also use nairobi so yeah. These are the products for that and i use. I also used some water with conditioner in it, but y'all. This is a finished. Look. I'M gon na um put some pictures down in the in the um end of this video to show y'all the finished. Look because my client wants baby hairs, but i love the no baby hair. Look now, i'm getting into it. Okay, get into the no baby, hair! Look! Okay! Let me clear the camera for y'all don't mind that garbage can back there we're gon na turn it this way. Okay, then y'all make sure you shop pretty girl mix. You need a wig done. Holla at me: hey, hey, hey, hey, oh anyways y'all! Thanks for watching. I'M gon na end this video, i'm also gon na, add some clips at the end, with baby tears and without baby hairs, so see y'all peace, okay, y'all. So this is the finished look. I went ahead and brushed the edges out to make it more fluffy. So y'all, i try to add the clip of me doing the baby hairs and i freaking lost the freaking clip bro. I have no idea where that went. It might be on my camera, but i'm a check. I know it probably got deleted by accident, but i will do another baby hair tutorial on my next video. If you guys wanted to actually see how i did the baby hairs and what i used and stuff so yeah. Sorry about that y'all baby hair is no baby hairs, i'm more into the no baby hair look, but some people like their baby hairs, so yeah, that's how it looks without the baby, hairs and peace. The only reason you got close to me, i shouldn't let this loneliness get the best you


Comments
johnita haynes: loveeee itt
R're & I: Tamia Robinson Your fb Friend here supporting keep going
Princess Rayah: Lol peep me