Sew Closure For Wig Making On Sewing Machine With Ms. Joy
- Posted on 24 February, 2016
- Lace Closure
- By Anonymous
How to attach a closure piece to make a full wig via sewing machine. I'm also answering your questions about wig making. Like, share, and subscribe!
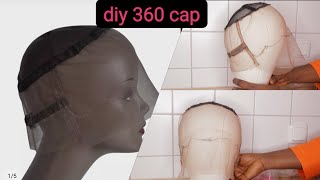
Hey youtube: joy williams here: um answering a few questions about the wig making i'm in the process of making another one for a client, and so i got a lot of questions on the last video about the closure. So i'm at the closure part um for those of you that have not seen part one. Please go and look at that. Video and it'll give you a lot of information as far as how to lay the tracks for those of you that ask. I do actually cut the wefts instead of folding them over because going through with the sewing machine will reinforce that weft. So you don't have to have the bulkiness, because i like it to lay really really flat on the side. So that answers that question. But if you can see um, i am at i'm using some curly hair and i'm at the part in which i'm getting ready to place the closure. I got to go in there and kind of clean up some of those lines, but if you can kind of see the type of wig cap that i use, i do not use a dome cap. I actually use a cap that is made for wig making. This actually comes like this all closed in and because of the measurements in the circumference of the client's head. I actually measure with the tape measure her measurements and match those measurements onto the wig. So because of that i know i need about two and a half inches of space in order to attach the closure so i'll attach the closure. Excuse me in between there one of the ways that i do actually sew the closure on via sewing machine. You can see just a regular lace closure and i like to kinda, get the excess hair out of my way so i'll clip it down, because of course this is the middle part of the closure, and i won't be sewing that and then i take my measurements Here this is the wig cap that has the adjustable straps so over time these do tend to stretch out not out of proportion because it's made for wig caps, but it does tend to stretch out, and so these help to keep that keep that intact and then, Once i go in those are different, imperfections and stuff i'll take pictures once i'm finished, but once i go in i go in and kind of clean this this part of it up, but it is ventilated. You can see that so it's really it's hot in texas, and so you want your clients to be as comfortable and yourself to be as comfortable as possible, so um the tracks are laid down that way in order for ventilation. So no the way that i do this and i'll show you in a second. The other part of this is that i'll take this section here, and so i'm literally just measuring the closure onto here now from there i'll. Take that to my sewing machine and sew down one side and then sew it on the other side and then tack the middle. So i actually do sew this up the closures down with the sewing machine and um. If i can figure out how to get my camera to video record me, while i do that i'll, definitely let you guys see how i how i actually do it, but just trying to answer a few questions that i've been getting an email and on comments and Things like that, so i will be back with the other part of this okay, so try to arrange the camera for you to kind of see what i'm doing as best as i could do so give me a break when i get a chance i'll get a Get the other things that i need, but just to show you how i'm laying the track. I'Ve split the the wig in half it comes together in a full uh, wig cap. I cut this down the middle, so i can adjust the closure and the size of this actual circumference. The reason why i do this so i can make sure that whatever circumference i've measured her head, which is you know around all the way around the side. I make sure that i have that same circumference in the wig that way when she puts it on it's, not ill-fitted. I have this clipped in. If you can see, i also take one little line. Most of the time is that reinforced section of the lace closure and i just separate that out - that's the straight line that i actually will sew on. If you can see that, but that's the straight line that i actually will sew on. So it's just the outside corner of the lace, um closure, but it's just that straight line. I line that up with the line here for aesthetic purposes for accuracy, a bunch of different reasons. Why i do this, but i've just found that this is the best way that works for me. Hopefully you get me on the sewing machine. One thing i will tell you do not be in a rush while you're trying to do this. This takes patience. This takes accuracy. This takes time when i'm making a wig for a client. I normally tell them about two to three weeks turnaround time, just because i have other clients and other people that i'm servicing, and i really want to make sure that i give the uh the wig the accuracy basically to be able to get that done. Until i have a factor and i'm mass producing, i'm doing all this by hand, and so i want to make sure that people are getting what they're paying for so no, i do not rush my process. Okay, now that i'm getting to, if you can see that now that i'm getting to the back of the closure, i stop it right there right when it starts to curve. I stop it, and then i go to the other side. So just so, you can see. What'S on so far, lift it up, pull it off and so that you can see i've successfully sewed down this one side again, i'm making a straight line now i need to go in and fix that little section, but i'm making a straight line right along this Side of that reinforced part of the lace and i'll stop right as it starts to hit that curvature, then i'll go to the other side and i'll do the same thing over here. So essentially, when i'm done, it'll look something to the effect of this okay and i'm pausing, so that i'm not aimlessly talking because it irritates me when i see people doing that on youtube into um. Show you again the straight line. The reinforced part of the lace closure that this will be on the other side of the stitch. This will be where i stitch line that up with this section of the wig cap, giving myself a couple extra inches of space to allow for to match for the circumference of the client's head. Lay that on there sew a straight line again, don't be in a rush. Only go a couple centimeters at a time make sure that you're accurate there's my stitch. Yes, it's good. I can't even find it there you go that way. You can see the stitch in there a straight line, so now i've got two straight lines: one going this way, one going this way. Of course you cut this little lip off once you're complete. Now i have this section of the closure that i need to go to. I need to sew down, so i just make sure that i'm i've connected that to this part of the wig cap, which is why i do not uh cut the wig cap completely off i'll. Show you what the wig cap looks like before i get started. That way, you can see the reason why i do it the way that i do it. This is one of the wig caps that i use. This is the week that i use it is for wig making. Specifically, this part is plastic. Of course, those come out. Um, i actually cut them out as i go up, so instead of cutting all these panels out to keep some sense of straightness of the panels, i literally cut a few inches at a time. Yes, it's painstaking. If you want to try to cut all of it at the same time, be my guest, what i will tell you is these panels move. So if you cut all all the plastic out at the same time, you don't get the proper. Spacing you don't get the proper spacing you will readjust the size of your wig, so i've learned again accurate way to do. This is to just cut a few inches of the plastic in the panels. At a time that way, you keep the proper spacing and you are more accurate, so you can do this one time and you're done. This is what the top of that wig cap looks. Like i said when i get to the closure part. I cut this down. This seam and then i adjust that this is a small to medium size which helps with adjusting when you're working with clients with small to medium heads. They do come in large as well. These have the adjustable straps, and so this is the type of wig cap that i use. These are ordered online they're, specifically for wig, making you've got ear tabs over here. You got a back panel right here. Let'S see underneath that's the lines for the adjustable straps to go right in there, but yeah guys just trying to answer the questions that you guys have posed to me. I want to make sure that i you didn't think i was ignoring you just been busy. So back to our wig reason why i don't cut all this off because, again, you think oh there's a wig cap boom closure goes right here, cut all that out. So all this around easy, not when you're thinking about accuracy and you're actually making a wig for someone's head now, if you're, just making a generic one yeah absolutely and whoever it fits it fits. But when you're thinking about accuracy and someone's paying you 500 or so 600 800 thousand dollars, four wig, you wan na make sure it's accurate, so i've given myself some little space, i've created more inches um, giving myself another about another two and a half inches here By just doing that and that matches up with the circumference of my client's head now, i'm just going to match this bottom up and again, another straight line. So you do one straight line this way once you're aligned that way and then once you're lying across and that's how you connect your closure to the wig. I add some pictures once i'm finished and then you'll be able to see the after thanks. You


Comments
MrsRuthie J: Love this... May question is... Do you sew on the elastic part or skip it
simply cynthia: Hi Joy thanks for replying my question, I have tried using my machine to do my first wig and it didn't fit my head .
Nomar Hair: Your Amazing... Your probably the best one to actually explain it right. Yas on Mass producing
simply cynthia: hello Joy is been nice watching this video thanks is been a good help. I have a question Joy. what machine should you buy to start with.
BAHBEE MILONAKIS: where do you get those wig caps from?
mpressions4u: Wait! IS that a Brothers JX2517 machine? I have the same one
MC Lala: o wow!!!!! this is new to me and amazing.. how often you give classes? and where?
Diamond Brazile: I wish you would have a class
Boss Babe Wigs: hey luv, can you show how to add the measurements of the client to the wig cap?
LLorenzo: Are you using a zig zag