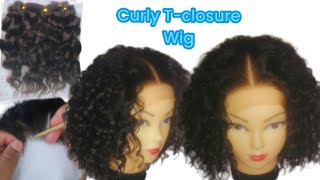
4 Wig Making Tips You Should Know| How To Make A Professional Wig
- Posted on 13 September, 2018
- Lace Closure
- By Anonymous
In this video I will show you 4 important tips you need to know when it comes to making custom wigs.
1. How to use a 4x4 closure as a bang
2. How to secure your wefts/tracks from beginning to end
3. How to sew tracks faster
4. How to do a fringe cut bang
LEARN HOW TO MAKE WIGS USING YOUR SEWING MACHINE, LACE CLOSURES & MORE!
WIG SALE! CURRENTLY GET 25% OFF
www.beautycutright.com/shop-wigs
==================================================================
☎️CONTACT:
For Business + Reviews + Sponsorships +Inquiries
SOCIAL PLATFORMS:
WEBSITE: www.beautycutright.com
FASHION CHANNEL: https://goo.gl/eUZdmN
FITNESS CHANNEL: https://goo.gl/YGfX8j
INSTAGRAM: https://goo.gl/Cc2sgH
FACEBOOK: https://goo.gl/6wFXCx
TWITTER: https://goo.gl/3FIIOL
==================================================================
Music Provided By:
All right, so I'm working on a client's, wig, a weird quarter. It'S going to be for this wig. I have two bundles a 22 and a 20-inch, and then I have a closure, and what this video is going to be about is how you can apply lace closures, especially four by four, to create a better bang for your wigs. So this is a cat. This is a dome mesh dome cap. This is going to be hand sewn or hand constructed, because I don't want to really do it with the sewing machine and for some of Harry's and I work faster by hand. But I work even faster by sewing machine, but just when I'm using these and for how I want it to be. Usually, this type of closure is right, dead center, so I would be sewing all the way around in a circular aspect, all the way up until here. So then I would apply the the lace closure at the very middle top of the head. I do have a video on that I'll make sure I'll link that down below. So you guys can see that. But in this case, because this is a free part - closure, meaning there's no parting in this - everything is actually falling to the back. So this person with the excess you see lace there, the excess lace with baby hairs will all fall to the back, and then they can choose how they want to do the the party they can create the partying themselves or you can place it from left or Right side, in this case, I am going to place it dead center, with the hair already falling towards the front to create the bang, and then I'm going to take some aspects of the back area of it. Engine kind of like molded, to cover all the way around, so this is just another idea that you can do in order to have a better switz, wispy kind of bang thing instead of having the bangs so heavy on your client. This is a good amount of hair to give a better bang in the front. So I'm going to use the closure actually attach it first towards the front and then I'm going to so the rest of the wefts down. So that's how I'm going to do it. So so this down, I'm gon na leave this lace here, because it's no big deal, I don't have to cut it at all, and this is exactly how I'm going to apply this closure for a banged. Wig anytime you're sewing a closure or even tracks down by hand just like if you were using a sewing machine. If you are familiar with back stitching, you have to go back and then go back forward in order to secure the stitch. Now, when it comes to hand sewing usually what a person will do is they will not at the very end of the track or at the very end or starting point of the closure? I would not suggest you do that. I would suggest once you get to the end go back like I did. As you can see, my thread is a little bit further back, so I went backwards and then not in that area. So I actually wrap the thread around a couple of times on the needle and then I pull, and this will create a knot and if, for any reason, you can't pull that knot close or shut, you can just go ahead. Take what you have available knot it from here and then cut this off, so it's better to knock things off a little bit further back then right at the edge. It makes your wig constructions a lot cleaner, all right! So to reiterate that here's me doing that technique on a track truck here, so the first thing that I do is, I make sure I pin in the location that I wanted to go. So I have it pinned here. I also have it pinned in the center and to the other end right here, which is I'm going to show you from beginning to end exactly how I sew this down. So the starting point for this is, I will take this pin out and place it up at the top, get it out of my way and then I am going to take my needle inside of the cap. I'M going to put it through the track. It needs to go through the track because it's a little bit more stable, I'm going to open my thread up and then I'm going to make sure I could put the needle between the two between the loop of the thread and then I'm going to go through The cap and the weft again and then I'm going to make sure that's done really nice and secure. So that's my starting point now I'll just continue to so this is actually in the rest of the training videos of the technique that I use to sew, and this is a good way to do it if you want to sew pretty fast. If, for any reason, you get to a point where you don't have enough thread left take it to you got a nice short amount to work with and wherever that point is you're just going to kind of squeeze the cap and the track and just go through The cap and the weft at the same time, maybe about three times after that cut at the needle, take this amount and just tie it once or not at once, and then cut the excess. Now I have my needle prepped again and I'm getting ready to start all over again and since it's already not it from the last amount of thread that I had. I can just continue going through the cap and around the track and put it through the loop of the knot of thread and just continue sewing from there, so I'm going through the cap, but around the track. So I don't go through the track or the weft of the hair. When I sew I just go around it, that's another way that you could be able to sew a little bit faster too, because it's a little it's a little bit of work, trying to get the needle through the weft of the hair as you're sewing, and that Takes away from your timing to get it done alright, so here we are at the end of the weft, so I'm about to be at the end of it, and so I'm going to show you what I do when I get to the end. I still continue to go through the cap, but around the weft all the way, as close as I can to the end and then I'll take the pin out. So, as you can see here it it's loose loose, so you don't want that looseness. So what I do is I take my thread and I pull so. I can bring my finger underneath the cap and then I'm going to go through the cap and actually through the netting of the cap and through the weft loop. This thread around and tighten do that one more time in that area as best you can loop around and then tighten and then letting that go I'll continue the rest of the way back, maybe about two or three stitches same technique and then again pulling and lifting And then I'm going to not in that area, so there's two ways to not: if you have enough thread you'll put this through and then take the thread and wrap around the needle. If you don't, you can just continue going in a nice looped circle through the cap and through the weft, and you should be done. This should be not it insecure again, go ahead and cut at the needle, take the excess thread and tie it. Maybe one or two times and you're done at this point, I don't cut the weft. I only cut it after I have sewn it down and then I can start all over again. So another tip: don't cut your weft just work with it until you get to the end and then you can cut that cuts down on time and it also cuts down on shedding as well, because now you're cutting it at a point where you know it's secure. All right, so here we are, it's completely installed. All the west's are completely installed. All of the tracks are in everything is done, so this is the front of the wig. This is the bank or ssin of the wig, including some parts of what we have on the sides will be included in that, but because this closure is all towards the front of the wig, that's not what I want to have happen. I actually want to use this as a center part, but to make it a little bit easier to style the bangs, so the bang is not so heavy. So what I'm going to do is I'm going to take some water spray bottle and I'm gon na spray. The closure itself with water, you want to try and try to saturate it. That'S the idea in this give an area, and I'm gon na use a brush to mold the center of this wig. So not only will you have a better bang. You'Ll also have the front of the way the top of the wig will look realistic, like the top will look like actual scalp, so we're just gon na use some water. No, this all around. It'S really what I'm doing is just trying to take some aspects of the hair from the closure and cover the back in and then kind of set the front so that it lays still nice and flat down cool drier just to dry it. I switch the wig on to a mannequin head with the face, because this actually makes styling a lot easier. I don't think it's best to style your wigs on canvas heads. What I mean these cuz. This is better to make the wigs with and to make links units and things like that, but when you are ready to style a wig for a client, it's best to use one of these that actually has a face to it, so that you are able to Kind of gauge, where things are going to go as far as the shape of the wig, whether it's curly or straight wigs, and especially when it's something that is going to be a banged wig. So this is going to be a bang wig, and my first most important thing I would tell you to do - is make sure you do cut the bangs very long and then not only that once you're ready to confirm pictures when it comes down to it. You'Ll just kind of like pull it back just a little bit just to show where it would be, but it's always best to cut the bangs long. So it's okay, if Culver's the mannequins eyes, so no no big deal with that, but because the most of the bang is the closure piece. So I will be cutting the cap completely off, but I won't do that and will not the cap off, but the area where the closure is I'm going to cut that off, but because the closure is already set to fall forward and it's a nice like thickness Where it's not too thick - and it's not too thin - I'm just going to just take that and cut that. So I'm going to find where the hair really is. As far as the closure is concerned, and the hair that is wefted, I'm going to make sure that's out of the way and only focus on the closure part that's falling forward in front of it, and I am going to cut that part first, it's all done. The closure is actually set up towards the front. You can actually see the top of it looks like a surf. You know it looks professional and it looks good. This wig was completely sewn, so handsome tracks or weft whatever you want to call it and the closure. Instead of it being in the top Center, it's actually towards the front because of how the closure actually lays. So that's really good, because it's a good enough amount of hair to give you some body or you know it's - it's got body to it. It'S not stiff. It'S not too heavy and it's definitely not too thin perfect length. Have it to cover the eyes it's as simple as your client pulling it forward or pulling it back to adjust the length and how it's going to look on their head. So that's how you really want to cut things. You do want to make sure that this is pulled forward very forward as much as you possibly can and then allow them to adjust how long they want it based off you cutting it right at the eye level of your mannequin head so yep. This is how I do most of my clients wigs. If not, I usually do them by some machine, but this is a good way to use a closure for cost efficiency and for professionalism.


Comments
Wannie Jeffery: That video was AWESOME!!! I got so many useful tips!!! Thanks so much!! ❤️❤️❤️
ItsNurseNeish: Awesome, awesome awesome video ....I am a beginner wig maker and this video was very helpful with the know process, instead of having the ends look bulky☺
Linda Hall: You speak so well and clear!!! Thanks much and your instructions are prefect!
Arleen’s favorite Bryant: You should do a video with this method using a sewing machine to show how easy or difficult it is because by hand it seems easy but I cannot sew by hand they cramp up on me so I have to use a machine the class is very informative excellent I enjoyed it Watch it 2 times already
Pray Slay Pray: It’s unfortunate that your wig making classes increases in price by over 100* what it used to be. I had high hopes of joining an online wig making course and yours was priced right!!
C Ellis: This is gorgeous......where do you get the the hair from, it looks of very good quality, and how many wefts did you use on this wig please..thanks x
Only good things 4 us: Thank you so much! very good explanation. hugs from Paris
boldgolddreads: What’s happens if the wig doesn’t fit on your head. How do u stretch the wig?
Trendytinz: Your illustration is so easy and simple am sure going to do like you did. Learning from Nigeria thanks
D Knigh: Good job!
Shedika: I never know if I should sew from end to end because I never see people do but then at the end my wig has so many empty spots around the perimeter...
Colleen Scholl: EXCELLENT!!!!!!!!!!!
Sandra Walker: When cutting the bang did you twist the hair and then cut thank you sis
Irene Ogbewi: please is it good if I use water wave and deep wave closure for wig?
Shandia Thomas: great video
Leticia C: Beautiful Cutright
Bosslady: Where did you get the styling head from, the wig head with the makeup on it?
Mel60 Sumerose: Wao wao was very informative
Sori Yazz: Do you have your clients measure their head??
_servinlooks: Nice!
Avianca G: U did this sis
Tisha Duncan: Very Nice
Ruby Chew: How to remove a frontal: https://www.youtube.com/watch?v=ixVDNCNmjyA
Laticia Saunders: ❤
Fashionova Divas: Hi how you ive always wanted to learn how to make my own wigs and for business please contact me on how we can go about it I want to learn please
stacy longwebb: Iloveit