Buss Down Middle Part 5X5 Machine Made Closure Wig | Beauty Supply Hair | Aqua_Diva
- Posted on 03 June, 2022
- Lace Closure
- By Anonymous
#beginnerfriendly #closurewig #bussdown
Hey Divas
Todays video is a beginner friendly wig making tutorial using a sewing machine. I created this unit using a 5X5 closure from Amazon and a pack of beauty supply hair. I had fun making this video and unit and I hope you guys enjoy. Please don't forget to like, comment, share and subscribe.
Sign up for Influenster using my link:
MY MOST POPULAR/ VIEWED VIDEO (VIRAL VIDEO):
—————————————————————————————
Brassy to Ashy: https://youtu.be/nyESaxeTAdY
CATCH UP ON SOME OF MY VIDEOS:
—————————————————————
Laundry Routine: https://youtu.be/d9YCKf7pS-E
My Skincare Routine: https://youtu.be/ahIiUPMlhrs
Amazon Unboxing: https://youtu.be/AaKcVQyeDKw
How I Detangle My Natural Hair: https://youtu.be/RUm-Bnw33Y0
Everyday Makeup: https://youtu.be/cJf0hvFke_c
Colored Roots Trend: https://youtu.be/Po5SWxjuFK8
Savage X Fenty Try-on Haul: https://youtu.be/X4uolgMbwgs
No More Messy Lace: https://youtu.be/w-iabPJIaNg
Black to Burgundy no bleach: https://youtu.be/Yh1aCAFggnA
Vlogmas Day 13: https://youtu.be/Cbn9E7sVdqI
Vlogmas Day 8: https://youtu.be/g9CgqgXqARI
Vlogmas Day 7: https://youtu.be/4H5fchA_ye8
Vlogmas Day 6: https://youtu.be/9wl_yRaVkqY
Vlogmas Day 3: https://youtu.be/AjsDuWas_3E
Vlogmas Day 1: https://youtu.be/qyc87-c9mH8
Vlogmas Day 2: https://youtu.be/WWY-SS41MPw
How to cut a bob: https://youtu.be/y8Mv9IaQDzw
Fall Makeup: https://youtu.be/zb5FdHO4zEw
How to make a lace closure wig: https://youtu.be/OJ9U2p71QrA
Shein Try on Haul: https://youtu.be/mYaq9QIJyqA
GRWM: https://youtu.be/KHVlp6s-OFg
Reinstalling my wig using the new Bold Hold: https://youtu.be/Za8AcbsP-L4
Laundry Folding Motivation: https://youtu.be/_mE87elsa5E
How to tone brassy yellow hair at home: Aqua_diva https://youtu.be/4cDxpE_9Eeg
Wash day routine after protective styling: Aqua_diva https://youtu.be/tJvcx7ufjbQ
Taking Down My 10 Weeks Old Box Braids: Aqua_diva https://youtu.be/eX7N-XxdI_k
Javy Micodose Coffee: Aqua_diva https://youtu.be/RWLm2oGeGJU
Weekly Laundry Routine 2021: Aqua_diva https://youtu.be/0kE-nkKDkck
How To: From Black to Honey Blonde With Highlights: Aqua_diva https://youtu.be/lnDLWcMrilk
How to Dye Your Lace For Beginners: Aqua_diva https://youtu.be/QRvDz395TJs
How To: Get White Hair: Aqua_diva https://youtu.be/cq0ZtBla0C0
How to style Braids using a head wrap: https://youtu.be/OB-5rAE9ehY
*DETAILED* GO-TO MAKEUP FOR WOC: https://youtu.be/Wt1pLece36M
Deep Cleaning Living Room: https://youtu.be/vWqK5QIPshk
Laundry Routine 2021: https://youtu.be/ff6KnJXOnuc
Let’s Recreate Nicki Minaj Hot Pink Hair: https://youtu.be/NxiwCnnFHUY
My Daughter is getting her eyes checked: Aqua_diva https://youtu.be/1Hkzo1WIWy0
Come With Me To Get My Hair Braided: https://youtu.be/56H9-1M9Evk
Kids Spring & Summer Clothing Haul: https://youtu.be/J6Jjm7F27aI
Deep clean with me: https://youtu.be/wI0A-HIejUk
Huge Tj maxx haul: https://youtu.be/wlGI9awQSxw
Viral blush technique: https://youtu.be/iw4FcmuuITg
Eyebrow Tutorial: https://youtu.be/nrIWORbEr98
How to bleach and tone knots https://youtu.be/BjKcvkCiLmA
Winter Wash Day Routine: https://youtu.be/lnrYdlPQ_fw
Kill the Brass: https://youtu.be/H7l6YOeIyL0
Fenty Beauty Soft Matte Powder Foundation: https://youtu.be/z05tJLZwk70
Life Update: https://youtu.be/Vv_61gsM70Q
Best lace glue: https://youtu.be/2AcyiqdnPxg
Black to honey blonde: https://youtu.be/EAWuiy5II7U
Chloe Ting’s Abs Challenge: https://youtu.be/c_Yl0y1BMdA
Black to Blonde: https://youtu.be/XFY8Alenlk4
B.O.M.B: https://youtu.be/hTeFZsL6DP8
Battle of the holding sprays: https://youtu.be/7hXO-otwXwE
Wash day routine: https://youtu.be/jeRRg_G9_dc
Taking down old cornrows: https://youtu.be/WdXOLi5NSRYk
Steam fish and okra: https://youtu.be/e3-Fsv2Om1Y
Dye your unit jet black: https://youtu.be/9Nqvr_w6Oz0
Wig maintenance: https://youtu.be/T-zUzIpa1-k
Baby’s first photo shoot: https://youtu.be/OcY7dQpS2yk
Clean with me: https://youtu.be/2RvSM5cO6KM
What’s in my hospital bag: https://youtu.be/zbe4IFtmmTc
Better than Got2b glued: https://youtu.be/K-Uu3a_UzfQ
Supplies used:
-----------------------
Measuring Tape
Thread
Needle
Closure
Beauty Supply hair
Mesh Dome Cap
Canvas Head
Tripod
Sewing Machine
BUSINESS:
For business inquiries contact
CONNECT WITH ME:
———————————-
Facebook: https://www.facebook.com/cadien.beckfo...
Facedbook Hair Page: https://www.facebook.com/Cadyb-3263360...
Instagram: https://instagram.com/aqua_divalicious...
Instagram Hair Page: https://instagram.com/aqua_divas_beaut...
Snapchat: cadybec
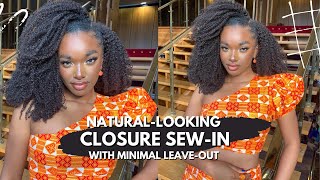
Hey divas kaden here welcome back to my channel if you're new welcome in today's video, i'm going to show you how i made this closure wig using some bundles from the beauty, supply store and a closure from amazon. So this is like a beauty on a budget. It'S super cheap and simple, so this unit is going to be a machine machine made unit. So first things first you're going to need to go again, go ahead and get your supplies so you're going to need your hair. So it's the bundles, the closure, your needle your thread and, if you're going to be using a sewing machine, you're going to need your sewing machine, i'm gon na go ahead and measure do the measurement for the wig cap for the wig, because this is for a Client, so i'm using a 20 a dome, a dome head which is 20 inches, so i'm going to go ahead and measure it out and then do the the markings to start doing my markings. I like to go ahead and do if i'm using a frontal or a closure, wish, whichever i like to go ahead and do the that marking first. So in this case i'm using a closure. So i'm going to go ahead and line the closure up before doing the markings to get the perfect marking. You want to ensure that your closure is laying flat, just like this wow, hmm, if you're not good with judgment, and you want to have like even spaces between each weft that you sew down. You want to go ahead and use a tape measure. I usually use like three quarters to an inch wide between each weft or depending on the amount of bundles that i'll be using, because i usually double my tracks, and these are the bundles that i'll be using, and this is from the beauty supply store. As i said before and i'll be using a closure from amazon, this was sent to be back to me by my client, and this is my daughter, showing you guys her little artwork because she loves to draw right here. I'M showing you a little clip of me. Doubling the wefts when you're, doubling your weft, you do not want both weft to be on top of each other. You want them to be slightly below i'm going to show you when i'm done sewing this so that it's flat, you want your wig flat. You do not want it bulky after doubling the wefts. This is how flat they should look. This is me, sewing down my first row and it is key whenever you're sewing your track at the beginning and at the end, to do what, like a reverse stitch. So you want to do that reverse stitch, because you want to knot the thread. If you do not knot the thread the wig can unravel, and you don't want that bye whenever you're sewing your bundles down. Are your tracks down? You do not want to stretch the wig cap, because that will it will break your wig, it will break hairstyle, and this is how flat and neat you want all your stitches to be no lumps no bumps, as you can see, it's perfect. So after sewing down your last track, this is how your wig should look. You should not sew on that that line that you marked off for the closure. Hmm. This is how you know. You'Ve done a good job, because the closure fits perfect. Yes, i do until the closure - and i use a c shaped needle - and these are the only stitches that i'll be using my hand to make to do, because all the rest of the wig was mushy made. The thread that i use is some basic thread that i got from the beauty supply store, as you can see right there beside the wig, it's pretty simple to sew it down. All i did was some basic stitches and at the end, and at the beginning i like to knot my thread just to make it secure. This is me, showing you how i do my stitches without speeding it up and it's pretty basic simple that is before i knock the thread at the end i like to do something. I call a reverse stitch, so i go a little backwards before knotting the thread to avoid getting like that little bump at the end of the closure to ensure that i get extra security after securing after making that knot, i like to cut and leave a little Thread so that i can form a loop side and then cut the excess. Now i'm going to go ahead and cut off that excess cap underneath the closure and when you're cutting off that cap, you want to ensure that you cut, as you want to cut close as possible to the stitching, but not the stitches, because you don't want the Wig to unravel and you you want to cut close, but not too close, wow, oh wow, this turns out perfect. It is definitely a bust on middle part, and here you go guys this is it look at how flat that closure looks. The the wig has no lumps or bumps it's smooth, it's nice. This is really a wig on a budget, because these are some beauty supply here. The the hair is from the beautiful supply store and the closures from amazon. Thank you guys, so so much for watching. Don'T forget to go ahead like comment, share and subscribe, and if you're new, thank you for tuning in bye, you


Comments
Brinevercared 2016: I would pay for this wig …how much ?