Detailed How To Make A Lace Closure Wig Tutorial | Beginner Friendly
- Posted on 04 May, 2020
- Lace Closure
- By Anonymous
DETAILED HOW TO MAKE A LACE CLOSURE WIG TUTORIAL | BEGINNER FRIENDLY
Hi Friends,
This is a detailed how to make a lace closure wig video. It’s super beginner friendly, I tried to be as detailed as possible so as to make the video beginner friendly.
THINGS YOU’LL NEED
- manequin head and stand
- Bundles (im using yyong brazilian bodywave hair, three 26inch and a 4 x 4 closure)
link to hair I used (https://www.aliexpress.com/item/328588...)
- Thread
- curved needles
- Scissors
- Dome Cap (mesh caps are the only ones I use now, but I learned how to make wigs on spandex.. it’s all about preference)
- T Pins
- Elastic band
- Super glue or any weft sealant you have (fray check is the most common weft sealant and you can get this on amazon or ebay)
NOTE: Most of the items I used, I got them on amazon
If this is your first time making a wig, please take your time because the process can be tiring. The first time I made a wig, it took me a couple of days to finish it. I explained in details step by step, what you need to know. once you perferct these steps you can decide to make your wigs your own way. As long as the wig fits, is secure, and lays flat The stitches do not have to be perfect to the eye except you are making the wig to sell then you need to do everything clean and precise.. put up a series on Netflix, also make provisions for some snacks and drink while you make that wig.
NOTE...If you are making your wig for an event and this is your first time making a wig, please plan ahead, try and give yourself ample time, preferably 3-4 days before the event to make the wig.
For any business enquiries, please email me ([email protected])
Please subscribe here for free: https://www.youtube.com/channel/UC1tG...
Social media links
facebook - https://www.facebook.com/tamaraun.agua...
Instagram - https://www.instagram.com/tamara_agua/...
snapchat - preye09
#laceclosurewig #laceclosurewigtutorial #yyonghair #aliexpresshair #howtomakelaceclosurewig #yyongbrazillianbodywavehair
song
Title: Harmony by Ikson
Genre and Mood: Dance & Electronic + Bright
food for thought
“The way to get started is to quit talking and begin doing.” – Walt Disney
You guys are absolutely amazing for reading till the end, I hope you find this really helpful. Please guys help to grow this channel by subscribing. THANK YOU.
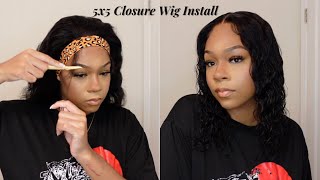
Hello, everybody welcome back to my channel today I'll, be showing you how I construct my lace closure week. I tried as much as possible to explain everything in detail, so the video can be beginner-friendly because of how long the video is already I'll. Just jump right into the video I'll be using my wire Brazilian body wave hair 326 inch bundles and 4x4 20 inch closure. The first thing I do usually is to go ahead and wash the hair, because I don't know what the hair has been so to make sure that the hair is in perfect condition before using it. I wash it first to wash the hair I'll be using Tresemme, shampoo and conditioner. What I do is fill up the sink halfway then pouring some shampoo into the water and then shake it, so it lathers, and then I start washing the bundles and closure one after the other by running my fingers through. Can you guys see how that see the water is? This is to show how dirty the hair is straight from the vendor's, and this is the exact reason why I try to wash my hair before using it, because you never can tell the states or the condition of the hair, even when it is coming straight from The vendor's after shampooing I drain out the dirty water fill in the sink again with clean water and then pour in a generous amount of conditioner. Then I place the bundles and the closure in the water and let it sit for about 15 minutes, after which, and without the conditioner and let the hair air dry. This is how much shedding I got after washing the hair now to make the leak you'll need sewing thread, sewing needles, see pins, a doll, makeup, mannequin head and stand a pair of scissors white tooth comb and rat tail comb and superglue I'll explain the need for The superglue later, the first thing to do is to thread your needle and make sure that the ends of the thread is knotted properly. But if you don't know how to knot your thread, all you need to do is pack the ends of the thread severally on the tip of the needle then pull out a needle and your thread opennotes head. The next thing you want to do is figure out the front and back of the don't cap before placing it on the mannequin head and while placing it on the mannequin head, you want to make sure that the dome cap is properly placed on the mannequin head. Once that's done, go ahead and place the closure on the dome cap make sure it's at the middle of the dome cap also make sure you pull out the closure about half an inch from the cup before placing the tee pins to hold it down. Also ensure that the closure is leaned very flat at the back as well as the sides. This process might actually take a while or it's okay, because once the closure is properly placed on the dome cap, it would be easy to sew it down and the week won't look weird in the end. After pinning down the closure, you wrap the closure away from the rest of the week up and then you start sewing the closure to the don't I like to start from the middle and so all the way down to either sides of the closure. What I do is put the needle into the we cup and then through the closure, then pull out the needle and place the middle in between the threads to secure the first stitch, and then I continue so mean till I get to the end. When you get to the elastic band, you want to make sure that you don't put the needle through the elastic band. Instead, you put the needle through the lace on top the elastic plan and then for the final stitch. You wrap the needle around the thread severally before pulling out the needle to secure it. I did the same thing for the other side. Okay, guys, I went ahead off-camera to draw out lines on the dog cup. So basically the outline is an easy team. Pro beginners and it kind of gives you an idea or makes it easier for you to know exactly where to place your bundles while sewing it down. If you don't understand what I'm talking about, you can pause this part of the video and take a closer look at what I did before you continue watching the video moving forward. You start sewing the west along the outlines and since the first track is on the elastic band, try not to sew through the pant would sew through the leaves above the band. Like I mentioned earlier to secure the weft, you put the middle through the lease and then into the weft, pull out the needle and place the needle between the thread and then pull the thread. So you do this again, but this time after putting the needle into the weft, you walk the needle severally with the thread and pull out the needle. Once the works is secured, you can start putting the needle under the west's value, so you only put the needle into the weft anytime. You want to secure the words once you get to the end of the track. You want to make sure the weft is secure. So, instead of going under the weft with the needle you put a needle into the weft, like I mentioned earlier, wrap the thread around the needle severally pull out the needle, and then you cut the thread, some distance away from the weft and knot. The thread about three to four times to make sure the weft is secure before cutting off the remaining thread, and then you call off the webs and go in with your super glue to seal the ends of the weft. So basically, some people do not like to cut the weft for obvious reasons. Personally, I did not like to cut the weft each time I made a week in the past, but I realized that the weeks that I'm meeting then they're not lay as flat as I wanted them to lay. So I started cutting my wife's, for I always make sure to go in with a wet sealant to seal the ends of the weft to prevent the hair from shedding. So this is what happens when you don't seal the ends compared to when you seal the ends. That is, you can use anywhere sealants that you have the most common one is called free check. I think, and you can get it on Amazon or Ebay, but in this video I'm using superglue so just keep sewing the weft along the outlines or the truck lines, as you can see, while you're repeating all the steps I mentioned earlier on each track. When you get close to the closure this time around, instead of sewing directly on the weak hub, you saw the weft to the closure that way, there's no space between the closure and the weft and the weak can look realistic after so in the last track. I realized the weft was too long to fit and I didn't want to cut the weft, so I flipped over the weft and sewed the Romanian waves directly on the weak Hawk. You don't have to do this. If it happens to you, you can just cut off the weft and try and sew it in somewhere at the back of the week, once you're done sewing in the bundles, you flip the wig over and cut off the weaker plane underneath the closure. At this point, I'm trying to attach the elastic bands to the week and to be honest with you guys, this process can sometimes be a hit or miss situation for me, but super safe. I always cut the elastic band to about six to seven inches long and sew it to the week from one end of the closure to the other. If you're struggling at this point, I will advise that you start out with a longer length and gradually work your way to the length that is comfortable for you, because if the elastic band is too tight, it can cause headaches and discomfort and if it's too loose Well, your guess is as good as mine so guys. I went ahead off-camera to lock the lace, closure and customize the week to what I want. If you guys want to see a video on how I customize my weeks, then let me know in the comment section below and I'll also list the items that I used and possibly leave links to these items in the description box below alright guys, don't forget to Like this video and share this video, if it was helpful and don't forget to subscribe to my channel, if you haven't subscribed already and turn on your post notifications, so you don't miss out on any of my future uploads. I hope to see you guys in my next video bye


Comments
Missy B: Superb tutorial, you make it possible for anyone to do this ❤️
linda Kyereme: Best tutorial ever, very detailed and also love your soft voice.
Her Royal Hair Extensions: Beautiful
Hope Osamede Okoro: Nice hair very beautiful, you did well
Chantelle Modisane: This is the best tutorial ever
Aisha Ngada: I really liked this video and you speak so eloquently. love it
Edna Goodluck: Good effort, I really what you are doing, but this is my first time to watch your video. Keep it up
Daniel Agua: Really liked this and I'm a guy so you can imagine