How To Sew A Jet Black Closure Wig With A Singer Heavy Duty Sewing Machine
- Posted on 04 December, 2021
- Lace Closure
- By Anonymous
If you’re from IG WASSUPPPPPPP if you’re new, hello
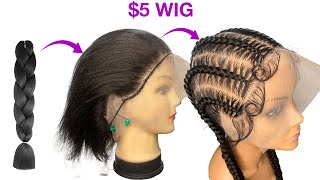
This is a quick and simple guide to sewing closure wigs with a sewing machine. In this video we size our wig caps, sew the tracks to the cap, bleach closure knots, deposited Jet black color and pressed it straight.
For more details on how to -
Set your machine up: https://www.youtube.com/watch?v=33Nisa...
Straight & zigzag stitch: https://www.youtube.com/watch?v=TqVWM0...
Size your wig block: https://www.youtube.com/watch?v=ShxCrw...
CUSTOM WIG REQUESTS [email protected]
WhitneChoo.com for Ready to ship units and accessories to install!
Follow my IG @IAMWHITNECHOO
How’s my mannequin make up? Say something nice ina comments so I know you’re here
K. Bye.
Okay, let's jump right into the video, because i don't want to make it too long, we're just going to make sure that we size up the calf. So it's not no extra space in there. All you need to do is make sure you make a couple of pleats if you are comfortable with sewing or already you should already know what i'm talking about, if not just watch you just need to make some folds, pin them down and stitch everything down once You stitch everything down and yes, i'm going to zoom in so you can see, see, look here right here: boom, okay, once i stitch everything down, i'm going to put the cap inside out and we are going to cut off the excess cap: okay, okay, okay! So it's pretty much self-explanatory because you want to make sure that your measurements are matching up before you draw your guides and when you draw your guides, you just want to imagine how the hair is going to lay if it was on her. These caps do have a bendable wire at the ear tab, and then they also have bands in the back just marked around those. So you don't jam your machine up and pin your lace down to the cap so that when you transfer to the machine, nothing moves. I'Ll show you how to remove them in a second okay, now, jumping on this machine, we are going to start by using our straight stitch, you're going to first start by locking it in place, which would be very simple if you watch the tutorial link down below In the description bar, it is the video of how to do a straight stitch if you practice on those. This should be pretty easy for you, but i use straight stitching because i feel like it's a little bit more simpler. It'S neater it's cleaner and it's a lot more durable than a zigzag stitch. You will need practice with this, though, because if you do make a mistake, taking the stitches out is a little bit more difficult than a zigzag stitch, but this gives a cleaner finished. Look. You'Ll go in you'll cut the entry points on where you started and finish, and then you're going to also cut the little pocket out what you're going to keep some money in her yeah so now i'll cut that off. Okay! Now, where services go last, so we're going to bleach the closure and then we are going to color or dye the rest of the hair gel black. So to bleach the closure we're just going to make us a small mixture of like a little thicker paste. Don'T get on here and act all crazy, especially if you not know stylist don't be using no valium developer above 30 because you need to watch it do not be over bleaching. Nobody hurt and don't be, putting no bald spots in nobody, lace, but yeah. Everything is pretty much self-explanatory. You don't want to do nothing too extra. Just you know place it nicely on top of the lace, if y'all want a more in-depth video on color or bleaching just subscribe, and then say that say that in the comments down below be like girl, i want you to do a video on xyz and make Sure you put the thumbs up, so i get the notification for wigs and custom requests check the description box down below. Don'T forget to follow me on my socials at i am whitney chew and oh yeah as always shop. We need you dot com, you


Comments
Ciera Evette: I just started using the straight pattern, and I love it.
jaricanlady: Sooo beautiful ….working up the courage to start using my sewing machine before this year ends! Thanks for this straight to the point video Ms. Whitne
Celeta Cruz: Thank you so much for the info. Everytime i back stich using the zigzag stich my needdle break. Im going to try the straight stitch.
Melanie Blanks: WE WANT MORE
Avi G: If you want to add hair in between the existing track on a wig , can you do so without the cap Shrinking
Caramel Crunches: Lovely