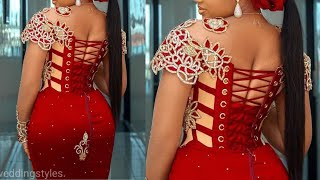
How To Make A Lace Up Back With Modesty Panel Neatly
- Posted on 22 November, 2022
- Lace Closure
- By Anonymous
Welcome back to the channel, in this video you would learn;
- How the draft the pattern of lace up back piece
- How to sew a lace up back piece
- How to neatly attach the modesty panel
Hope you enjoy this video and make sure to watch till the end to fully grasp this tutorial.
Was this video helpful? Support This Channel
- subscribe https://youtube.com/channel/UCTFnbUM7o...
- click bell icon
- Like this video
- Leave a comment
- Share this video
- Send a dm @thelafashion_ on Instagram for custom clothings.
Thank you! ❤️
lets connect
email; [email protected]
ig; https://instagram.com/thelafashion_
Bored? Click here ⬇️
https://youtube.com/playlist?list=PLB7...
#howtomakeamodestypanel
#laceupcorset
Hi guys welcome back to Stella fashion. Today'S video is going to be a tutorial on how to neatly fix a modesty panel onto a lace-up corsets, we're going to start with pattern, Drafting and then go over too soon, so make sure to stick around. I already have a couple of measurements put down. I have my shoulder measurements, I'm hold on the bus line and waistline, and I also have my zip allowance, because this is the back piece we'll be focusing on, and my zip allowance is one inch. So the first measurement I'm going to put down is the dots line and I'm taking it to be four inches away from the zip allowance. This pattern is cut on fold. So when you open that up, it will be eight inches in total and I'm also going to go ahead to Mark out my Dart length and I want the length or the height the height of the dots to be 5 inches. So I'm just going to Mark out five inches and for the width of the dots I'm going to go ahead. To make that one inch I'll take half inch to the left and to the right of the line that we've drawn out. Giving a total of one inch, so we have a one inch. That'S that is five inches high. Now that I'm done with that, so I'm going to go ahead to Mark out the round measurement, starting with the bust I'll, go ahead to take the bus measurement and divide it by four. After dividing, I have 8.5 inches, I'm going to go ahead. So add seam allowance, I'm taking some allowance of 1.5 inch, making a total of 10 inches. I'M just going to mark that down I'll go ahead with the underboss measurements, the round measurements divided by four and whatever I get, I'm going to make sure to add back what the that is at that area. So at this point is half inch, so I'm going to go ahead to add half inch back into the measurement that we took away for the dots before adding my 1.5 seam allowance. So that'll be a total of two inches that will be adding at the under bus line. Then for the waist I'm going to go ahead to divide the waist by four and whatever I guess, I'm going to make sure to add the one inch we took for the dots around that area before adding my 1.5 inches seam allowance so I'll be adding a Total of 2.5 inches now I'll just go ahead with the neckline and first I'm going to take a neckline depth of seven inches at the center back. So I'm just going to mark seven inches at the center back there for the neckline now to continue with the neckline I'm going to go ahead to measure the boss pan. So I know how wide the neckline of the off shoulder would be. So the bus pan is 11 inches. The bus pan is the measurement from one armpit to another armpit. We measure on the chest one and piece: another armpit is 11 inches, but we're going to divide it by two, which is going to be 5.5 inches. So I'm just going to go ahead to Mark 5.5 inches and I'm using dotted lines because I'm going to be connecting it later on, so to get the depth of the neckline around the armhole I'll just go ahead to mark five inches from the shoulder. That'S from the top there 5 inches, and I'm just going to mark that. Then I can connect the five inches from the shoulder to the seven inches. We measure that the center back for the depth of the center back neckline and also connect the five inches to the rest of the armhole. So now we can go ahead with the lacing area. So first I'm going to take out 1.5 inch at the waistline there. That is 1.5 inches away from the zip allowance. I won't be including deeper language just 1.5 inch away from it and at the top I'm going to take two inches instead of 1.5, like we took at the waistline, so we can end up having kind of like a v-shape. You can increase yours. If you want, you can take 1.5 at the bottom and three inches at the top. It totally depends on you but be using 1.5 and 2 inches. So this is what I have now and I'll just go ahead to cut this out so before I continue I'll. Go ahead to fold in the dots you really don't have to cut out the dots for the back piece. You could just fold it in it's easier. If you fold it in so just go ahead to fold that in and tape it and then continue to cut out the rest of the pattern. So it was just a zip allowance. We cut out the other time with the rest of the pattern, and now I'm going to cut out the lace area and first I'll just mark it out. So I can differentiate it from the rest of the pattern. Then go ahead to cut it and then go ahead to cut the rest of the pattern on fabric, so I went ahead to cut the pattern on fabric on my main fabric piece and the lining. Also. I also made sure to leave out seam allowance of about 1 cm at this Center back there, so the fabric doesn't end up getting shot when we're done sewing because I'm going to be fixing the emergency panel on the right side of the cloth you can fix. Yours on the left, but I'll be fixing my on the right. I'M going to go ahead to cut out the lining of the right side, also three inches away from the center back, and that is where I'm going to fix the modesty panel and I'm doing this. So that we can have a neat finish so to explain better, I'm going to go ahead to take one of the lining pieces measure three inches from the center back and just cut a straight line so that I can put the mother still panel in between that And have a need to work when I'm done sewing, so I went ahead to interface, the lining and fabric pieces, with the very light comb stain to make them a little bit thicker. Now I'm going to go ahead to cut out the modesty panel, so we can go ahead to start sewing. So you want your modesty panel to be wide enough to cover the lace area and the eyelets, especially if you are using the really large eyelids and your client's skin could be showing through them so I'll, be using 10 inches and I'll be cutting it on fold. So when I open this up, it's going to be 20 inches in total for the length of the modesty panel. I want it to be as long enough to cover up the areas of the skin that would be showing, but I don't want it to be. As long as it's starting from the neckline, so I want it to start about one inch below the neckline because we're going to be sewing in the neckline. This is what I have now now just go ahead to sew in the sides of the modesty panel and then turn it inside out. You can also go ahead to interface, the modesty panel, if you want to - but this is what we have now after turning this inside out I'll, go ahead to place it in between the two pieces and then join the two pieces together also make sure to place It about one cm below the neckline and leaving about one cm, also at the bottom. So this is what we have now and you can see how neat it is the whole idea of dividing the lining piece into two to place. The modesty panel in between it's just so you can have Anita finish so now we can just go ahead to finish with the back. That is join the neckline. The sides are burning and then we can add our eyelets and all of that, so let me start with the neckline. So now that we've sewn the neckline, you can see the benefit of putting or placing the modesty panel about one inch below so that we can successfully sew the neckline. So after sewing the neckline I'll just go ahead to sew in the sides and then turn it inside out. So after sewing the sides that is the center back and then turning it inside out, we can now create the channels for the burning another way to do. It is to actually create the channels for the burning first with Buyers before sewing in the neckline and the side, but I'm going to in this case I did the neckline first and the sides before going ahead to now create the channel for the burning and I'll. Be using bias for this I'll just go ahead to sew three lines which I can pass the burning through. Thank you. So this is me passing in the Bunnings and I'm using plastic Bunnings for this foreign. So after fixing the bunny now just go ahead to Mark out one inch for the eyelets and I'm using the smallest size eyelets, because I didn't have the bigger size so after fixing in the eyelets, that is all then I'll. Go ahead to lace. This up I'll be using my eyelids plier to fix the eyelets onto the fabric and make sure to get the modesty panel out of the base. You don't want to fix the the eyelids together with the fabric and the modesty panel, so I'll be using the plier to punch holes and also fix the eyelets by pressing it down. So this is the final product I'll just go ahead to lace this up. Thank you guys so much for watching this video till the end. If you liked it, if it was helpful in any way, please don't forget to hit the Subscribe button like this video, so it can get recommended to others and leave your comments down in the comment section. Thank you and I'm going to see you in my next video
Comments
Oyewole Sofia: It's so amazing how your videos meet me at the right time...not too early, not too late, just the right time I needed this Thank you so much for your time ❤️
Gladmoris Channel: Beautiful