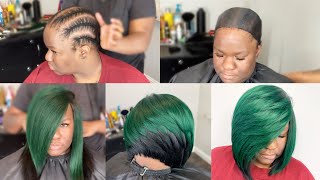
Diy Closure Quickweave Over Locs | Chiiix3
- Posted on 08 August, 2022
- Lace Closure
- By Anonymous
heyy frensss ! in this video , i did a closure quickweave install using amazon bundles and a beauty supply closure . i used #janeiro hair for the closure to achieve this look . if you want more hair videos or hair reviews , let me know below, enjoy ❣️
like, share, and comment request .
___________
social medias :
instagram - https://www.instagram.com/fineaschii_/...
twitter - https://twitter.com/stfuuchi
___________
music used:
___________
for business inquires : [email protected]
subcount : 18
road to 1k❣️
new videos every MONDAY , WEDNESDAY, and FRIDAY , turn on post notifications so you don’t miss out on new content !!
diy closure wig install , quickweave over locs , diy quickweave , quickweave with no leave out , closure wig install , hair review , amazon wig review , aliexpress wig review , wig install , protective style , black girl youtuber, darkskin girl youtuber , brownskin girl youtuber , vlog , day in the life vlog , ootd , outfit ideas , liyah li , double c , rege destiny , chiiix3 , chiix3 try on haul , chiiix3 hair tutorial , chiiix3 do my hair with me
I ain't got to get naked for no tennis bracelet, but i need hey friends, tell a friend and tell a friend, and she is back again with another video period and as y'all seen by the title, we are doing a closure quick weave over locks. I started with my foundation, which is very, very bad, but do as i say, not as i do y'all i'm gon na put some things on the screen that y'all can use to actually protect your hair. Those are usually what i use, but y'all will see later. I ended up doing a completely different method, we'll talk about it when we get there okay. So now you see me bleaching my closure and i'm using like capfuls of developer to the bleach, because i want to make sure my consistency is kind of like toothpaste. You want it to be really thick, so it doesn't seep through to your actual hair and um. It just gets on the knives. Another thing i'm doing is applying my bleach from the bottom to the top of the closure, because the knots at the bottom of the closure take longer to process. So once i finished applying my bleach, i covered it up with aluminum foil and i let it sit for about 30 minutes and the water you see me spraying is to deactivate the bleach that got on the hair. Okay, so i used three bundles from this company. I got some hair from they're, not my favorite, but it did the job, and then i used a closure that i got from my local beauty supply store, it's called genero. The closure, i believe, was like 14 inches and it was body wave and yeah. It was about 60 dollars, and so this is a method that i was telling all about. It'S a very, very ghetto, but it does still work. I used some paper towels and put it under my wig cap. My quick weave, stay down and glue did not get on my hair, so yeah, okay. So what i'm doing here is measuring my track to the space on my head, cutting it and then i'm putting glue on the track. I doubled my wife, so i just measured the track twice and then glued them together and then glued it to my head, and so what i like to do is spray got to be glue on my tray after i glue it down and then i blow dry It to make sure that it sticks here is where i noticed that you will be able to see the paper towels through the tracks, so i'm putting makeup on my couch, and this is a step that you wouldn't have to do. If you didn't do this method so yeah, i recommend the liquid caps that i showed y'all in the beginning. Okay, so here is where i measured the placement of my closure. I put it like right in front of my hairline literally because you do not want it on your forehead. That'S so ugly and i use some concealer to outline where i place my clothes okay. So here i am putting my hair up so that i can trim the excess cap, the paper towels, all the extra stuff. That'S sticking out from under the quick weave, i'm cutting all that stuff off because it needs to be out the way. You don't want people to see that, and you also want to make sure you're being very careful not to cut your tracks or not to cut too far into the quick weave, because you can mess up your foundation and that will cause your tracks to lift. And here i am cutting off the excess cap, because your closure has to sit right in front of your cap and if your cap is too far up, then your closure will be too far up too. So i went ahead and put some makeup on the closure. So that it's closer to my skin tone - and i also will spray some got - ta - be glue spray just a little bit on the closure and brush it back, so that the flyways aren't in the way when i'm trying to glue the closure down. So i put glue down on and in front of my cap, i'm spreading it out to make it thin so that it can dry clear and i continue to glue down tracks as i'm waiting for that to dry as y'all can see. I almost forgot to put makeup on my couch, but i didn't don't forget to put makeup on your cap because your closure is going to be very visible, like the lace is going to be very visible if both of your cap and your closure don't really match Your skin tone, okay, so once i find the placement of the closure that i like, i take my fine tooth comb and i comb me into my skin and i'm going to go in with some got to be glue, spray and spray that down and tie it Down so that i can get that first milk, so this is another, do as i say, not as i do moments, because i'm gon na glue my closure down, but i highly suggest that you sew your closure down rafael on the beat nowadays, okay. So at this point i was done with the quick weave. I was just brushing everything out to like see how it looks before i do. My final touches for real - and i was just looking at my closure to examine my part. Now i'm trimming the excess lace, making sure that i don't cut any hair off, but i'm doing it in a zigzag motion and i'm getting as close to the hairline as possible, and here is where i start to part my edges and customize. My lace. I meant to record this, but my camera started editing up, so i didn't get any footage of that. But if i wanted in-depth like hairline plucking tutorial, let me know yeah. This is what it's giving it's giving frontal phone die, but i'm gon na tell y'all what i did off camera. I basically just plug my edges and um the way i did. I really could give y'all a whole in-depth video about how to plug and stuff like that. Really i could have did better, but i just kind of got tired of doing it. So i stopped it's a given middle part purpose down, but yeah. Those are the vibes y'all. This is a quick weave, it's not giving quickly if you're lucky giving me the purpose now. Oh, i need to put makeup on my part. That'S something i need to do too makeup on your part is very important but yeah i swear. I just stopped caring literally but yeah. Oh, if you made it this far comment the hair emoji period, because you don't revive, i slay this hair and like comment subscribe, so i'm popping and we're just gon na update this with

Comments
Nappygrl TV: Omg thank you !!!!!!!
dejahmonaéé:
Nappygrl TV:
Dee: ♀️
Nappygrl TV: ♀️♀️♀️♀️
Jasmine Arlease: ♀️♀️♀️