How To Ventilate And Braid A Two Colored Braided Wig. #Youtuber #Youtube #Youtubeshorts
- Posted on 12 January, 2023
- Lace Closure
- By Anonymous
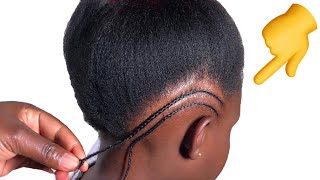
Foreign thank you for stopping by if you're new here make sure you subscribe and if you're not thank you for coming back to watch um. Please watch this video to the end. Today'S video is a hair one. I'M going to be showing you guys how Jesus my battery was this, because I'm about she's one useless, Wi-Fi yeah, I'm going to show you guys how I make a braided wig, it's a it's going to be a six by six frontal and with two colored hair Color twin color, 30 and colored no color take three I'm collecting seven and I think you already made closure at the frontal. I tried to get it, but I did not, but I have this. I'Ve been avoiding using this because normally I buy my laces like this, and then I cut them out, but my previous videos before the frontal front house, you saw that I was actually buying the already made ones, because this one for this one, the holes, are tiny. Quite tiny so, but I want to look for the six by six in the market and I didn't get it so. I have to use this. So I'm not going to show you how I'm cutting that out. If you want to see that you can see that I'll, do it in a different video, just comment and um I'll just start ventilating, but I'm not going to show like how I am going to sleep now. Just have little clips of it and then this hair is available guys. Is it 13 by 4 front half with styling coil I've posted this thing before, let's start, let me not talk too much. Let'S start make sure you watch this video to the end and like And subscribe watch it to the end to help my watch hours, guys yeah. So so I have to wear my glasses to see what I'm doing this supposed to be a heavy Jeep. I don't know why it's looking like a vlog, sorry, oh I want to measure but not showing people as a measuring yeah. Okay, so I actually went ahead to um install the wig. It'S now mine, but if you want it, you can go to my read page weeks by Palm, follow and then place an order. It'S available there for 39K for a 13x4. This and I'm wearing is 13x4 front of 12x4, sorry and then 42k for a 12x6. Most of those I'm about to start, I just picked the attachment um. So since I cut out the leaves right um, you know the early ones they already made ones come like with this place, um sewn together. So I'm just going to go ahead and use my needle before I attach it to them. Just quickly. Do that and come back and show you guys the next process, the next step. Sorry I have gone ahead to sweets on the cup, so I'm just going to cut out. I need to cut out the thread, but there's another part I need to cut behind here. Please ignore the noise. If you get too noisy, I think I'm just going to have to do a voice over. So for this part, you have to be careful. You have to be careful not to cut your lace and don't cut too close too close to the um. So the list just to avoid any mistakes yeah, so it's kind of um windy, it's windy outside you know it's kind of it is harmattan and just flies and disturbing me. So this is what we have we're just going to put it and then place it properly and do my pattern and then start braiding. So I'm trying to see if I should cut out for baby hairs or not I don't know, maybe I should if, if the the owner doesn't like it, then she can, you can just cut it out, I'm just taking what you do very little. She doesn't like it, she can cut it out, hi guys, so I went ahead to do my pattern. I need all this the magician and then I made here to be like three, because I don't like when I do my period weeks and then it shows these parts, so I like to do at least two to three or even four, even four. I wanted to be four but like, since this is a six by six. I it has to show that it's really deep right, so I won't be able to do four, even though I can't do four, I can actually do four. Maybe when I get to this part I will, I will add one more because I don't like you to show this place. I like it to look as seamless as possible like to look as natural as possible, so I am just going to start braiding. Thank you. Um so guys, this is me trying to show you guys how I um had like to make the length longer, because I use this small Lush, braiding, hair and um. I cut it into two so to make the front longer than the back for the front part. I was just adding like I repeat and then add, and this was how I was playing it and since I was working with two colors I would um put for the two different colors um at different times, yeah so yep and then to start braiding. I would um go in with the color, 33 dancing seven and then 103 like. I would use three to start my braiding then, when I get where I want to add, I didn't add twice now. This is me, showing you guys where I cut through, like I was at the second um second column of the second row second column here. So I'm just I'm just adding the color, I'm sorry 27 right now and today with the 33 and then I'll, go back and add one more twin, I'll, go back and add one more um. I feel like this. This um is not really the color. I wanted to go for you know. This has sent me a picture and um. I actually wanted to get a closer 613 and they're mixed with the um mixed with the 33 but they're like nah, it's going when I went where I went to buy it like now. It'S going to be too bright and all that so, but it shall look like it was it, but now that I've created it, I feel like I should have gone with these six. One three would have been better. Maybe I'll try to make a week for myself with it or even braid, my hair, with that six one three and then this day three and then see what I get so guys. Okay, it's what I was saying like the back is now covered right. I don't when, even when I start to feeling the back like behind here, you guys are not going to see it's not going to show that you know it's not going to shoot out the medication and all that, so it's actually going to be covered, and it's Going to look like a full frontal when it's not not even like, if it's just going to look like there is no like um the Dome cap behind it's just going to look like everything was braided and all that so yep. That'S a concept if you uh, if you braid, hair, try this way, try it this way, and you see it's going to make sense either you do two columns, two using two smart tissue at least three columns. I went to ground. I I added one more because you know I did three first, I first I first made the pattern for I first made the pattern for three columns, but I think I had to add one more left me or if you made it five, so I did four Columns behind and then now I'm doing the side right just doing um the same process. I was doing use my either I'll use 233 once and seven or I'll use. 2. 27. 130. Like that, I was just changing, changing changing and guys. I was scared that the extension was not going to be enough, but it ended up being enough. I said I bought two packs right. One packet, three color 30 under one part color twenty seven yep. So this is just me showing you how I was doing it see how fine it looks already. I was not done. I had not filled up the back, yet I was just trying to play the closure and guys I underestimated this, and I was thinking I'll be done in two days, but it got to the it got the three I was still braiding and thank God I had My cousin to help me like finish the end, so I wasn't finishing the ends right. I was living in soda she'll be helping with that part yeah. So this is just showing you guys and then yeah, I'm adding again I'm adding the color 33 right now and then I'll go and add the color also into seven. It made the front Parts longer than the back. No need for you to cut say, do a cut, a cut one and two, and all that just cut everything in the same length, then for the front part you just kind of add more and it's going to look all perfect yeah. So this is how far I had gone. So sometimes you guys to see you can't see the behind. I have not put anything yet, but even as it is like right now, it's making covered, so I don't have to do too much. I don't have to put so much behind to get it all covered and all that this is just the other parts machine, the other part, so that you guys can have an idea and then also see how long it is um. So for these parts I was just trying to show pillows now doing the back. Sorry, not the back. I was doing on the the demarcation parts that's the in between or where the lace meets the Dom Cup right. So you have to make sure that you do this plus properly, because if you don't, then, whenever you're you're wearing them, you go whenever your clients is wearing their wig. It'S going to show that there's a cup behind and you don't want that to happen. So you have to follow it and put like put the hair closely together. How I do my knees I first put like apart. Like this other place, that's not pretty. You can see that there's space and then I go back to add one two, one, two like that until everywhere is covered up. So I was just and you have you - you want to make sure that you're back the back is really covered, because if it's not the sides can be a bit scanty. The um, the braids for the sides can be a bit scanty because I don't know Isha doesn't show like that. But if the back is not covered up, then you're going to have a problem so mainly make sure that the back is really really covered up. For this other side, that's the to the left that you can see you can actually maybe skip you can make it not too full excuse me you shall put, but you can make it not too full, but this back, you can't just leave it like that. So yeah, I was just showing again how I was feeling how I was braiding like that you can see, look closely um yeah and then I'll just showing you how I was feeling in the back right. Oh god, um sorry um. This thing was taking too long, and I was getting tired and I wish I was doing it yeah for the back now. For these other parts you just put in it doesn't have to be too full. Another thing you want to do is make sure that your hair, your wig, is not heavy. Try as much as possible. Try your best to make sure that your wig is not heavy. Now I was um, you just put it and the main thing for the um. What I call it the trick to it is make sure that this stuff, the magician I showed you guys just make sure that part is covered up as long as it's covered up. Then you don't have an issue, no matter what even if inside, is not filled up you. You know that and you whenever the person is wearing the week, it's not going to show right. So when that part is covered up for the inside now, you can just put it anyhow, but I'm saying anyhow: don't don't just go onto anyhow, so this is it. I finished the wig finish the ends I put hot water, hot water on it. Um did. I mention I use the color 27 and 33 in in Lush, and this is what I was telling you guys like. The back has to look very neutral, and then here this is how lengthy it is. I'M already loving it. I'M already feeling like this should be. My wig, but no it's not yeah. This will just show you guys how long it is and um how the inside of the hair is the inside of the week is how the filling was done and all that so yeah. I hope you guys enjoyed watching this video. I hope you learned it. You know too, if you have questions, don't forget to ask and thank you don't forget to subscribe.


Comments
precious cornelius: Did you mix the two attachments for the ventilation of the frontal?
Ajito Mujidat: Please sis which method did u use to ventilate the closure….the horizontal method or vertical method
Ajito Mujidat: You are good at what you do
De Braid General: Please is this swiss net the same as the sewing net for cloths that we wear?