Extremely Realistic Kinky Edges Wig Install| Kinky Straight 24Inch 150%Density Ft. Klaiyi Hair
- Posted on 12 January, 2023
- Lace Closure
- By Anonymous
OPEN MEE FOR HAIR DETAILS + MORE ❤️❤️❤️❤️
Get 26% off Use Special Code: MY26
●▬▬▬▬▬▬▬▬▬♛#KlaiyiHair♛ ▬▬▬▬▬▬▬▬▬●
Direct Hair Link:➤https://st.klaiyihair.com/eidq0
Hair Info:13*4 lace front wig, kinky straight with kinky edges, 24inch, 150%density
Official Website:➤https://st.klaiyihair.com/eidq1
Best Sellers:➤https://st.klaiyihair.com/eidq2
Affordable Natural Density Lace Wigs:➤https://st.klaiyihair.com/eidq3
Aliexpress Klaiyi Hair Store:➤ https://s.click.aliexpress.com/e/_opNA...
Amazon Klaiyi Hair Store:➤https://amzn.to/3OLRlhL
YouTube "Klaiyi Hair": http://bit.ly/2zpjQhu
TikTok"@klaiyi hair": https://www.tiktok.com/@klaiyihair
Instagram "@Klaiyihair_no1": https://www.instagram.com/klaiyihair_n...
Facebook "@NO1KLAIYIHAIR": https://www.facebook.com/NO1KLAIYIHAIR...
Contact for Wholesale: +8618337492297 Email: [email protected]
#klaiyiwig #lacefrontwig
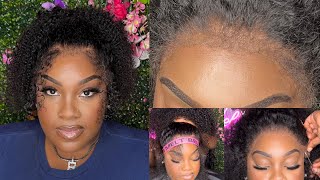
Foreign or welcome to my channel - this is your first time here. My name is Diana in this video. I'M going to be showing you, the installation of this hair that I got from clay here. All the information for this hair will be in the description box below um. So this is a 13x4 kinky straight 22 inch wig. I think it's 22 inches yeah 22 inch wig um. The original curl pattern of this hair doesn't come like this. I flat ironed it um, but it's still straight here, but it's just a lot thicker, but you're going to see what that looks like um later in the video in the box with the wig. They sent me this really cute wig band, this wig cap, which is like the thinner wig caps that are really good for Lace, Wigs, a really cute robe that says Clay on it, a another thin wig cap, another wig band, some lashes, look like this and a Brush for your lace, so if you want to see how I install this hair, you got to keep on watching. So this is what the wig looks like um. I did bleach the knots but, as you can see here, the wig is super super thick. It'S hard for me to even grab it all with one hand, it's so thick here, but this is what the lace on the wig looks like it's a little bit of bleach left there excuse that, but it does have the two Combs on the sides and the Elastic band at the bottom, your typical wig construction. So let's get into it! I already have my wig cap installed, so I'm just putting my black opal makeup onto my wig cap and then I'm going to go and take the uh, this lace, tint that I got. I got it from the beauty supply store. The brand is called lace tint from what I know, but I'm going to use this and spray this on the lace of the wig just to darken it, because I kind of over bleach The Roots just a little bit. So I just wanted to correct that um and so now I'm going to put the wig on my head adjusted to make sure everything fits properly and then I'm going to cut off the excess lace, as you can see like the wig fits really snug. On my head - and I have kind of my head - is kind of on the smaller side. So if you have a bigger head, you may have to adjust it, but I did not have to do any adjusting of the straps or anything like that at all. It kind of just fit on my head already and then so. The glue that I'm using to install this hair is from wig dealer um the glue that I use all the time. So I'm going to go ahead and put the glue across my hairline overall, I applied about two to three layers of this glue. So now I'm just blow drying it, and now I'm going to go ahead and melt the lace into the glue first, just starting with my comb and then I'm going to use my hot comb um and then I'm going to wrap my edges to set this into Place I did let my edges sit for like five minutes um and now I'm going in with the wig Bond spray and I'm spraying it behind my hairline, where the edges are um just to make it the wig sturdier. Even though, like you know, I use two to three layers already so was It was kind of enough, but I just wanted to give it that extra layer of protection honestly having the baby hairs or the edges like pre-cut and curled, for you helped or for me Anyways made the install so much easier. Usually I struggle so much with like this part here, like cutting the lace and making sure everything looks straight something about having these edges and the placement of these edges really just made. This install like super easy, like the wig in the front, the lace came down far enough to cover up my weird hairline. Like I don't know this type of wig just works. For me, this is like the quickest. I'Ve ever installed a frontal honestly, because it's done only thing I have to do now is like flat iron, the hair pretty much and style it, but yeah get you get you one of these. Get you one with the baby. Hair is pretty plucked out because who has time for all that like because the baby hairs were already cut like the hairline was kind of already plucked a little bit. I did go through and pluck like a little bit more, but the hairline was already done. The baby hairs was already done, so really that's half the battle right there only thing I had to do was glue it down and style it also, since the baby hairs are already curly like you, don't have to curl them with like a baby flat iron or Anything so they just swoop into place a lot more like easier, um styling. My edges was a dream because it did not take long at all like because it was basically all I had like done. Only thing I had to do was just swoop it into place. I love these honestly, get you one like I said now, I'm just going to cut off a bit more lace at the top, because I want the hairline to look more natural. My forehead's kind of big and you know the lace when it covers up half my forehead, that doesn't look natural in my eyes, because I know I really have a six head um and now I'm going to use my got to be free spray. Just to conceal that harsh line in my lace, foreign, so when I say this hair is thick, I mean this hair is thick like baritone, like a base thick like heavy, like it's a lot of hair on this wig, I'm not sure of the density. But if you'll check the description box below click, the link, the information will be there. So I'm using my bio silk um and I'm splitting this hair up into itty bitty sections and when I say I am taking my time to flat iron, this hair, I'm taking my time so I'm using my wide. I think this is a two inch flat iron. I got this from Amazon, I'm not really sure the brand um, it's okay, honestly, truly uh! It'S all right! It'S not the best flat iron, but it'll do because it does the job um, but I'm just taking like small thin sections um, not only like small sections, but like thinner sections, just to make sure I'm really. You know flat ironing the hair really really good, particularly like at the root, because that's where it gets the poofiest. I really just want to make sure I get those roots um. This whole process probably took me team, like close to an hour like 45 minutes to an hour. Honestly, that's like the longest part of installing this wig. Now you don't have to flat iron the hair, it's completely optional, but I just like how kinky straight hair looks flat ironed because even though it's straight, it's still textured, so it looks a lot more natural foreign to the other side, I'm just going to do a Quick side by side comparison like look how silky I was able to get the left side and look how thick the other side is just so you can get an idea. You know of the two, but now I'm just going to go through and finish flat. Ironing the rest of my hair foreign, so even though now I'm done flat, ironing the hair um, you can see that the hair is still super thick, even though it's straight because one thing I hate is when you flat iron hair and it gets super thin. But this maintains its thickness and it's thick from like root to tip, which is perfect um. So now I am going to go through and touch up. My part and my edges, um just to you know, do the finishing touches and make everything look more natural. So now I'm going to take my got to be free spray and spray it along my hairline and use my wax stick and my hot comb just to make the front of my hair look more Sleek. I'M also going to run my hot comb through the top of my head um to make it flatter at the top just so it's not bumpy again, because this hair is super thick, it's easy for it to be lumpy at the top, but just run a quick Flat iron, not a flat iron hot comb through it and you'll, be fine foreign. So, as you can see here, this style is almost done. The hair is super silky and pretty you can really get an idea of how thick it is and that Biosilk really really made it shine, and also I, like I love how um natural the hairline looks like look how silky it is from the back, even though You can see the texture in the hair; it just still looks natural, so I'm almost done it's just one last thing that I want to do I'm taking my eyeliner and I'm correcting my part. I, like I said I over bleach the knots I know some people use, like I don't know like a hair color like they'll place like a rat tail comb over the part and then spray it with some like black hair color. I don't have all that all. I have got is a black liquid, eyeliner pen, so I'm just using it and I'm doing like light Strokes along the part to make the part look more natural and just covering up. You know those bleach spots from the root making sure not to get too close to the lace with it and just being very light-handed did, but, as you can see it did the trick like I didn't need all that other stuff. Lastly, I'm just going to put my hair behind my ears and cut this little part right here. I don't even know what this is called whatever I just like to cut it because I feel like it adds a little something extra to the style. Some people like to gel it down or curl it which I probably will do later, but for now I really just wanted to wear it straight, but besides that this style is done y'all. This hair is amazing. I still got this wig on now and it's so thick like that's what gets me it's so thick and the hairline is so awesome and it made it really really easy to install y'all um. I had a really great experience with this wig. I have no trouble with it. I love it, but yeah all the information for this hair is in the description box below. Thank you all so much for watching adios till next time.
Comments
Royal Bee’s: Only $198 after discount for same style and length - I’m getting my wig!