No More Frontals?!? | Ula Hair Hd Lace Closure Wig Install
- Posted on 25 February, 2021
- Lace Closure
- By Anonymous
I'M IN LOVE! This is the BEST HD Lace Closure Wig by Ula Hair. Watch this beginner friendly HD Lace Closure install wig tutorial. This was hands down my best wig install yet! I hope you all enjoy and please don’t forget to COMMENT, SHARE & SUBSCRIBE TO MY CHANNEL! SEE YA! XOXO
SUBSCRIBE HERE!!
https://www.youtube.com/channel/UCsvIp...
-----------------------------------------------------------------------------------
B U S I N E S S I N Q U I R I E S
Email: [email protected]
Connect With Me!
Instagram: @Stephanie.voltaire
Twitter: @Stephie_Volt
Facebook: Stephanie Voltaire
Snapchat: Stephie_Volt
----------------------------------------------------------------------------------
H A I R I N F O :
♥$10 Coupon code: SV10
♥Product information : Invisible HD 5x5 Lace Closure Wig Body Wave 22inch
♥Video hair link: https://bit.ly/36bineV
♥Highly Recommend:
New In Mix Color Highlights Wig: https://bit.ly/35RZlK9
Cheap&Beginner Friendly Weave Wig: https://bit.ly/2KIkbDJ
Wholesale Promotion Hair Deals: https://bit.ly/2IZzO9i
♥Check all items in Ula Store: https://www.ulahair.com/
♥Follow ulahair for more:
Instagram https://www.instagram.com/ulahair/
Facebook https://www.facebook.com/ulahumanhair/...
Youtube https://www.youtube.com/@ulahair
Tiktok https://www.tiktok.com/@ulahair
♥Contact for promotion:
Email: [email protected]
Whatsapp: +8618924029739
----------------------------------------------------------------------------------
P R O D U C T S M E N T I O N E D
BW2 Powder Lightener - https://amzn.to/2DxGHfr
L'Oreal 30 Volume Creme Developer - https://amzn.to/2DGVWCK
Ardell Red Gold Corrector Plus - https://amzn.to/33Q4Atg
Bold Hold Active Lace Glue - https://amzn.to/2E11btp
Crimping Iron - https://amzn.to/2MrkQe2
Got2B Glued Freeze Blasting Spray - https://amzn.to/2DK3cO5
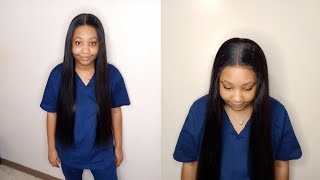
Hey you guys stephanie here, welcome or welcome back to my channel and for today's video guys we gon na get all into this beautiful unit. Y'All - and might i add this - is a closure wig yep? I set it a closure wig. So without further ado, let's get straight to it all right, you guys, so the hair that i'll be working with today is by euler hair, and they sent me this beautiful 5x5 closure wig. This is also in the body wave texture and i believe the length on this is 22 inches, and the density on this hair is 250. So, as you guys can see, the hair got a lot of body to it and for me personally, i prefer, for my body wave wigs to be super full and have a lot of body to it. The lace on this wig is also hd, so i already know that this lace is just going to melt onto my skin and blend so seamlessly, so i'm so excited about that and it's also pre-plucked. But as always, i always like to bleach the knots on my lace, so i'm just going to go ahead and do that real, quick. So, as y'all can see, i just sprayed down the hair with some got to be glued freezing glass spray. This is just going to help to get all the hair out of the way, so none of the bleach gets caught onto the hair and i'm just going to comb all the hair back to get everything out the way. At this point i feel like bleaching. The knots is pretty much self-explanatory and i'm sure you guys know how to do this. But of course, i'm going to take my bw2 powder and i always like to mix it with my ardell red color corrector, to get rid of that brassiness and real quick. This wig also comes with a pre-sewn in elastic band to the wig, which is clutch, because this is just going to help for the wig to sit down better on the head. It'S just going to help for everything to lay down super flat and this elastic band is adjustable. So, according to your head, circumference size, you could either loosen it or tighten it up all right. So, as y'all can see, i already mixed up my powder with my developer and added my color corrector, and i believe that i used a 30 volume developer. I'M going to leave everything that i used down below and add the links to them in the description area below so, of course, when you're bleaching, the knots you want to make sure to lightly press down, you don't want to be too heavy-handed, or else the bleach Will seep through and it will bleach the hair so just make sure that you are using a very light hand when you're applying your mixture onto the knots. So now that i'm done applying my bleach, i'm just going to go ahead and put a plastic bag over and i'm going to let this sit for about 15 minutes now fast forward to 15 minutes. I'M now going to rinse the bleach out and it looks like the knots got, bleached pretty well to my liking and next, of course, i'm going to take my neutralizing shampoo and i'm going to apply a good amount of this shampoo and make sure that i thoroughly Wash that area with my neutralizing shampoo and, of course this is going to ensure that the bleach does not develop any further and next i always like to follow up with my shimmer light shampoo. This is optional, but i like to use this tony shampoo so that it could help eliminate that brassiness finish this in conjunction with the color corrector that i applied earlier. This just really helps to give it more of a scalp-like effect to the bleach knots. Oh hey! All right guys so, as y'all can see, i installed the wig and i just did a little bit of baby hairs, nothing special and honestly. I don't really like how the hair looks straight, so i'm going to add some crimps to it using that heat iron. Now that iron, i actually purchased it from amazon, it was very inexpensive. I believe it only cost me about 25 bucks and um yeah, so i'm going to leave the link to it down below and, of course, you want to make sure that you protect your hands from getting burned so that irony also came with the heat protecting glove. So after that, i'm just going to go ahead and proceed to style. My hair and i did crank this baby up all the way on high and i'm just going to crimp the hair like this. Now it's pretty self-explanatory, so starting off at the top of that section, i'm just going to place my crimping iron there and hold it for about a minute or two and just gradually work my way down that section, and that is all that, i'm doing you guys. I'M just gon na continue to do the same thing around the entire head and yeah. That is pretty much it now, this style it is a bit time consuming. In my opinion, although the style did come out, super duper cute. This did take me about 35 to 40 minutes to complete. I just think it looks better when you work in small sections, so this is actually what the first section looked like and, of course, after each section i make sure to spray it with some holding spray. I believe the one i was using was by uh tresemme, i'm gon na leave the link to it down below, and i'm just gon na continue to do the same thing along the entire wig but yeah, and actually this clip. I was rushing to go to a dinner party, so i was trying my best to finish this in a timely manner, and still it took me about a solid 40 minutes to complete, but nonetheless this style did come out. Super duper cute. I really like it and another thing that i have to add. The lace on this wig is so bomb you guys. This hd lace was super easy to work with and apply the meltdown process on this lace. I feel like it came out flawless. It melted into my skin so easily and in my opinion, this closure. It really looks like a frontal, in my opinion, you'll tell me what you think in the comment section down below, but i think this closure wig it could pass for a frontal and i'm quite surprised how good this came out, because this is actually my first time Working with a closure, so i didn't really know what to expect but yeah surprisingly, this closure wig was super easy to work with and apply and yeah. I just think it came out. Super duper cute, but anyway you guys. I am rambling, so i'm just going to let you guys watch me complete the rest of my hair and i'm gon na come back on here in a little bit purchase your track today, alright. So this is what one side looks completed in comparison to the other side, and this is what the hairstyle looked like fully completed. Now i know on camera it does look a little stiff, but usually after about 20 or 30 minutes the crimps, it does loosen up a little bit but yeah initially, once you apply your holding spray, it does look a bit stiff, but um yeah y'all. This is what the hairstyle looks like. I think this came out. Super duper cute and if you guys are interested in this wig, i do have a coupon code for you guys y'all know i got y'all just use this code down below. If you want to save ten dollars off your purchase, so thank you guys so much for watching and if you enjoyed this tutorial, please don't forget to comment share and subscribe to my channel before you guys leave thumbs up this video and, as always, i will see You all in the next video bye, guys

Comments
ILL REEL: Get it Sista!!! You killed that look✨
Maame Wilson: Beautiful hair pls where did u buy ur curling comb from? Thank you
Ula Hair: wow thankyou for review dear, super pretty! My boo her coupon code is SV10~ Shop your BEST GLAM LOOK hair~
P Davis: BIG
Shante Wilkins: Hello