How To : Diy Melting Elastic Band | Frontal Wig Installation
- Posted on 05 March, 2023
- Lace Closure
- By Anonymous
Hello guys welcome back to my channel my name is Stella Simbi and in today's video going to show you how to make a diy melting elastic band and how to install a crotchet frontal wig
Music: Reach You
Musician: Lacore Diamond
URL: https://pixabay.com/music/-lacore-diam...
Watch my other videos
Frontal Ventilation Playlist
https://youtube.com/playlist?list=PLrK...
How to Ventilate a T-frontal | DIY T-frontal | Detaild Beginner friendly Tutorial
DO's and Don'ts on how to ventilate hair
How to ventilate a frontal | Beginner friendly tutorial
How to make a 4x4 Closure Using Ombre Hair Bundle | Beginner friendly tutorial
How to make a Frontal Wig Cap | How to Draw a Perfect Hairline | Detaild Beginner Tutorial
Diy Frontal Knotles braided | Hair Ventilation | Beginner Detaild tutorial
Diy Realistic Cornrows braided wig | Hair Ventilation |Beginner Detaild tutorial
How to make a Crotchet Frontal Wig using one pack of Expression braids |Detaild tutorial
How to make a twist wig using a needle | Detaild tutorial |Beginner friendly
How to make a twist wig without closure | Beginner friendly | Detailed tutorial
How to make a 4×4 Three Way Closure | Hair Ventilation Pattern | Beginner friendly
Diy frontal 27 peace pixie wig
How to make a Bob Braided wig | Flatiron method | Detaild tutorial
How to make a closure using curly hair /How to achieve the curls back after ventilating
DIY/ how to make a blunt cut 8×5 frontal wig
How to make a kids softdread wig |Detaild tutorial beginner friendly
How to make a crotchet headband wig using one pack of expression braids
How to diy crochet braids using ombre braiding extensions / Easy way to do crotchet braids
How to make a 19" afro wig
Please kindly SUBSCRIBE LIKE COMMENT and SHARE
#frontalinstallation
#meltingband
#elasticband
For enquiries email me
Thank you for WATCHING GOODBYE
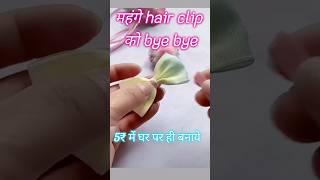
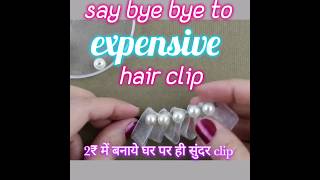
Hello guys welcome back to my channel. My name is Taylor simbe and if you are new, you're welcome and please subscribe and if you're already subscribed, but thank you so much for coming back. So in today's video I'm going to show you how to make your own DIY melting elastic band, and I'm also going to show you how to install this crochet wig that I'm wearing right here. So if you are here for the install, you can go ahead and Skip and go to 4 minutes and 26 seconds of this video. But if you are here for everything keep watching so, firstly, we're going to be making our melting elastic band and the thing that you need to know is you have to measure your head circumference first in my circumference is 22 inches, and then you have to remove Some of the inches from that 22, so that when you put on your elastic on your head, it will be tight so right here I did 18 and a half inches for my elastic and I'm just cutting off the velcro. I measured on the side of the elastic and I'm cutting off the velcro and I'm going to sew the soft part right here on this side of the elastic, then the other hard part I'm going to sew it on the other side of the elastic. So yeah. Just uh use your threading needle to sew it right round on the elastic. Then you also do the same on the other side on the hard part, but the hard part I'm going to sew it off camera. Then I also add another soft part right here so that I can adjust it like. If I want it to be tight, I can go on the first velcro. If I want it to be more tighter, I can pin it on the other velcro that I will be sewing like the other soft part, so it will adjust to be tight or to be more tighter. So you have to make sure that you take your head measurements first, then you can remove like the other inches or you can just put your elastic on your head before you cut it, then you can feel like if it is tight enough or it if it Is too much you can add more inches? So when you measure your elastic on your head, you can then cut it off. It will be easier that way. Both our hairs are different each and they have might not work for you. It might be too big or too small, so you have to measure your own head. So after sewing, I just bend the ends or like where I cut the thread so that it will be secure. It won't unravel so right here. This is where I'm going to sort the hard part and make sure that you have to try it before you saw so that you see that it will stick make sure you don't sew them. On the same side, the other one will be uh on the left side of the yeah of the elastic band and the other one will be on the opposite side of the elastic band. So right here, I'm going to add another software of my velcro and I'm just going to measure right here. Then I'm going to cut and after cutting I'm going to leave a distance of half an inch between the two velcros and I'm going to sew it right here. So guys do. Let me know if you're going to be trying to make your own or you already have one. If you don't have, you should make your own guys. This really helps on your install, especially when you're doing frontals. It helps guys. It helps so make sure you make your own uh, that you'll be using for installation to melt down your legs to make sure that like when you are installing a front door, the sides might lift. Sometimes. So you have to make sure that there's something that is putting uh pressure on it, so that it will stick to the glue, so it will help on the ear on the ear sides. When you want to lay your frontal, it will also help to put pressure on it and it will stick to the glue. So this is a necessity. You have to make your own if you don't have like this, is so easy to do. Uh just use your velcro and your elastic and you will be having your own melting band. So this is how it's looking guys two soft parts and one hard part that part will be using it to pin it on the first part or the second one. You can just adjust to where you want it to be, you want it to be tight or you want it to be more tighter guys. This is so simple and easy do. Let me know what you think about this melting band. So next to the install I'm applying my foundation on the list to make sure that it matches my skin tone like that guys, and then I'm not going to be doing a bold cap method, I'm just going to install it without doing bold cap yeah, because this Is a all back wig, it doesn't have any um parting, it's just all back! So, if you're interested in seeing how I made this crochet twig do subscribe, it's totally free to subscribe. You won't be charged any money. Just subscribe and uh turn on the notification Bell. When I upload the tutorial now, I made this crochet week, you'll be notified, I'm uploading it soon guys soon soon, don't worry, I'm uploading it soon. So yeah and right here, I'm just applying my go to be glue gel. I did cut some sleeves so that it would be easy for me to lay down the less so just blow dry it and make sure that it is clear. It'S no longer white. It is clear and tacky, then just press down your wig right there. The first section, the middle part section and just press it down uh using your combo, anything that you have and then on the other side, make sure that you also put your glue on the sides of the ear so that your legs will lay really well on The sides so just put your go to big glue right there blow dry, it and press down your wig like that yeah. So I'm also going to be doing the other ear, but I'm doing it off camera. And then, after doing this, I'm going to blow dry to make sure that everything uh the wig is laying down. Well after that, I'm going to be using my melting elastic band. This is it works guys, I'm just going to put it right on the hairline and then it will help to make sure that the earpods they melt too low, like this stick uh on the side. They won't lift, or anything like that. So after that, I'm going to be cutting off the excess less then we're going to be applying our glamor. Let'S uh, let's pray on the edges, like the less that is lifting right at the front, those tiny, tiny little pieces of less we're going to be applying our glamor spray right. There then we're going to be using our melting band again guys who are going to be using it again. So you should make your own. If you don't have guys, you should make your own elastic band, it's really cheap. The velcro is cheap, so you can afford anyone can afford it guys so yeah after cutting off this is the glamor spray that I was talking about. I'M just spraying it on my fingers. Then I'm just taping the uh spray on the hairline right there to make sure that lace is melting right in so just apply it just dip on the less. Then we are going to be putting the elastic band right here guys, and I left it like that for about 15 minutes and then uh when you remove it, we're going to be using our foundation to dab on the ends to make sure that there's no like Residue so guys do. Let me know what you think about the install: what you think about the uh melting bed guys. Are you also going to try your own? So if you're new don't forget to subscribe, if you're already subscribed, but thank you so much guys for coming back, you are the best. I love you guys. Thank you for watching I'll, be seeing you in my next video, which will be making this crochet tweets.


Comments
Jennifer Adams: It’s not giving. Sorry