Temu Free Wig Review How To Make Your Affordable Wigs Look High Quality| 4X4 Close Middle Part Wig
- Posted on 25 February, 2023
- Lace Closure
- By Anonymous
Hi welcome. stay for while
https://temu.com/s/mD7SfBCOLc1j7Wx
FYi: its important to sign up first then refer back to this video for the exact item you want to purchase!
30% off link :
https://temu.com/s/mD7SfBCOLc1j7Wx
Temu sign up link ( to try & win free items)
❗️ https://temu.com/s/GGKYwOetfYyn7L
Link to wig: https://temu.com/s/L5N1wHyL72141o
Email: [email protected]
Instagram: https://www.instagram.com/pretty_kimmy...
Business Instagram: https://www.instagram.com/serene_beaut...
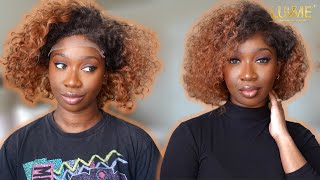
Buddy, hey everybody! Welcome back to back to grab girl because that's just what we do over here. So if that's something you interested in make sure you hit that subscribe button and that post notification Bell, so you can be notified every time. So today's video that you can tell we have a bust down middle part, closure wig, okay and it turned out absolutely amazing amazing. I love kids and this wig was absolutely free from temu, so check out my previous video. So you can get all you know the details on how to get you some free stuff, okay, girl, because I actually gave me another three week on the way and three free bundles all the way. Okay, bro, don't sleep on timber because they definitely came through with you girl, okay. So if this video sounds like something you're interested in how to maintain an affordable, wig like a cheap, wig, basically or um like an Amazon, anything some straight hair period, if you want to know the details on how to get your hair, shiny, silky and soft, then Just stay tuned for the rest of the details in this video yeah, so this is pretty much the packaging you guys just come in a plastic bag like this with the stocking cap in there and that's pretty much it. This is the wig straight out the package and how the hair looks in my previous video. I did more to like unboxing when I was showing you guys, the free stuff that I got so make sure you go and check out that video, if you haven't already explaining how you get free, hair and stuff from timmo. So this is just the unit right here. It comes with four Combs two on the side, one in the middle and one in the back and just a plain adjustable strap. It is a four by four closure. It is 28 inches and it's supposed to be 180 density, but it does not feel like 180 more like 130, but yeah. So let's jump right into it. This is all the products we're going to be using. So, of course we got the kiss, Lift Me Up powder and we got the 50 volume developer, so we can bleach the wig. This Kiss powder is blue. It helps to tone brassy knots, but I still had to go and tone them with my purple shampoo. So for closures, I do like to use just one scoop, because it's not a lot of lace, so you don't have to waste product. I did go ahead and put some of the 50 50 volume cream developer on the lace that helps it bleach better. But these knots were extremely big, and I didn't realize until this point that even this and bleaching it twice really didn't help as much as I wanted it to so. If you have some good lace, this step will be very beneficial to you. If you're trying to bleach your knots without having to go and bleach them again, so I did squeeze in three small dots. You want to do a small amount at a time adding into a powder, because you want it to be a very thick consistency, more like toothpaste to where it doesn't fall off like that, and then you want to go ahead and smooth it on. I did not have my brush, so I've been using this spatula right here and I actually like this better than I like the brush. Okay - and I just put it on now. I did let it sit for 15 minutes when, if it's chalky, then that means you need to add some more cream developer, which I did right there and I went and added some more onto the lace. But I let it sit for like 45 minutes. It did Tone the knots not toned the knots, but it did bleach the knots, but they were extremely big. This one I noticed, but I did get bleach on the hair and if you do just get a paper, towel wet it and put it on there. So this is how the knots look first, brassy orange, you know not realistic. Looking and this one I realized. The knots were huge, so I did go in with some Clairol purple shampoo to tone them to get that orangeness out of it. I just sat this on there for about 15-20 minutes, which this is the Highlight Shimmer like purple shampoo and after this it did take the brassiness away, but I felt like after the brassiness was taking, it really looked like the knots were huge. So this is when I decided to go in and bleach it again and I bleached like in a tea part motion, because I was only doing a middle part. This is a closure and you can see where I bleached it and you can see it is still brassy. So I did have to go in again with some more purple shampoo on there for about 20 minutes again, and then it took the brassiness away, as you guys can see right here, and this is how the knots look they weren't perfect, but I had to make Do because I had already bleached it twice and there really wasn't much that I can do, because the knots were just big, that's just how the wig is made. This is the only downside to this wig, so I was gon na put the wig in a bowl and condition it and all the other good stuff. But I decided to do this little trick right here, so I got some adore uh crystal clear. This is just supposed to be a semi-permanent shine or gloss that you add to your track hair. So if you know you know that silicone conditioner work miracles on bundles, we used to use that back in the day and I decided to bring that baby right on back. So I just put the Adora Crystal Clear inside the conditioner, because I condition hair every time. I use it whether it's my or client I'm going to deep condition your hair, just because we don't know where these factories been at. We don't know what they got there. What'S on the hair and I have sensitive skin and I don't got time to be breaking out, do you hear me so I just saturate the hair very well front and back top closure everything I even did the inside of the closure, which I didn't show on Camera, but I did like put conditioner everywhere and make sure it was well saturated. I did comb through it just to make sure I got in all strands of the hair before I went ahead and put the hair inside a plastic bag, and when I put in the plastic bag, I realized the plastic bag had a hole in it. So I just put it in another plastic bag, so um yeah, that's pretty much what I did after I put it in the plastic bag. You guys are not going to see me do it, but I did put it in a microwave for two minutes. Once you put it in a microwave for two minutes, you don't take it out the bag. What you do is you just open the bag? You can see the steam if it's steaming, you just closed up and let that steam sit in the bag and let your wig just Steam for a while and after it steams, you can rinse it out with cool water, so this is the next day. This is a hair. After it's been air dry, it has a nice Sheen and luster to it from the products that we use. It'S steel is very soft. It was actually soft coming straight out the packaging, so I did pluck it and then pull out the baby hairs you can see. The knots are still pretty big. I did have to pluck the part as well so right now. What I'm going to do is conceal. The part and start trying to cover up these big ass knots. You guys going to keep me to hear me talk about the knots because I was so blue because I got such a nice wig. I have big ass knots like that, but anyway yeah, I'm just concealing the part right now I did pluck it, I'm concealing it just to Define it some more because I just wanted the part to be the highlight of the wig. So you just take you some concealer take a small brush and go back and forth, and then I went in with um. What is it called the magic right here? Magic gray dye cover up, and I just went along the part just to make sure that the part was crispy in every part that was over. Bleached was covered up with the black tint, so yeah that just is a better way better way of making your part straight than using black spray. If you don't like using black spray baby, okay, you guys I'm gon na go in with my scissors and my Garnier fruit, tea, Sleek and Shine oil. This oil is perfect for flat ironing hair. This was the it oil for hair before the bio silk baby. I'M telling you you have to try it if you haven't tried it I'll, go in between bio silk and this for you all the time I've been using this for you for years. I just started using it by yourself. Can I think, I'm gon na convert back to using this oil because it was everything, so what I'm doing is just cutting my two inches off of the wig, making it blunt because it ends up a wig like I always tell y'all are just thin and when They'Re thin, you need to cut them because they don't look good, they look straggly and something about a blunt cut at the end. Just looks more classy to me. So that's what I'm doing I'm going ahead and I'm cutting those ends off to make it even all the way around. So I am going to go ahead and start flat ironing it. I did flat iron it already, but the oil with the flat irons it just makes the wig look so luxurious and nice, and I really like that. That'S why I like going in with the oil first, I did put oil on it previously, when I flat ironed it when I told you I'll, let it air dry, so I'm just going doing one glass run through with the flat irons. That'S why I'm not going piece by piece, because I already went piece by piece, but now that it's cut, I want to go ahead and flat iron. It again. So next up is the um, the lace, I believe the lace on the wig is like uh. It has those thick pieces on the end, so what you want to do is you want to go ahead and you want to cut those off with your scissors. I'M going to show you guys how to cut those off in a second. You just pull the lace up to smooth the baby hairs out the way and cut that thick piece off. I cut all the way up until as far as I can cut like, even if I got to cut a little bit of the track, because this is this - is what's going to help your wig like from. I don't know why I'm messing up. This is what's going to make your wig like flat in the front Okay, so this is what all you do. You just cut those little tabs off. It'S going to help your baby hairs, lay flat and everything. Okay, that is the key cut those off and then I'm gon na cut my baby hairs. I did make one side thicker than the other, which I do all the time. Oh, my God, I oh yeah we're gon na jump right into the thing. I did everything already in the Foreclosure wig, so there's not much to we do so. I still have the wig on the mannequin right here. Look at this luster and sheen on this wig, okay, so we've we've put it on. I have a pen in the back. Let me take the pan at home, I'm gon na put because the knots did not bleach the way I would have liked them to bleach. I'M not complaining, because this is a closure wig and I'm not having all that other stuff going on. So I'm about to take some Foundation. I got some Too Faced Foundation and I'm about to put it like in the front, because I already concealed the part so put a little bit on my hand, go ahead with my foundation brush. I use make sure it's Blended and then we're just gon na take this on the inside right up in the top okay. I want to make sure it's well saturated because I really wanted to come through on those knots that didn't because they don't they didn't bleach. Well, so I really want the brown to come through really good, but not so much that it looked like it's got, hair at the boot or anything like that like it was over bleached, but I still wanted to come through a bit. You know, and then I'm gon na bring it up a little bit, even though I'm gon na try to cut off almost all of the lace, which is what we're about to do next, so yeah, that's what we're working with now. It looks so much better. So so much better, oh my God! Yes, that looks so much better. I'M trying to push it through y'all push it through here and then I'm gon na put off this lid okay, because this wig is basically going to be a glue this week. I don't want to use glue on it because I do want to go ahead and I'm just going to cut the lace off now, because I don't want to have to wash it as much as you know. When you use frontals, you have to wash them a lot, because every time you put them on well, I don't know if how everybody else is. But after I take my wig off, I got ta wash it before I put it back on. I don't want to put no use glue, that's just not for me, but I'm just cutting this lace off doing a little zigzag motion. Just cutting it. Y'All can't really see, but y'all know how it is cutting lights off. So now I'm gon na go in with my even um right here right across okay. They try a little bit away with another layer and that's gon na, be it so we're gon na. Do that and then we're gon na put the wig on okay. So I'm gon na go ahead and tighten up the wig in the back and then I'm gon na slip, the wig on my head y'all. I forgot the mirror again, I'd be squeaking, so bad, but I got it now, pull this back down wow. This fits really good like extremely good. It'S looking good already, so the wig is pretty snug and it's really this snug, because I have my ponytail in or whatever. So. This is how the ends lay down right here. So I don't know they got it made like this, so I really like that. So, if the wind blow back my real hair isn't showing or whatnot, but what I'm gon na do is just take some of my my liquid moves. Put it around the edges and put my elastic band on just to melt the wig into the skin, more wasted, dangerous, McDonald's, okay, y'all! So I got a few flyaways. So I'm just going to take some of this some Liquid mousse again and just rub it down. Rub it down, but y'all we are done, we're done we're done. Let me stand up, so y'all can see how long this was a 28 inches. I cut like two inches off and I'm five seven. So, look how to comb go through. It y'all see the sheen on there. It goes in the middle of my back, so pretty so pretty! Oh, I got me another cute, everyday wig. So love that for me, but anyway, y'all very simple, easy to do, and I absolutely love, like I mentioned before. If I've watched it go check it out that this wig was absolutely free, I didn't pay, not a dollar for shipping tax. None of that Timo sent me this week for free just for getting people who join the app okay. So if you want to get you one um, you can click the link down below and have your friends join too. Okay, get your cute little every day, wig on you know like. Oh I'm feeling myself now. Let me calm down, I'm feeling myself now: okay, okay, y'all! We are done with today's video. I hope you guys enjoy how to maintain and make a affordable wig to treat with look very nice and expensive on a budget. Okay, so the wig was free, but we made it look extremely good, it's cheap already. If you want to just buy it, which I will have everything linked down, no, you click. You click on the link. I do have a post if you guys are interested in purchasing these wigs but yeah like I said this. Wig wasn't bad to start with. At all, but I wanted to make it feel more luxurious and expensive, so what I did was I did all the steps that you see me do with the conditioner the microwave trick, like everything so just follow those steps and bring your affordable units back to life. I always bring my photo weekends back to life, because companies reach out to me and they send me wigs. Sometimes they be like straight up trash but sometimes they'd be like it's giving Beauty Supply hair. So you know we all have to run to the beauty supply here and there and get some hair to do us a little quick, weave or whatever, and we got to maintain that so sometimes those wigs be given that. So if you want to make like that type of hair last longer, this video is perfect for you, so yeah. I feel like this weird turned out absolutely amazing, it's just so pretty, as you guys think it is so soft. I cannot stop running my fingers to it. I cannot believe I got this wig for three. Only downside to this wig is the big ass knots. I was telling you all about okay, like them knots. It'S not they big, but as for right now like, if you follow the steps that I just showed y'all, you won't even really have a problem with that at all, because I'm still gon na rock my damn wig, it's soft, it was pretty and I made the Cheap wood, look good, okay, so ain't nobody gon na be able to tell so you guys. That concludes the video. Like I said, I will have everything linked down below all the details of the wig, so just make sure you go check it out down below and click the links get the 30 discount code. If you want to purchase it, if you want to try to get it free, you definitely can just refer people to demo or whatever, but you can click my link also, so you can refer people and still get 30 off. If you just have to something you can refer back to my previous video, if you want to see how I got all of the stuff, I got free and I bought so yeah. That concludes this video. You guys make sure you subscribe click that post notification Bell and Link and leave me down below, and let me know what y'all think about this. Okay, let me know what's happening in the comment section and we'll be back next week or maybe in a couple of days with another video


Comments
MZ LEGACY MONEYBAGG: So pretty