Side Part Closure Sew In Diy Ft Alipearl Hair
- Posted on 05 January, 2020
- Lace Closure
- By Anonymous
ww.kasiamaebeauty.com
email: [email protected]
IG: https://www.instagram.com/hairbykasia/...
Twitter: https://twitter.com/KasiaMae_Beauty
●▬▬▬▬▬▬▬▬▬♛#AlipearlHair♛▬▬▬▬▬▬▬▬●
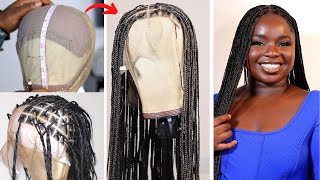
Hair info→Body Wave 3*16 with 16 inch 6*6 closure,
❤Same wig in video→http://bit.ly/2MGQpxh
Body Wave lace front wig→http://bit.ly/2MGrR7L
6” deep part lace wig→http://bit.ly/2ZCCU7e
Alipearl Official Site→http://bit.ly/2MH6wLb
➤10$ Off in Store use Code: alipearlyoutb
♡Instagram @"alipearl_hair"→https://goo.gl/SjMrzq
♡Want to win free hair? Click here→http://bit.ly/2H0Gmmc
E-mail: [email protected] (Provide Wholesale)
WhatsApp: 0086 17719937661
Ali Pearl Hair Aliexpress Official Store:
Body Bundles With Closure:https://bit.ly/2MvWxZ0
Body Wave 6*6 Lace Closure Wig:https://bit.ly/37aYEcQ
Alipearl Hair Amazon Store: https://www.amazon.com/alipearl
Body Wave Lace Front Wig: https://amzn.to/2qaafZD
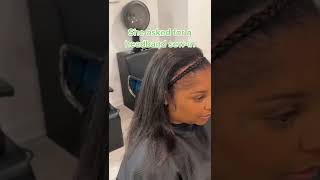
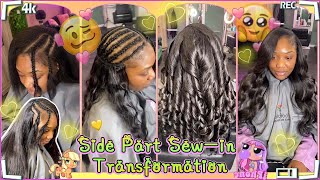
Hey-Ya occasion - and today I'm gon na show you how I did this side part close your so when using Ally Pro here, I have worked with them numerous times, so you already know imma leave everything in the description bar below for this install. So they sent me this cute little bag with the hairband we cap edge, brush lash comb, eyelashes care instructions, and then I got a 16 inch body. Wave 6x6 closure. It'S a bit closure, so you can do any type of parting with it really long. Tired and big pardon, it's basically better than the front to honestly, and then I got 316 body waves, bundles and so yeah, I'm just gon na get right into starting to braid my hair. I did bleach my knots off camera, so I just like braiding my hair down, I braid my hair to same way every time I do my weaves, so I know y'all probably already used to this, but if you're not I'm just parting, my hair on the side, Where I want my parts to be, it doesn't have to be a purse size part of where you want your parts to be, but you want that section should be as flat as possible and then I'm going to be oiling my scalp. You can find my growth, serum and oil on my website. However, what I have in this little container, I'm using it, was a mix that I made because I sold out of my danghang gross sales. Okay, I saw I just measured my hair for my elastic band and I'm going to be cutting it off. It'S going to be fitted to my hair, but it's not going to be tight because I don't want my hair to hurt from the last bit. So I'm just gon na put the closure on my head and measure where I want my elastic bands from sit which is right behind my ear and then I'm gon na snip off that thick part of the closure on the side. Up until that part of where I wanted to start it or where I want, the elastic bands will be sewn on it and I'm gon na do the same thing on the other side, but I'm not going to cut it down as far on this side, as I did on the other side you, okay, so now I'm just sewing it on and I sold it off-camera. But basically, I'm just gon na put the closure on my head and begin to plug I'm going to do a lot of plucking off the hairline of this closure was so full and I need some new tweezers. So it really gave me the floods honestly, like you shot some good tweezers, because this dressed me out, I ended up having to go back in after, but anyway, I'm just gon na be slick in my edges. Down with some gel, you feels what I kind of gel you like you, I'm saying: blow-dryer, that's the place, make sure you know you don't have none of your hair. Stick it out, because you're going to be doing the ball. Cap messy - and so y'all probably have already seen me - do this so many times on. If this is your first time, I'm still gon na explain it, I'm just using some gel to adhere the caps on my head and then I'm going to use some hairspray, which usually I use free spray, but I'm not today, I'm using some Tresemme holding spray. I, like it actually a lot and I'm just gon na let that dry well, I'm gon na blow dry it and then I'm gon na off the excess cap, and so the cap onto my head, you, okay, so I'm about to give y'all a kid sick success When I cut off my cap, my cap follow the way that my hair, my naturally goes. So what I'm going to do is use the edges of the cap to guide me and plucking out or pulling out hair that follows my hairline. If that makes sense, so how my hairline goes down right there and then dips back, I'm following my actual hairline and I'm plucking it out on my closure so that my closure can mimic my real hairline and then what I'm going to be doing now with what I am doing now is going in and thinning out that hair line with my tweezers and, as I mentioned before, my tools are terrible, so I did have to go back in after I finished this video and pluck a little bit more, but you kind of get The gist for the most part, okay, so now, I'm gon na be sewing my closure on I'm gon na start in the back, and I'm gon na make a lot and then I'm just going to kind of pull the closure flat to my scalp and sew it In place and then once I'm doing, slowing down one side, I'm gon na go right back to where I started it and sew down the other side. Okay, so now that I'm done slowing down my closure, I actually should have did this ahead of time, but I forgot to have to go back and do it, I'm just adding some makeup to my wig cap, because it is not the color of my skin and I'M just using some hairspray to make sure that the wig cap is really like melted into my skin, so yeah, I'm just gon na be using some. You know makeup, that's my color and once I'm done with that, I am going to begin to show my hair in, and I really can't see it that well, I'm doing it mostly. I feel I look through my little mirror sometimes, but for the most part I'm doing this I'll feel, but I am just gon na be going back and forth doing the flip over method and I'm just flipping over the track at the end sewing it back and Forth until I finish with each bundle, I also put in it two bundles of hair in my head. It'S really personal purpose, how many bundles you put, but since the closure was so big and I only had 16 inches of hair, it made the bundles to be a lot fuller. So I only ended up needing to do two full bundles. So if you like your hair, fuller, that's fine, but it was really full, so yeah, okay! So now that I'm done sewing in my hair, I'm just gon na show y'all like some parting y'all can party anywhere you want. So after that, I'm going to be using my bow, my bow to hold active lace, glue to glue my closure down, and I'm also going to be using some 91 % alcohol, okay y'all. So I'm gluing, my hair. I do three layers of glue. Why I'm going my legs I'm doing three layers of glue? I let it dry completely before I put on the next layer, so it'll be clear and then you put on another layer, and you do that three times, and so this is what my dilemma came in. I thought that I was recording and I wasn't recording so what I did was. I inserted footage from my last side. Part closure install so in or whatever just so, y'all can see what I did, because I did the exact same thing. So I'm just basically pressing down the lace into the glue and combing it and then I'm doing like jagged, like almost zigzag motions with my scissors, to cut off the lace. I'M so sorry that I didn't get this footage, but this was the best that I can do instead of just leaving it completely all the way out. So I hope that helped out out sorry, but anyway, once I'm done with this little clip, I'm going to go back to me doing my hair and I'm just going to be plucking, some more your eye, plucked and plucked and pluck and pluck and pluck me pluck The clip, but now at this point I'm just going to be pulling out my baby hair and going ahead and cutting them and using some mousse to smooth them into place and set them. So the shorter you catch a baby here, the more natural they're going to look. You can always go back and cut them some more after you know you stopped them. If you don't, if you want them to be shorter or whatever, but yeah, I'm just gon na. Be using my little edge brush to the calm side of my double-sided edge, brush and comb, to be slick in my to slick, my baby hair into place - and I am using what kind of I forgot what oh the afro G mousse for this you can just Use any mousse that doesn't have alcohol in it, but I really like this one. I also like the Nairobi one too, so I'm just going to use rap strip to tie my hair down and then I'm going to style it and I'll be back you, okay! So I'm taking off my wrap strip. This is how it looks right out of the rap strip, I'm going to do a little bit of fixing up on the side. Where I have my hair push behind my ear. I just thought it was too full it thick. So I did go back and plug that some more, but what I'm going to be doing is using wax stick and using that to flatten my closure and I'm also going to be using some concealer. That'S the same color as my skin and being using like a more fluffy brush to blend the concealer out cuz, I'm using like an angle brush to put the concealer on then I'm gon na use a little bit more of their moves to kind of, like fix. My baby here how I wanted to be - and this was pretty much it I just you know - did my little final touch-ups with the hot comb and a little bit of a little more plucking. And then I use a small razor comb to put in a little bit of layers in the front and that's pretty much it for this tutorial. I hope y'all enjoyed it, give it a like thumbs up or whatever comment and if you are not subscribed, already hit that subscribe button and turn on the post notification bill and I hope y'all enjoy. Thanks for watching. I'M gon na have new videos coming soon bye.

Comments
Queen Leo: I love, love, love your tutorials! You be doing sew ins on your own head and it gives me motivation to do a sew in on myself! When I do I will be sending pics! Peace and Blessing Queen
Danyta Townsend: I already knew you was going to slay this. Beautiful as usual
Nini Bossalini: When my beautiful brown skin sisters complain and say they got scammed by a stylist or the style came out poor I copy the link to this video and tell them to do their own hair. Save your coins
Leighla: How long does the glue last? Also, how often do you have to redo the baby hair? Does washing your face affect the closure edge at all? Does that concealer get on your pillow? I'm about to try this for the first time that's why I have so many questions.
Mo nique: Finally found a style and look that I love sooooo beautiful thank you
Jamaican Goddess: Gorgeous! I can tell that you've improved from the side part video you made a year agokeep up the good work and I'm most definitely about to do my hair like this
Franchelle Workmon: I love this. You did that girl. I have a client with a 4x4 closure and I was just looking at how I would want to do it. She want a side part so it kind of go with how I want to do it
Asia Chanel: I know this is a lot of work and you still do an amazing job
Kay spice: Pretty as always! But come on sis we need more videos
T M: This came out gorgeous and flawless
TheLost Panda: Yo at 4:54 , that’s a good hairline tip ❤️ THANK YOU
Quentella Walker: I love Th is you did great ! Ima try this on myself wish me luck lbvs
Queen Universe: I love your tutorials! I just need to know since you been working with this hair a lot I have questions. Can it hold curls for a long period if time? When you get hot or sweat does it look like store hair? Can you bleach the hair? And is this hair you recommend if I'm just learning how to work with a closure? Love you thanks :)
Lulu Jackson: I really want her to make me a wig now .
whitey bop bop: Love this ❤
marlas51: Love this hair
Orlandria Medlock: You did that girl!
Denise Varnado: First time doing a sew in can you give me some advice? I brought bundles 16, 18, 20 inches what size closure do you recommend?
Patricia Bevelle: Beautiful I took notes to my hair journey
Lyryk Autrey: So do we cut the band and some point or does this stay there the entire time ?
Erica Smith: Slayed it❤
Ginas Plug Tv: Love it
Tanya Anderson: I see you're using that Babyliss Titanium flat iron, my mom just got it...how do you like it?
Franchelique Waller: I like your method of the side part its in the .middle giving parting options
Malika Perry: Could you do small straight backs to achieve the same look ?
Tonia Burrow: You've inspired me!
Ashley 2393: Period this was pretty
Shaquille Thomas: Should I order from the ali pearl website or aliexpress??
Soraida Hahn: Perfekt closure wow
Lyryk Autrey: So with your elastic band does it get seen over or cut of or ? It’s kind of hard to tell
Physics Is Not Fun: how long do u keep this in?
Cassandra Renée: Loved this Video❤ also i was wondering if Can you make a video on how to wash your wig & the lace and reinstall. For both Straight & curly wigs.
Shonta Taylor: So talented
jennie lefedor: Do y’all glue the closure all the time? I don’t have the patience
I’mJussTi: omg i love this
Aniya Newsome: Looks BEAUTIFULAnd I love your tutorials!!
ilashflare - The lifestyle: You did an awesome job
Destined2bdestini: U did ya thang .❤️❤️
T T: Can someone explain to me what the cap does and why its necessary with all that gel and hairspray???
Official Keona Jordan Music: Do you sell custom lace closers?
Kim Campbell: Thank you for. When you buy in bundles and it comes with 18,20 24 or how ever. Would you start off the smallest bundle first and next middle to the longest for top of head.
BigbangingBurks 1: Beautiful
Shakira Lanier: Yasssss girl ❤️❤️❤️
Kimmie Colton: U did a amazing job but what kind of wax stick u used it?
Tanya Nichols: Ok so I had a sew in and my cap was coming up on the back and it only lasted 3 weeks . My closure was glued in I just want a sew in that will last
Taylor Dunn: I love her sooooo much.
Profession Gig: Bomb that is so smarr of you. Beautiful XOXO
Child of YAH: Yessss sis...❤️it
Christina Rose: BIHHH YOU DID THAT
Pixie Dust: Slayed to the gods sis
Brittany high: I love u so much and u do a wig for beginners and step by step
Vanessah Heavenly: Can u do another video like this but a free part
Monique Lanae':
Im GOOD: You be doing your own hair soo nice
Keyatta Latrice: Girl you look
TheyloveJy: Gifted
EB White: Plucking is always so hard for me
Erica Monique:
Tricey Boo:
saf Fran: great job
Diamond Ansong: NEW MEANING TO SNATCHING THEM EDGES LOL
Amirecal Jackson: How long does this style last? Maybe a month?
saf Fran: why did you use the elastic band
Shelbbbsss: Girl I can watch your videos all day
kea johnson: What size closure did she use?
Chantia P.: Do u sew on the band
Latoya Andrews:
Patbro Bro: Is the wig cap used as a scalp look for closure?
Makayla Martin: Perioddd!!
Parisoconceited:
Dilicia Blackman: Nice
Trudy ann Dixon:
Venessa Akunna-Nwosa: Where do you live? Asking because ill pay you to do my hair
Sweet Simone: Very nice
Quin: Can u do my hair girl?!
Sweet Simone: You left out how you use me the elastic band
niyanextdoor: PERIODTT
Courtney Dunson: Where you beennnnn??? And
Nai:
Jessica Griffiths: you baddd