How To Melt A Closure Quickweave Bob
- Posted on 28 September, 2020
- Lace Closure
- By Anonymous
Apply Closure to a Quickweave Process & Melting Baby hairs in place ‼️
Hair Used: Two packs of Empire pack hair & A Beauty Supply Preplucked Closure
Facebook: Tasia Brown
Instagram: Tasiahouseofbeauty
Snapchat: TasiaTiaa
Email: [email protected]
Please Like Share Comment & Subscribe
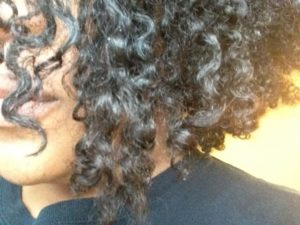
Hi guys welcome to my channel so today i'll be demonstrating on how i achieve this cute cute cute closure, quick wave bob on one of my long-term clients. I'M gon na go ahead and jump into right into the video into what i'm doing i'm going to cutting around cap. I went ahead and molded it down. Um i like to go ahead and have a firm foundation. I like to sew down the cap because it is a quick weaving. You do not want it to lift up in the back. At this moment, i'm a cleaning hook um skin, with a 99 alcohol y'all so hard to find alcohol, but i did finally get some and i like to clean the skin, make sure it's ready to go. I haven't tried skin protectant yet, but i'm going to work on trying it, but so far it's so good with alcohol for me and my clients and i'm going ahead and drying this before i go ahead and apply ghostbuster. I like to use ghost bun, for my clients to me: has a good hold and it lasts long if you do like three to five layers, so i'm go ahead and you can't see because i'm so far away. This is my first shot, video that i'm actually doing a voiceover and recording y'all. So just work with me. I'M just go ahead and applying the makeup to the back of the lace in the front of the lace and i'm going to go ahead and spray. Some guys to be spray to seal in that makeup, so it doesn't leak or spread when i'm trying to apply it to the adhesive. So i usually use these um y'all know y'all, go to the dentist, make y'all like the mouth swabs i like to use those to apply my glue, but i was actually had ran out when i was about to record this video, so i'm just using a comb. I tried my best to work with it. Y'All was not working for me, so i had one and just transitioned to my finger. Y'All see me, i couldn't do it, no, i tried, but it was working. So you know once you do this for so long. You find ways to work better for you, so if i don't have the tools, i do work around with what i have to make it work for me. So i'm letting that on glue dry as it's drying, i'm going ahead and spraying that closure sealing that makeup. In with the glass to be applying my second layer, i like to do a wide layer. Just so it sticks to the cap in the skin, and when it comes up, it doesn't pull up off the hair. You know the glue just pulls off with the cap and i don't have a problem with the way i do it. It works for my clients and it lasts, for at least i want to say roughly four to six weeks. I don't really have problems with people coming back, saying my laces lifting unless they did some hard rough sweating and went out to the club the night before and they was just sweating, but other than that. I have no problems. So as that glue is drying, i'm going ahead and find her out getting it real, real, clear. So just watch as i apply and let the glue go ahead and set in with the lace. So now i'm applying that closure to the adhesive and as you can see, it is a little white up under there. It'S because it's still stuck on some of the cap, but nothing that the blow dryer. You can't fix. I'M going to blow dry that out make sure it's sticking make sure it's ready to go and, as i am blow drying, i make sure i am trying to get in between every little piece up there. So it sticks to the lace and adhesive is down and to make sure there's no problems with lifting or anything, and i do like to take my comb and go in between and comb it out too also when i'm blow drying just so it can get in There see i'm gon na go ahead and comb it and, as you still can see a little white, but there's no problem with fixing that so i'm going to put my little milk belt on got one of my little elastic bands off um amazon and, like um Black and white, so they last me for a little while and once they start getting dirty, i switch them up and at this time i'm gon na go ahead and sew down the closure. You know i'm trying to make this part real, quick and fast and just sewing down nothing really special but just slowing down the closure, because i feel like with the quick weave yeah. You can glue it, but if you sew it down, it just give the hair. Do a little bit more extra security and it makes it last a little longer and you'll still be able to get a touch up with that quick weave when it's the closure is being sold down. So, as you can see going between it - and you don't have to sew it too close together, because you don't want to be hard for them to take out just give them enough space. So when they do it able to take it out, they could just clip it out and i'm gon na go ahead and finish sewing that and i'll be right back with you guys, y'all, sorry and finally got that closure slowed down. I'M gon na go ahead and clip my hair out of the way take that milk bill off go ahead and cut off the excess lace and get ready to comb out. My baby heads as you can see that is already melted, honey and we went through the melting process. Please excuse until your arms and i'm working on y'all, i'm on a diet trying to get this weight off, but it is what it is. I'M still fine. I don't care so cutting that lace off here we go, i like to part out my edges and go in between and just add some makeup to make sure it matches their skin tone completely. So i just go and i go use like a dab brush. I don't know what you like to call the foundation brushes and i just go ahead and dab, but as you can see, she really don't need a dab, but i just went back in there just so i like to get that seamless look boom boom boom. You see so let me go ahead and do that spray a little bit of his oh, it got to be sprayed, but first i'm gon na clean off all the excess glue. That'S up under there. That may have spread it out or if i put too much excess glue just going to clean it up with some alcohol, so the hair doesn't stick to it. Make it easy for you to lay your baby edges. Boom boom boom come down, get them out of the way all right, i'm going to spray a little bit of gossip spray, i'm going to go ahead after this apply the milk bag and put her back up under the dryer just to go ahead and dry um. I like to set them up under the rub for about good five to ten minutes, um no longer than 10, but just to make sure that um makeup blends up with their skin and make sure that um lace is dry and make sure it is ready. For the baby edges and the quickly to be done, so we go ahead and just comb everything out of the way and get it ready. So y'all, i'm back and i'm going to take off that milk belt go ahead and get those baby hairs off her skin brush them out, get them fluffed out, so they are ready to be laid, and this is just basically me giving a demonstration on how i Go ahead and apply the quick weave before i go ahead and bund in all the tracks for the install. I just want to show you guys how i do my baby edges and how to make sure that quick weave is laid, i'm going to cut them very. Very short, so they can go ahead and be ready. Now i like to use this gel, it's called slick and slay honey, and it lays i go ahead and apply a little bit of this gel to my baby edges and i like to use the nairobi foaming lotion just to go ahead and give me a little Bit of leverage to swoop them, it just makes it easy to lay them down when i put them on the edge brush so boom. I go ahead and do that and i like to do a c motion once moving my edges, i like to go ahead and get that first, one on the edge out of the way. Just start. Your little guideline basically - and you see see like like you're swimming in the ocean - not ocean y'all, but y'all - get what i'm saying y'all see me laying down. So i do that motion i keep and i use my fingers. Y'All fingers is a very big part to baby edges when trying to lay them and you're not gon na get them perfect, so you won't keep going back in and laying them. As you can see, i'm not perfect little pieces of hair. I pull out and i pull back if y'all do want to give me y'all a very slow demonstration on how i create my baby hairs. I will do that. You know this was actually a pre-put lace ready to go. It was already done, and i love pre-put lazy - just make y'all see that nothing, but it's just laid laying honey, pre-plugged and ready to go my favorite lace. So i'm going to go back ahead and wrap the edges down and i'm going to put back on the milk belt because i like to seal back in that um the tracks make sure it don't lift up because you did apply product to it. So you don't want your legs to lift, so i just go back, so it just have a little bit of hold to it and off camera. I'M just gon na go ahead and finish monday in the tracks and getting them ready for a hair, install and i'll. Be back at the end to show you my finished results and right now, i'm just combing out the extra hair and blow drying, so they can go ahead and be dry. I didn't let y'all know that, but before i cut it off, i want to let y'all know that hey y'all, so off camera went ahead and bonded all those tracks in i'm about to go ahead and show y'all how i lay this hair out so it i Could split it so good in with this closure doesn't look like her hair can like scalp. So i like to use the shea bum wax stick and i went ahead and sprayed some glasses b. I have a andy's plug-in hot comb. Maybe it gets the job done. This is my favorite hot comb and y'all see how it gets and that's the plug-in. So i love it, but i'm just go ahead and parting out each section in between this section, i'm partnering up putting a little bit of wax and i'm going ahead and making sure that hair blends in with every part of that hair. So i just want y'all to focus on this closure, how i lay it down y'all, as i am struggling to take this black paper off my laid baby edges. I just want to let y'all know i do not comb my baby hairs out just because a lot of my clients do not like the fluffy baby hairs, because they do not know how to comb them back or put them back in place. So i try to do my here as to where they stay, so they don't have to do too extra much work worry about them coming up anything, so that's the reason why i just go ahead and mold it and let it stay the way they are, and I comb out the little extra help, but they see it but them edges. They stand just how they are so right here. I just went ahead and sprayed some hair mist. I'M going to go out ahead, go ahead and part out. Each section apply some wax and some more hair mist and flare iron, each section out, so i get the desired part. I would like for this quick weave bob, so, as you can see so far, lay the honey laid look at that part. I didn't even plucked it out yet, but we use the lace. I'M gon na go ahead and finish the other side go ahead and do the one two one two wet spray flat iron: let's go and let's get it. This part was everything y'all. So i'm applying my sheet bomb wax stick to go ahead and mold my hair on the closure in the exact spaces. I want it to be i'm going to put a little hair mist on those baby edges, so they can shine, spread that gossip beat and we're going to go ahead and mold with that hot comb. Now this is the hard part, so you got to be careful when doing this make sure you do not bring your clients y'all. I'D have burned a couple, so i know how this go, but i'm i'm i'm good. Now, y'all don't burn them no more, but i'm just saying this thing to get really hot. So, as you can see, i'm going ahead and molding her part into place and i'm gon na go ahead and cut it. I will let y'all see the cut um. I guess i'm gon na decide by the end of the video, but i really just wanted y'all to focus on how i laid this closure and how i put it into place and how it just gon na melt with her skin. At this point i didn't - i didn't, have no good angle on the camera, so i can't really see, but i will let y'all see the finished results at this moment, i'm just showing y'all how i laid it in place to go ahead and prep it before i Cut it have someone in the background just so they feel comfortable. I won't put them in there and i'll just show you all the end results and how i sprayed my part and got it laid. So here i'm going to apply my line to make that part crisp. It already is looking crispy. I never did the black spray head and i'm going to spray it and get my camera focused and woof chris y'all, that's just black spray using the gold can. Oh, if that ain't, no bob, i don't know what it is seal that spray in shine it up with some hair mist and go ahead and comb out that bob honey, yes put it in place so y'all. This is the finished result. This bobby's live. Look at the cut y'all look at her. Yes, like comment subscribe, tell me, which i would like to see next and book taser house for beauty. Thank you for supporting me guys have a great day.


Comments
Chameya Brihm: I never watch hair videos all the way through without skipping, but you did this sis. I watched everything from beginning to end.
Lex O: Excellent and easy to recreate at home cuz these other stylists be making life too complicated when it come to hair
Ash’: This is such a great video for beginners..I just love the way you break everything down and you did her closure so effortlessly. Everything was on point. New Subscriber ♥️
Marissa Payne: This is extremelyyy helpful. I do my hair myself and I definitely learned a better way to lay my edges from you. Thank you so much
etty hill: I love this! The way she did the closure is so much easier than other tutorials I have seen
Takari Brewer: "If that ain't a bob, then I don't know what is" You DID that!
naeshia harris: Yasss im gonna do this tomorrow.. The way u laid her frontal is a way i can comprehend..lol..i lovee this..and thank u for this video
La'Shay Scott: I found this very helpful! I've been wanting to try lace fronts w/o full fledge diving in. So thank you. Also, let's just talk about the comment when you said " excuse my arm I'm working on it. But I'm still fine" that's what made me subscribe QUEEN!! I LOVE IT KEEP UP THE GREAT WORK!!!❤
Ty W: Really great work. Thank you for sharing with us. I like how detailed it is. ❤️
Monday Loveth: I can’t wait to have this look for this summer ❤️❤️
Geminidrama: Yes Ma'am! You definitely know what you are doing! I tried it on my girls and they both had me take it down 2 weeks later because of the extreme itch and their scalp couldn't breathe. Hopefully there's a better way than what I did
kia williams: This is absolutely beautiful I love it great job ❤️
BRIE SHARNELLE RN: The model is naturally beautiful
Rashad Brooks: You did an awesome job! Loved the natural looking baby hairs!
Aviance Slowroll: Super detailed!! I love it! Keep the detailed videos coming please! Subscribed
Jaye Beaumont: I love this straight to the point with it but easy to understand. You are a bomb stylist hun.
twalkaj: Love it! Great tutorial.
Meek🥰: This looks amazing , you did great ! Keep it up ❤️
Brianna Robinson: I just have to say you do an amazing job. More videos, please!
Camille Parker: The first time I actually watched a full hair video and leaned something from it. Thanks for sharing!! It looks amazing
Deasia Thompson: I love this stylist energy it looks bomb!
T Far: Baby this quick weave look like a frontal. Slayed!!!
Keyona Moore: LET ME SAYYYYYYYY THIS IS ONE OF THE BEST VIDEOS I'VE SEEN IN SO LONG! BOMB
Michelle J: Doing this for when we go back to school !! You killed it What kind of glue did you use on the lace?
Simply Keisha B: Flawless and Amazing Natural Look!
Nesha: I loved how you placed the closure more on the side for that deep part look it’s the whole bob for me
pas4466: Wow this lady is magical one of the best quick weaves I’ve seen on YouTube! Great job
Ms. Liberia: You definitely did a great job!
Shermeka Winston: Best closure install I seen thus far. Love . More Hair!!!
Kendra Shine: This was EVERYTHING!!! I love it
keke fay: I'm about to do my daughter's hair. You did that boo. I love .
Nyeja Monay: Model is beautiful and you did an AMAZING JOB LOVE THIS❤️❤️
Mel M: This the first hair video where I didn’t skipped. You had me glued to the screen. Great job Ma . Beautiful
shalonda gasaway: This is one of the best closure video, I have viewed on here. Love it
tanya carter: This is beautiful awesome job
Monday Loveth: Wow amazing tutorial thanks ❤️
Nola Niecy: Yeah you did that it came out beautiful
Rhonda Williams: Oh woow! Impressive! Very neat and a great job. I will try this
Tanisha Bryant: Like it very simple to achieve the look. Thanks
Gail Baker: Can you give me a list of the products you used on her hair. You do I really good job. Loved it
jamilah shahid: You did that!!!!!!! One of the best I’ve seen
angela nadeau: LovelyYou did a beautiful job Your honesty is welcomed, lol
Sierra Rhymer: You did that!!! Great job!
Brooklynn Bourne: Yooooo!!! That closure is slaaaaayed!! You couldn't tell me this wasn't a full frontal. Simple and easy to follow, great video!
Jackie Durant: This bob is EVERYTHING I love it so much Can you tell me what kind of hair mist did you use?
Rhetta Mcbride: OMG !!! That is lit!!! Fantastic job
Sheena Shortcake: GIRLLLLL THAT BOB IS SO CUTE LOVE IT
Fran Soles: Understandable, yes thank you, beautiful work
TWEEZE ME PLEASE: What brand was the closure ? Like from what company so i can purchase
Rosslyn Gilmore: Thank you im ready to try this
Travis Douglas803: Beautiful job
Alexandria Nicole: Awesome job
Kenya Laury: You did damn good !!!!
Taja Gee: I enjoyed listening to you and watching well done young Queen ♥️
Pmomma100: Loved it!!! Wow very nice.
Justice Wilson: My stylist always slay I love her ‼️‼️‼️ YAS MA’AM TASIA
Kareisha Watson: Yes!! I love it
Tray Turner: Love it!
Shatara Relaford: Love It!!!
Tacia M: That was great great job
SheisME: You did that!!
Iris E: I love your voice and your energy. You do amazing work
Joyce Lloyd: YOU DID A BEAUTIFUL JOB QUEEN. LOVE YOUR Video SEE MORE
Ebonye La Soleil: Beautiful!
Siphokazi Figlan: This is stunning
Hudson boy: Now, this look natural. Don't remind me of the everyday lace
HairObssession: Thankk u for this video.it really helped me do my own closure wit baby hairs...u are a great teacher/ stylist
kimber Bryant: Beautiful talent. What spray did you use, hot comb and hair stick? Thanks in advance. New subbie❤️
Ms. CeCe: Best install i have ever seen!!!
Luxurious You: Love it
kallahari: Wow you did that and still don't have 100K subscribers?? Underrated. Very natural looking good job ! new subbie from Europe.
Uzi: This can’t be from the beauty supply store! Amazing
Gabrielle Bailey: Did you mold the hair before you put on the cap or do you just apply the cap?
Raquel4Ashley: Beautiful ❤️
Kay Linell: Loved it
Trinity Gillings: Your video is great sweetie. I love how you did it. Im gn try it today. Thanku.
SlayedByMatthew: I loveeee the way you do baby hairs
Susie Rodriuez: Beautiful
Angel Gary: You slayed this bob babbyy!!!!!
Reva Dean: You slayed that❤
Dymond Nails: What kind of closure is this and where can you get it from
Samantha Cutchin: Hey! Beautiful video was the glue for edges?
Yourdailybeauty daily: Beautiful
YaYa love: Girl this is soo pretty
Summer's fun: Beautiful
Jamie T: Love this
SimplyBeingToya: Girl!!! You laid her hair
Trinity Gillings: I know ur clients leave you and be happy. You are gifted hunn.
Breyana Simone: When they be spraying the black spray for the part and seal the look I threw the phone shit be so mf cold
KEYIA: Beautiful
Nicki M: You did that!
Day byDae: You really out did yourself love
Jasmine Jones: What closure??? Cause babyyyy this is everything the technique the finished look the model LOL ... you did ya thang new Subbie
The H Family: I wish you would of showed us how you braided under the cap, but great Install
Slayyd By Shaii: Can you do a step by step video of this
Arlana Brumfield: I've been reluctant to change my quickweaves to include a lace closure BUT I really enjoyed this. I'll add this service. I missed where the melt belts came from.....anyone know?
Quanetta Patrick: New sub here... you did that‼
Nico Spanxx: Ma’am you did that thang
Yourdailybeauty daily: Good job
sherise scott: I need that closure. Its bomb. Where can I purchase