Alopecia Transformation | Deep Wave Lace Closure Bob | Quick Weave Tutorial| Step By Step
- Posted on 20 February, 2022
- Lace Closure
- By Anonymous
Detailed Step By Step Quick Weave Tutorial
Location:
451 Sumter HWY Bishopville, SC 29010
Booking and Inquires [email protected]
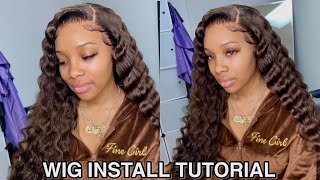
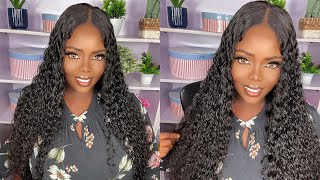
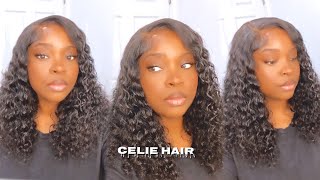
Hello, you guys this is miss felicia inspire. We are back again with another tutorial today we're going to be demonstrating how to do a deep wave lace. Five, so get your pen and pad ready, because we are going to be getting into all the details. Okay, so let's begin so, i'm going to start off with rubbing alcohol, and the purpose of this is to remove the oils from the scalp and i'm using the 901 percent. And you can find this at your local walmart or you can go to salads beauty and find it, but this is um. I find this product to be very, very good. It gets the job done and it's inexpensive, so you won't have to worry about that. So all you're going to do is just get a cotton pad and get the oils off of the scalp. Yes, she is an alopecia client, but this doesn't harm the skin at all. So i'm going to be using a 4x4 lace closure. I have already bleached it. So um you're not going to see that process and i thought i recorded it, but i didn't, but i'm using three bundles of deep blade. I think this is 10 inch, 12 inch and 14 inch. So all you're going to do is cut the tabs off the side of the lace closure and when you do this, it's going to help blend the lace closure better. When you go in to lay it down. So all you're going to do is get your scissors and just cut a little bit off you're not going to cut off much just enough so that when you lay the front of the closure down, it's going to blend seamless seamlessly into the skin. And this is how it looks on the back. All i did was bleach the beginning portion of it because you're not really going to see the back. So that's all. I want to do okay, so right here, all i'm all i'm doing is lining it up where i want to place the lace closure, and this is going to give you a guide on where you want to place it in gives you a visual of how it's Going to lay when you lay the lace closure, so i'm going to go behind just one more time and clean up that area with a alcohol pad. Today, i'm going to be using the evan platinum lace glue to lay this let's closure down and you can find this at amazon and it's inexpensive, but it does an awesome job and i'm going to be applying it with a wood. Stick just for sanitary reasons, and i find this to be very, very good. It'S not like the plastic um tools that some people use when they are applying the lace glue and it doesn't stick and you won't have to worry about any product build up and you can just throw it away so you're going to just lay a couple layers Of the lace glue down and when you are done or when you feel as though you have enough layers down for me, i'm going to pla apply at least four layers just because she is a alopecia client and she doesn't have any any um hair. So i'm going to just go in and apply as many layers as possible so that she can get longevity out of this quickly. Okay, so right now i'm going to be using my ruby, kisses cream foundation, and this is going to be my replacement of lace. Tint and all i'm going to do is get my brush and just kind of brush it on the back of the lace, and this is going to um, take the place of using lace tint. I do use lace 10 from time to time, but for this purpose, i'm going to be using the cream foundation and you can find this at your local beauty - supply store. Okay, so right here, you're going to see me get ready to lay down this lace closure, and this is going to make or break how your lace closure is going to look. So you want to make sure you place that lace closure in an area where, as though you are creating a hairline for your client, so this is going to set the foundation of how this is going to lay how it's going to fall. Where you're going to place your parting, all of that is going to be very, very, very important, and when you lay this closure you're going to pull it a little bit tight like i did. I hold it down on secure one corner and then pull a little bit tight, just to lay it down and secure it from end to end so that you don't have any bulks. Then i go in and and laid the the back of the closure. You, you have lace glue on there. So, therefore, when you lay it down, it's going to stick and all i'm doing is kind of pulling it taut just a little bit just to make sure that it's laid down in all all areas of the lace closure, sometimes depending on how much glue you have Applied you may have to go in and glue some down with black glue around the edges and all i'm doing is parting just to make sure that in all areas the lace closure is laying down, because you don't want any bulks. So all i'm doing is taking the back of my comb and kind of pressing it down just a little bit so that i can make sure that that lace glue is adhering very, very well for this application, i'm going to be using the 30. Second super bond glue and you can find this at your local beauty supply store as well, and now i'm going to apply the black wrapping paper to her hair just for added protection of her scalp and you're going to apply everywhere as needed. Right now, i'm going to begin laying my tracks, i'm going to start off with the longest length first, simply because i need that length underneath and i want to layer have that layered effect, because i will be stacking and razor cutting the back of this quickly. So i'm going to be using the um longest length first and it is double and i am applying it double. It makes no sense to me to apply one by one, but if you are a um, if you are trying to be productive and get this done in a timely manner, when you are working on your clients or if you're working on multiple clients just go ahead And leave um the tracks as they are in um, applying it double is going to speed up the time when you are applying and laying those tracks, and i'm going to do this from side to side side to side all the way up. Until i get to my lace closure again, i'm going to start off with my longest level. First, all the way up to the shortest do now that i'm done laying all of my tracks, i'm doing a little bit of last minute pressing, and this is how she looks after everything is laid down just going to kind of breeze through those um curls and See where everything is falling inlaid and i'm going to prepare myself to cut that lace off so right here. All i do is get my scissors and i will put a cut in the middle, and all this does is give me more control cut a little piece at a time, use a razor or you can use a eyebrow archer um to cut that lace off. Make sure you take your time because you don't want to cut your client. This blade in particular, is very, very sharp and after i cut the piece off all i do is um press down with the back of my razor, and i do apologize that i'm somewhat standing in the camera. If you missed it, i apologize about that. But this is how you're going to be looking when you cut that lace off and um. Don'T worry if you have a little bit of a case, you can always go back and add your makeup after you lay the um after you cut the lace off, you can always go back and put as much um powder on it as needed. So right here, all i'm doing is laying out how much i want to cut when i get ready to lay down those baby hairs and i'm kind of comb it over just to kind of see where this is falling and laying and i'm pressing all at the Same time, just to make sure that lace is down - and you already can somewhat see how this lace closure is going to be falling, and this is how all i do. I comb it just to see where i'm going to place that lace parting. So now you're going to use a comb to part how you want the lace part to lay me in particular, i always like to use a curved parting for some reason: um it gives it a better and more natural look and all you're going to do is Lay that um lay that part in there and while i'm parting, i'm making sure that i kind of press because you have to remember you, apply lace, glue and if you press on that parting is going to um. Ensure that that you um that it's sticking and you won't have any bulk. So now i'm going to use my tweezers flat tweezers, you can get tweezers from anywhere, but you want to make sure you have a good pair of tweezers that grip really really good. So all you're going to do is make sure you get all of those hairs out of that part. So when you are done applying um tweezing your part, you are going to apply your um phone wrapping lotion. Today i am going to be using nairobi, foam wrap, and this is a very, very good foam wrap lotion. It doesn't um, leave a lot of white residue, it doesn't get hard and it leaves a awesome shine and i love that it doesn't take a long time to dry. But you are going to apply this foam, wrap lotion to the lace closure just to tame that frizz and to lay down the hair in the direction that you want it to lay. I'M also going to be using this to um style. My baby hairs so just apply as much as needed. The more you apply the easier it is to maneuver the um, the baby hairs on the lace you on the lace closure. So all you want to do is use your comb to direct the baby hairs in the direction that you want them to lay. Also, please remember that you don't want to take a whole lot of time doing this process, because you don't want to um have to keep applying applying applying. This should be a quick process to style your baby hairs, i'm kind of detailing it a little bit more because i want it to lay really really nice on her. So also remember that you don't have to use a 4x4 lace closure, i'm using a 4x4 lace closure simply because you just get apart. But if you want to have more um creativity or if you want more space, you can use a 5x5 or even a 6x6. But today i'm using a 4x4, and this is how i am laying these baby hairs so right here, i'm going to be filling my part with concealer and all this is going to do is give it a more natural look. I do mix my concealer with the um protective bun, and this gives it a better look and also it makes sure that the lace part is laid to the scalp, because once it dries under the dryer is going to seal in and it's going to cover any Kind of knots that are going to be showing so this is going to make it look very, very natural, so she is back from under the dryer and you can look at that part and see how well that part looks, and it looks very, very natural. Now i'm going to begin cutting this um, this bob and you're, going to ask your client to sit straight up simply because everyone don't have the same necklace, so you're going to ask that client to stick straight up so that you can get the proper angle and How you need to cut that ball to make sure that it looks good? I'M i'm going to be stacking this bob in the back, so i really need her to sit straight up. Use that razor. This is um a razor. The razor comb out of the hair store and i'm going to start that um start stacking. My layers up high because i wanted to give it a really really nice layered look in the back right here. I'M going to um begin wetting and styling this bob. This is the finished. Look, i've done all the razor and that's going to be needed, so i'm going to be using my water bottle simply to wet this hair down. I don't want to use a a lot of product, so i'm going to go ahead and wet it with the water first and then go behind it with the phone wrapping lotion, because you don't want to use a whole lot of product weigh it down. Have product build up, you don't want it so you're, going to begin by wetting that um hair with water, then you're going to just simply apply your foam. Wrap lotion apply as much as needed. I'M just going to be applying and combing it through. Then i'll just be teasing it out just a little bit do and, as i am applying my finishing touches, this is pretty much going to be your finished. Look don't forget to like comment, share and subscribe this video, if you learned anything, make sure that you try. It leave me a comment in the comment section and yeah. This is the finished product just tease that hair out as much as you want to and girl. Yes, slay honey, so go ahead and try this on your client. I hope you learned a lot come on back to the channel i'll bring more tutorials for you, guys and yeah. Don'T forget to subscribe. Thank you guys. So much

Comments
Sheronda Riley: Love this and it’s not too much hair it fits her perfectly!!!
Sarah Moses: You did a very good job on everything. It looks very nice and fits her face.
Loretta Foster: Very nice, and You explained the process to easily be understood Beautiful
Earth Angel: I love it ❤
NiqNiq Nicole: This is so pretty you did an amazing job! Where are you located?
Rosemary Vyslouzil: Looks really nice
SIERRA SHEAR: Oh hey neighbor!