Glueless 5X5 Lace Closure Wig Install + Deep Side Part Ft. Klaiyi Hair
- Posted on 10 January, 2022
- Lace Closure
- By Anonymous
●▬▬▬▬▬▬▬▬▬♛#KlaiyiHair♛ ▬▬▬▬▬▬▬▬▬●
Get 25% off Off Use Special Code: MY25
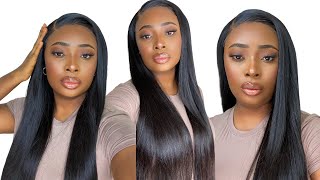
I'm wearing 26" HD 5*5 Lace Closure Body Wig:➤https://bit.ly/3q73PXw
https://www.klaiyihair.com/ ➤New Protective Style V-Part Wigs:https://bit.ly/3HQMl7G
Must-Have 13*4 Lace Frontal Transparent Wigs:➤https://bit.ly/3Gonxn6
Can't Miss Lace Front Curly Wig: ➤https://bit.ly/3k1PSqa
Invisible 13*4/13*6/5*5 HD Lace Wigs: ➤https://bit.ly/31HcruB
New Trendy Lace Part Wigs:➤https://bit.ly/3Ge84Gr
Big Sale!!! Affordable Youth Series Hair:➤https://bit.ly/3zGRNHu
Klaiyi Hair Official Website:➤https://bit.ly/3f9bnm8
Aliexpress Klaiyi Hair Store:➤https://bit.ly/3r6kERs
Amazon Klaiyi HairStore:➤ https://amzn.to/3jeMnug
YouTube "Klaiyi Hair":➤http://bit.ly/2zpjQhu
Instagram "@Klaiyihair_no1": https://www.instagram.com/klaiyihair_n...
Facebook "@NO1KLAIYIHAIR": https://www.facebook.com/NO1KLAIYIHAIR...
Contact for Wholesale: +86 18864600633 Email: [email protected]
#klaiyiwig #HDwig
My Website: https://kb-kollection.com
KBKOLLECTION IG: https://instagram.com/shopkbkollection...
KEEP UP WITH ME ON ALL SOCIAL NETWORKS
Instagram: https://www.instagram.com/thekiarakayb...
My Website: https://kb-kollection.com
Twitter: https://mobile.twitter.com/KiaraKayBro...
Business Inquiries: [email protected]
==============================
Are you a YouTuber looking for Sponsorships?
Join Octaly: https://www.octoly.com/youtubers?yt_re...
==============================
I use MagicLinks for all my ready-to-shop product links. Check it out here: https://www.magiclinks.org/rewards/ref...
Hey guys welcome back to my channel, so today's video is sponsored by kaleigh hair and it came in this box, i'm just taking everything out so starting with the things that came in the box, so i got a wig cap. I also got a little headband a pair of lashes and then i'm going to take the wig out the wig that i'm working with today is a 5x5 lace. Closure wig, as you can see when i open it up and definitely looks like the knots have been bleached on this. You can tell by the color of the lace that the knots have been bleached, so here i'm just trying it on my head. So it already came with this middle part, which i do a middle part, a lot on lace closures. So what i did was shifted it to the side, because i wanted to do a side part. I'Ve never really done a side part with a lace closure and because it is a five by five. It'S a lot more lace on the closure, so i'm just starting off with a wax. Stick, i'm just going to go over that with the hot comb. I did use the wig cap that came in the box and it is pretty light. So i'm just going to take some of my foundation and place it on the cap, where the part is going to be because you can see the cap through the part because it's so light and then i have the wig back on my head and i'm just Going over it with a hot comb, again just making sure to press it out because, like i said, i did shift it to the side. So it's no longer a middle part. I have turned it into a side part and if you want to part it over further, of course you can do that, but i just left the part that it already came pre-parted in i'm taking that same sponge, no product added and i'm also applying it. On top of the lace just so that it can blend so this is basically my lace tint for today and i am doing a glueless install, so i'm using the suave hairspray and i'm just going to spray that right on top of the lace. This is how i like to use hairspray. Of course you can use the got to be glued if you prefer that this is not as good of a hold as the got2b glue, but it gets the job done and, like i said, it's glueless, so it'll be a lot easier to take off when i'm Done wearing it at the end of the day, and then i am going to do some layers because i want to do curls so using a razor comb is probably the easiest way to do layers if you're, not a professional, which i am not so i'm just Combing down going downwards on the hair, just be careful not to chop off too much, don't be too heavy-handed, but just kind of drag the comb through the hair till you reach the end of the hair and kind of just create these layers. As i'm doing, you should be able to find this at your local beauty, supply store or maybe sally's. You know you can always try amazon as well, because amazon has literally everything, but i just got mine from my beauty supply store and, like i said i like to use that it's a lot easier to use. Instead of using scissors, i'm using the gonier heat protectant spray, so i'm going to spray that on the hair first and then i'm going to take the sleek and shine anti-frizz serum and i'm also going to apply that on the hair. These are products i have used a long time ago and forgot that i liked them, and i ended up picking them back up again and using it, and it just reminded me that i actually do like these products and they are very affordable. So these products is a cheaper alternative to the bio silk therapy that i use a lot, but i actually do like these products better and then i'm going to start with the top section. So i'm going to start at the top and then work my way to the bottom. So i'm just wrapping the hair around the barrel, like it's a curling wand, because that's the easiest way for me to use a curling iron. But i do kind of twist it like it's like it's supposed to be curled, but it's just easier to wrap the hair around the barrel first and then i just let it fall in my hand, and i am going to pin up just the bang part of The wig, so just where the hair falls in my face, i'm going to pin it up just because i want those curls a bit more tighter and bouncier. So that's what i'm doing you'll see me here, clip it just to pin it and for the rest of the hair. I am going to continue curling it going away from my face, but i'm not going to pin these up. You can pin up the whole entire wig if you wish, if you have somewhere to be, you want your curls to last for a long period of time, then doing pin curls will definitely help achieve that, because it'll help hold the curls in place. Whilst finishing cooling down so once that heat from the iron has cooled down on the hair, it's going to sit in place when you have the pins in. So that's a good alternative. But for me i wasn't really worried about the rest of the hair. Like i said, i only wanted to make sure that i pin the top half and, as you can see, i'm on the last section on this side and the hair, even though i didn't pin them up the curls. They look absolutely amazing. So if you're like me and don't know how to use a curling iron, this is the way to go. It will get the job done. As you can see, it looks just as good as anybody else i feel like, and then i am going to use that same suave hairspray to spray onto the hair, so it can finish setting into place and then i'm doing the other side. So for this part, i am curling going towards my face. So when i have a side bang i like to curl in that direction because i just like it looks good, you can go whatever direction you want, but i just like how it looks so i just do that top section like that. Bang part. That'S the only part that i will curl going forward and i was low-key struggling to pin it up. So i kind of did just let it fall and then i did try to re-curl it and then re-pin it. But, like i said, i couldn't get it together, but you see how good that curls looks just going forward, but for the rest of the hair i will curl going away like i did on the other side, as you see me doing here, so only the bang Part the side, bang is the only part that i curled going towards my face. This has become my favorite curling method, just because it looks so good, as you guys can see so normally a lot of times. I like to pick up my curling iron. More than my curling wand, but i feel like i use them just as much like equally but like i said i really like this curling method because of the outcome that i get, and that was the last section. So i'm done it took me, maybe 10 to 15 minutes to curl the entire wig, which is not bad. Then i am going back in with hair spray. If it's not like a heavy hairspray. Definitely, you know go in with it, because this also helps to hold the curls in place. So after taking a little break to let the pin curls set into place, i came back and now i'm taking them down and just look at how they're falling you see that bounce. That is what you want. That'S exactly how you want them to fall and how you want them to look. So, as you can see, they're a lot shorter because i pinned them up so they're a lot tighter and then i'm also taking the band off, because the lace should be nice and dry down at this point and then i'm just going to go ahead and cut The lace off really easy: it's just a lace closure, so it's not a lot of lace to cut off and then once i do that, i'm just going to go in with some powder just to help blend it in a little bit. More and now i am doing baby hairs, so i'm only going to do this one right here that you see me doing so: i'm just going to pull some hair out on the side and then cut it using the razor comb and then, of course, i'm going To take my eco styling gel any kind would work, but i'm going to take that so that i can lay the baby hair down into place. So yeah, not nothing too crazy, just one little baby hair. That'S all that i did, and i just swooped it to the side like i normally would do really simple, really easy. So now that i have my baby hair i am going to do. I don't really want to call it a sideburn because it's not really a sideburn, but i did pull some hair out by my ear and i am going to cut it not too short, but just cut it and then i'm going to attempt to curl it. I didn't really curl it. It was more of a bump but yeah i wanted to curl it just so it can match the rest of the hair, but that's all that i did for that. At this point i am pretty much done. I am going to comb the curls out. I would either finger comb or do like i'm doing with the wide tooth comb and just comb them out, because i don't like a defined curl. I, like the messy look, it looks really good and you can see the difference with cutting layers, just how the curls look and how they fall. It makes a huge difference. So i absolutely love this look. I love the side part with the 5x5 lace closure. This hair curled so well like i'm so impressed it looks so good. So i'm happy with the ending look. I will have everything listed down below for those who care so make sure you check it out. Give me a thumbs up comment down below sub. If you're not already - and i will catch you guys in the next one - you


Comments
Kiara Brown: Shop My Website: https://kb-kollection.com (USE CODE KBAE10 AT CHECKOUT)
Merle Lewis: You look absolutely gorgeous that wig is doing it for me
Kersha Beaver: Beautiful
Melstar: Loving your videos❤️ What app you used for your thumbnails
Dee Luther: LOVE YOUR VIDEO STUNNING THUMBNAIL THO BEYOND GORGEOUS U ARE UR MAKEUP ALWAYS ON POINT HAPPY MARVELOUS WEEK TOO BE BLESS N STAY SAFE ALWAYS
Re’Mona Lavon: Oouuu this purrty
Evolution: Pooh girl Instagram models should take notes from YOU Who inspires your makeup?