The Ultimate Melted Lace Glueless Lace Closure Wig + Super Easy & Beginner Friendly| Kennysweets
- Posted on 01 January, 2021
- Lace Closure
- By Anonymous
Hey dolls!
#6x6wiginstall #gluelesslacewiginstall #hdlace
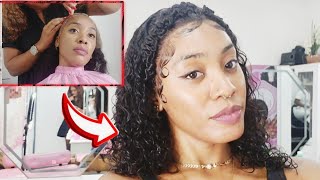
This is a very detailed tutorial on my glueless lace closure install using a 6x6 hd lace closure wig. This install 6x6 lace wig was super easy and beginnner friendly. I like to have my closure look like a frontal without frontal work. You can do at home flawlessly. You are not using any glue, tape, or adhesive. I take this off every night. This some tips I wanted to share with y’all so y’all can achieve that flawless lace install. I hope this is helpful.
PRODUCT DEETS IN THIS VIDEO
Pink Bonnet: http://bit.ly/2Zmu6TL
Lace Melt Glueless Lace Spray: http://bit.ly/38T0IbM
Pinking Shears: https://amzn.to/350hnsY
Wig Cap: Beauty Supply Store
Dee natural hair — Hydrating Loc Spray: http://bit.ly/3ohuJbC
91% Alcohol : http://amzn.to/2F4toic
Bold Hold Liquid Gold: http://bit.ly/3hAgvQY
Foundation: https://amzn.to/2MM5ACs
Edge Brush : https://bit.ly/3m5rGme
Pink Pintail Comb: http://bit.ly/2MjdIQh
Got2b High Hold Hair Spray: https://amzn.to/35kn8C
Lay and Stay Foam: http://bit.ly/3ndXgxP
Barb Slay Band: https://bit.ly/3isdi5t
Lay Flyaways Wax Stick: http://bit.ly/3b07YFw
Hot Comb: http://bit.ly/3b02gUi
Cash $h*t Lashes: https://bit.ly/35hNFk9
MY TECH
Camera: Canon T7i - https://amzn.to/3pEK8mW
Lighting: Newer - https://amzn.to/38TyihJ
LETS CONNECT
Twitter: https://twitter.com/kennysweets
Instagram: https://www.instagram.com/kennysweetst...
Facebook: https://www.facebook.com/kennysweetsth...
Pintrest: https://www.pinterest.com/kennysweetst...
Snapchat:
FOR BUSINESS INQUIRIES
KennySweets Dreamhouse
P.O. Box 292395
Lewisville, TX 75029
Websites
Email: [email protected]
DISCLAIMER: This description contains affiliate links, which means that if you click on one of the product links, I’ll receive a small commission. Also, yall the products sent to me for review will ALWAYS be my honest opinions and my own.
Hey y'all, it's kenny here, i'm back with another video. If you guys are new here, make sure you hit that subscribe button. So you guys, i have never done a talk through video on my channel. What i mean by that is a talk through hair video as many hair videos that i've done. I'Ve never walked through it step by step, and i feel like i'm missing, that i feel like y'all missing the full experience you know speed through it, don't be enough honey. So you guys, if you're interested in knowing how to lay and slay your weird, i mean like like then go ahead and keep on watching, do not forget to hit that like share and subscribe and i'll see y'all soon, okay, y'all. So this is the wig that i'll be installing. Today. This is from the barbed life i've already made her y'all, so i did go ahead and lay down her baby hairs already. So i'm gon na go ahead and cut the lace and then we're gon na get started on our next step. So as far as cutting my lace y'all, i do like to use pinking shears. So what i do is just go in a zigzag motion and go around my baby hair so that i can get that perfect cut. Okay, so i don't know if y'all can see, but i went ahead and cut it in a zigzag motion with my pinking shears, and this just gives you a more flawless install and we're going to clean it up once we get it on our head. But essentially you want to make sure that you're not cutting straight. Otherwise it's going to look very, very unrealistic and you're not going to get that natural look you're going for so y'all. This is the way my hair is looking once i took my hair out now. I feel like the key to having a perfect install, is really saving your edges. If you don't have edges honey, like it's, no purpose of doing what you're doing unless you are medically suffering from it, so you guys i go ahead and i just like to use the d natural locks. Hydrating lock spray. So if y'all wearing a ponytail like me, make sure that ponytail is flat, i prefer braids, but considering gap man right now, i'm gon na go ahead and work with what i got. I'M not doing the ball cap method y'all because i don't feel like this is needed for this particular install. Next, i'm going to go ahead and just lay down my baby hairs on the side since we are doing a closure install. I just like to have my natural edges out on the side just to make it look more realistic, so i'm going to go ahead and use my bow hole liquid and i'm going to use this to go ahead and lay down my baby hairs. So now that we got our edges down, i'm going to go ahead and use my nars in the shade new guinea and i'm gon na go ahead and use a little bit of this. Probably just one pump and one maybe two honey um, but i'm gon na go ahead and use my real techniques and i'm just going to warm up the product a little bit and then go ahead and put it in the inside of my lace. Pull up and goes yeah, my diamonds are choking, i'm going to go ahead and take the rest of the foundation. I had and just put that on my wig cap just to make sure that it's going to blend in flawlessly. So next y'all i'm going to go ahead and take my alcohol and clean the perimeter of my hairline, and that way you make sure you're removing all of that gunk and oil. So when we go ahead and lay our lace, you don't have to worry about it. Lifting so y'all that's what i've been waiting on honey, so we're gon na go ahead and put on our wig and just get her adjusted and y'all. I like to just take my rat tail comb and go ahead and pull the lace forward, because sometimes it will kind of buckle underneath when you're putting it on so this kind of helps you get that lace from underneath without ripping it and y'all. This is hd lace, so i like to be super careful with this hair. I don't think that this sort of lace is beginner friendly because it does rip very easily. However, if you are using a 4x4 5x5 in this case, this is a six by six. I think the closures are a lot easier to work with than the front okay y'all. So now that we got her lines up, i'm just trying to make sure that my part is good. I am doing a deep side part today. You guys, i always do a middle part, so i said today honey we about to do a deep side part. So i'm going to go ahead and secure her real quick. I will not be using any glue today. We'Re going to use a alternative, which is a lace smell spray, but i'm going to go ahead and secure her down with the spray and then show y'all kind of step by step on how i do it: okay, y'all! So if you want, you can go ahead and use the got to be high, insta hole. I still like this one, but i'm going to go ahead and show you how i get the perfect milk. So i go ahead and spray my spray on the foundation brush and then i go ahead and just put it right on top of the lace in the specific areas that i wanted to lay because i don't want it all over the place, and i definitely don't Want it too far above my hairline to where you can see that sort of cast on it or see that shyness? So then, i'm going to go ahead and use my rat tail comb and my blow dryer just to go ahead and get that down. So y'all go ahead and make sure you're repeating that stuff along the hairline and make sure your blow dryer is on cool to warm setting, okay y'all. So now that we got our lace down honey, we're gon na go ahead and lay down our baby hairs. I like to use the lay and stay foam, and i really like this, because it is a little tacky and you don't have to worry about your baby hair sliding all over the place. So i'm gon na go ahead and just adjust them to my liking and make sure they are perfect on my head and then we're going to go from there y'all. What i like to do with my baby hairs just to make sure that the lace doesn't come up at all, because sometimes any adhesive that you use. Sometimes it will start to buckle. So i like to just go in with my blow dryer on a cool to warm setting and go ahead and blow dry. It then go ahead and blow dry, those down okay, y'all, so we got them down. We got them in place and at this point you just want to make sure that basically, your foundation and all the products kind of melts into the skin, so i'm gon na go ahead. Excuse me, i'm gon na go ahead and use my sleigh band and tie that around so that i can get that perfect melt. Okay, y'all, so we're gon na leave that on for about five to ten minutes. Just because i don't want that line on my head and i can't add any problems, so i'm gon na go ahead and leave this on for about five to ten minutes. Okay, y'all. So we are ready to go ahead and take this sleigh band off and y'all. I hope to god i don't have this freaking line because trying to mess up my install and i got the line y'all, i got the line, but it's really not that bad, like i just got ta give it a few minutes. You want them, but she looking good. You know what i'm saying so, i'm gon na go ahead and just comb out my curls so that i can kind of get a better look of. You know how things are looking: okay y'all, so these are kind of how the curls are looking. I'M just gon na go ahead and keep kind of playing with it. It'S getting a little stuck because of this holding spray that i put on here. So i'm just trying to go ahead and just kind of get her looking the way i want, but i think she's i think she's, given what i'm going for honey she giving it, but i'm about to go in real, quick and just kind of give her a Little bit more height right here and what i mean by height, is just make sure that she's in place. That way, i don't have to worry about her falling. I do feel like i want to add a little bit of powder here and a little bit of makeup in my part, just to define it a little bit more. I'M young, okay, y'all. So remember when i took the makeup off along my hairline. Now i'm just going to go in with my contour powder that i use and just make sure that i get those areas that i originally took off now. The goal here y'all is not to get it on the lace because you've already matched that color, okay y'all. So i'm gon na go in with my smaller brush just so i can get a little closer to the hairline and then y'all, i'm just gon na go in with my tamer and just get some of these fly aways, okay, y'all. So she is done honey. Your girl is done. This closure is giving me all type of frontal vibes honey. So, if y'all enjoyed this tutorial, make sure you give me a thumbs up. I hope it was super helpful for you guys do not forget to like share and subscribe and i'll see you in my next one later i'm a barbie girl living in my barbie world. I'M a barbie girl living in my barbie world. Take me to the party girl,

Comments
Kenny Sweets The Barb: Hey Yall! This this is my first video of the year!!!! I want yall to be able to do your hair at home flawlessly. I take this off every night. I styled this one as well so if yall let me know below if yall want to see it. I really hope this is helpful. Should I drop my vlog next or the second part to this video?
TheBossBre: Beyond gorgeous. Happy New Year✨✨
Army Barbie: Ohhhhh the comb is the trick!! I definitely ripped my lace lmfao
Army Barbie: We want the styling video ❤️
Army Barbie: Can we get a beauty room tour
KALISE DOLL QUEEN: Wait I’m gagging cause IVE BEEN BUYING THE BARB LIFE PRODUCTS AND DIDNT REALIZE THIS WAS YOUR BUSINESS IM SO GLAD IVE FOUND YO YOUTUBE