How To Diy No Closure Braided Wig / Diy Knotless Braided Wig
- Posted on 07 July, 2021
- Lace Closure
- By Anonymous
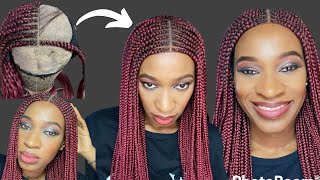
DIY CROCHET NO CLOSURE KNOTLESS BRAIDED WIG
Welcome to my channel so today I will be sharing with you all how I achieve this lovely trending hairstyle wig knotless box braids wig this is a very and easy wig to achieve I use 4 and half pack of xpression braiding hair to achieve this box braid knotless braid wig, I cut one xpression braiding hair into 2 this is a very beginner wig to achieve I know you will learn one or two things in this video.#diyknotlessbraid#diybraidedwig#noclosurebraidedwig
thank you so much for watching this video do not forget to thumbs up and most importantly subscribe so you can stay update with my latest video thank you .
_____________________________________________
For sponsorships & business opportunity-
_____________________________________________
PRODUCT USE
Expression braiding hair color 340 / 350
Lace closure net
Crochet hook
wig cap https://alitems.com/g/1e8d114494c9c6b2...
LINK TO WATCH MY OTHER VIDEOS
BRAIDS&TWIST / cute &
easy protective style for kids https://youtu.be/kqLbZsTMVyE
LINK TO WATCH MY OTHER VIDEOS
How to make a headband wig / using kids pantyhose https://youtu.be/8Teh-Z1xMzk
fake it till you make it natural hair style / using braiding hair https://youtu.be/b3AYVdXd1Ow
Diy passion twist using braiding hair https://youtu.be/5JjlrDXINEY
Diy: super tight curls using kebab stick https://youtu.be/pSYbQPeA3wI
how to passion twist on natural hair, https://www.youtube.com/watch?v=53uQbG...
Jumbo box braids /Brazilian wool box braids, kids hairstyle ft discoveringnatural https://youtu.be/9ScHVKV7tBU
How to goddess box braids tutorial for beginners,https://www.youtube.com/watch?v=ykU7Ok...
diy needle and thread flat twist cornrows diy hair style with brazilian wool,https://www.youtube.com/watch?v=NKCYRe...
Jumbo box braids using Brazilian wool /butt length braids https://youtu.be/kkzAK4740OQ
Let be friends on instagram https://www.instagram.com/invites/cont... WIG / DIY KNOTLESS BRAIDED WIG
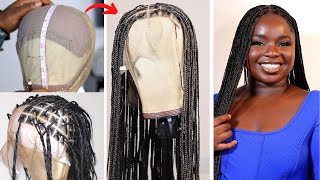
Hello beauties welcome back to my channel. It was almost dancing, my god just love your face. My name is aznike, so today i'll be sharing with you. I achieved this lovely knotless, braided wig. These are the thing i'm going to be using this attachment. I got five. Five pack of attachments, i made a mistake: i meant to get everything color 350, so i got four color 350. Then i got one color 340, but i used it like that you're going to see as you keep on, watching how i use the both attachments. So now you can see what i'm doing. I'M just sewing down my lace nets. After i'm done sewing my lace. Knit i'm going to be cutting the excess net. We don't need that we're going to be cutting that off, because some people don't know that you will cut that off. So that is why i have to tell you you are going to cut it off. Then i'm going to be using this shopping bag i'll cut the size. I want i'll place it on my mannequin head i'll, put on the cabin i'll lay down with the pin. Now, at the back, i'm going to be using this my metallic pen to section out some line. This will really make your work to be fast, your braiding to be fast and you over braid. This is a very beginner friendly method, very beginner, friendly method. So now i'll come to the front at my list, closure net pass i'll use my eyebrow pencil to section out the line. If you think you can do this, you can actually use a tape rule to mention the meters you can use if they briefly don't want to use your head like guessing, if your hand is not straight, it's not my first time of doing this, so i don't Need a tape room now, i'm picking out the air i'm going to be using for the closure part. You can actually use the color of the attachment you want to use to achieve your closure pad for me. No, i want to use color black, so i cut one attachment into six, but it's still kind of long. So i would advise everyone to achieve yours. That was the mistake. I did cut the attachment into seven then after i'm done picking the attachment i'm going to brush the air out now, let's start ventilating from the beginning, i started ventilating little by little like three to four strand, but it was not even helping the easier at all. So keep on watching you see how i keep ventilating when i go to the front part. So now you ventilate at the middle, no just ventilate that triangle shape. You drew out your eyebrow pencil like the only place you have to ventilate without no space outside, so that it will show inside that you didn't ventilate any air inside. Do you grab that i'm trying to demonstrate here for you to see that you have to follow that line to ventilate? When i got to the front part, i didn't even count how many strand of air i'm using to ventilate, i'm just taking a very little quantity of air, very, very little, very, very little quantity of air. That is what i'm using to ventilate after i'm done. Ventilating, the air i'll just braid the head down so that it soon gets to each other, just break it down for each braid. You can see i'm taking a very little amount of air to ventilate very little. This is what we are having after. We are done with the lace closure parts. So now this attachment i'm going to be using from the braid. This braid is very long. I cut one attachment into two into two. If you a beginner - and this is your first time making your own wig yourself - do not try it because you'll get tired, so i cut it into two advice: if you want to achieve yours, you can actually cut it into three into three. So this is what i'm doing. I took the color 340 i crochet with it. Then i braid with the color 350.. That is what i did throughout the air, but someplace at the back in the middle. I didn't put any color 340. When i got to the top part. I started putting the color because the color 340 - i got it by mistake, which i end up, loving how i mix it. So i have only one pack. I have to work with one pack. So that is why some place at the middle i didn't crochet with color, 340 and crochet with color 315.. I did not braid the hair towards the end. I didn't braid it i just break from the beginning. It'S a small part. Then i drop it because it will make my work to be very fast, so anytime, i'm free i'll, just start braiding towards the end i'll be braiding it down, but the most important part is for me to break from the beginning, then, to make my work fast. Did grab that you can see a very close, the up part don't worry when we do that, nothing is going to show i'm going to take my crochet hook. Then i'll put it through the cap and the crochets and the lace neck. Sorry and the delicious. Do you understand what i'm trying to say i'll crochet through the cap and the list next for me to cover the excess leaves, i don't want it to show and it helped me to cover the space i left at the back. It'S very important for you to leave a lot of space at the back so that the air will be heavy okay. You see that i covered it so by time i braid them lace, closure by time i braid it on it. It will show at all now. I'M unraveling the air. I braided, i section four to do my knotless braid a section four, but first of all, i'm going to be using three. Then later i'm going to be using one kind seam, i section the air into three. Then i braid a little like. I turn my hand like three to two times. Then i place it on to up then, when i braid i'll drag my attachments so that it won't show that i had it any air. This is a very, very beginner friendly. Sorry, for this part for notion very well keep on watching you see where i never knew that i already dragged my mannequin head off camera, so you see where i showed it very well section the egg into three break like once or two or three times. Then you can see, i drag it so that it shouldn't show. Then i take the second one i braid. I drag it. The third one i braid, then i keep braiding another one. I used four, i used four towards the end. I added the fourth one. You see, i dragged i i had the second one i drag it then i have the third one. Then i keep braiding sorry for that. This video is kind of all over the place, but keep on watching. I know you're going to grab one note. So then this is the first one i had. I want the edge to be the same length with the other one. So that is why i had another one towards the end. You can see i sectioned into three braid. First, one drag then, second one i drag it also, then the third one then i keep braiding then towards the down part. I had the fourth one that is it. Then i keep breathing. I try my best in explaining these parts. I'M still going to be showing you again section on the end to three twist one like three to two times i mean brady, then i add this fourth, second one. Then the third one drag it. Then i keep braiding. So i'm going to be adding the fourth one. Also, can you see i had it so that is it after i'm done braiding all day, i start trimming, i start trimming the air it was not showing here i use a ponytail rubber band to hold the part. I want to trim so that one have no trim mix with the one i've trimmed. I did the end to the hot water. Then i dipped this towel inside the hot water, so we laid the upside. I use my cream air cream to rub the body when it still wets, then i use my mousse, so that is all for the video. Now the final look, oh, my god, then i'm going to be using my concealer just to blend the parts, the center parts, all the effort. So this is the final look. Oh my god, this air looks so beautiful. I love the final look of this. So much very comfortable. You can see that nothing is showing the lace knife. No, no see. No! Oh, my god. Can you see the lens? I love the final look of this. As someone can please make sure you support me by clicking on the like button. Subscribe share like comment, please. I really appreciate that. Thank you. So much for watching see my next video stay blessed. You


Comments
Lillie: I love how neat this wig came out and the colour is beautiful
VICTORY SPACE TV: The wig is super beautiful well done
Tips with Nikky: Well detailed and explained tutorial, Well done dear
💞Iyawo ola vlogs💖: Well explained beautiful hair tutorial
Joy Destiny: The wig really look beautiful
Marta Mille: The hair braid wig look super beautiful and neat
MsNike A: Beautiful braids keep it up sis
Muna Leonie: Nice one, new sub here
Claurichman: Beautiful wig