How To Make Lace Frontal Wig Cap {Lace Frontal Braided Wig} Details Tutorial.Diy.Beginners Tutorial
- Posted on 07 January, 2021
- Lace Closure
- By Anonymous
How to make lace frontal wig cap {lace frontal braided wig} Details Tutorial.DIY.Beginners Tutorial
Get a 360 lace cap from Amazon(Affiliate)
products used from Amazon (Affiliate) needles,canvas &stand
Ventilation needle
Swiss Lace Net For Making Wigs
4x4 lace closure
13x 4 lace net for making wigs
Elastic band
combs for wigs
How To Make A Braided wig for beginners without a closure.Protect your natural hair by wearing a wig. No closure
How To Make Ghanian Braided wig- https://youtu.be/FzUz1Fp6dIY
I hope you find this video helpful.
get 100% human hair
⇒✻SUBSCRIBE TO BECOME APART OF THE WANIZ SQUAD⇒✻
---------------------------------------------------------------
✬KEEP IN TOUCH✬
follow me on Instagram https://www.instagram.com/p/BoRZ-64B1m...
watch my other video on:
No closure wig https://youtu.be/h6YaugfD4J0
How to:make an afro wig
I tried following a make-up artist tutorial:
undoing 2018-2019
No glue no tape wig
fake it till you make it ponytail
how to make a wig
How To Make:Wig on this video
#braided#braidedwig#braids
No Closure.How to make Ghana braided wig(biginner friendly)
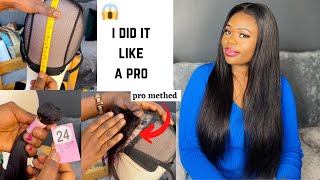
Hi guys, thank you so much for clicking welcome back to my channel if you're new welcome so in today's video, i'm going to show you how to make ear to ear less front cap. If you find this video helpful make sure you give it a thumbs up. Comment and don't forget to subscribe, so the first thing you're going to need is a cap. You can use whichever cap that you have i'll be using this dome cap. You also need a knit, a lace knit so i'll put um i'll, put some links in the description box down below or for the product that i'm going to use today, just in case you're interested. The reason why i always love this net is because it actually blends so well with my skin tone so like i don't have to apply concealer on it. The next thing you need is thread and needle, so the first step is to pin down the net on the cap. You can also just do this process when it's on your head, like as in wear the dumb cup and then put the net on your head and mark, where you're going to to sew the net on the cap. That will save you a lot, because you don't want to waste the need, because if you pin it like, if you don't pin it right, you might cut and wear some pieces so put it on your head and mark you're going to sew it on the cap. So when you pin it down, make sure you pull it because you want after you sew the net on the cap, you want your wig to be flat or you want your legs to be flat and look natural after you make your wig. So the next step is to mark on the last we are going to sew it on the cap, like this just going to guide you on where you're supposed to sew your net. So let's tell you like not to sew the elastic band when you make your wigs, but now in today's tutorial you have to sew like the elastic band, make sure you insert the needle in the elastic band and make it tight make sure the stitches are tight Because you don't want it to tear, you know: you're going to cut the cap, so you have to make sure the stitches are tight and also just to know. There are some listenings that um are really like ear to ear, so you don't have to go through all this process. You just have to take the need and sew it on the cap on the dome cup, but i always prefer this big lace knit we have to cut the shape that i want or the size that i want, and also it's also like, cheaper compared to buying. Like this type of lace, i prefer, if you buy the big one and then cut it to the shape that you want once you're done sewing. The next step is to cut the lace and cut like a centimeter from where you sew, because you don't want to cut the thread. So the next step is to cut the cap so that you're left with the lace knit - and this is where i was telling you like. You - have to make sure you sew the elastic band and make sure the stitches are tight. Because when you cut the cap, the only thing that is going to support the dome cap is the need so make sure the stitches are tight. Just like that, and you have your ear to ear less front cap like there's no difference between these and this diy cup before you sew your braids on this cup or crochet. Your hair on this cap make sure you mark the shape of your hairline on the list like that is going to make the wig look more natural, so that this part is very, very important. As you pin down the cap again guys just make sure you pull the net because you want the hairline to look natural. So basically that is it after you make this cap now you can pin the braids. However, you want, whichever style, that you prefer, whichever style that you want i'll, be using this braids on my next tutorial, guys make sure you check my next video on how to make this wig um. So this is a different style that you can make with your ear-to-ear lace front cap, so that was it for today guys. Thank you so much for watching. If you learned something from this video or if you enjoyed this video, make sure you give it a thumbs up, comment and don't forget to subscribe, see my next video bye, you


Comments
waniz sharon: Zigzag Wig Tutorial https://youtu.be/qjXUEOjFk4o Kindly Subscribe to my Vlogging Channel as well. https://www.youtube.com/channel/UCN4SBy6sjRUzfXgoIoQ_t0A
Tips with Nikky: I like how you made the DIY lace wig cap. Waiting paciently for the full tutorial of this beautiful braided wig
Julie Mills: So of you are doing this for a client how will you shape the hairline?
Aslinur Kalenderoglu: ❤
BLACK AND SHINE: Is so beautiful babes. Nice one
Juliana Sorhaindo: Cooool
Kemar Chow: We're you get the lace