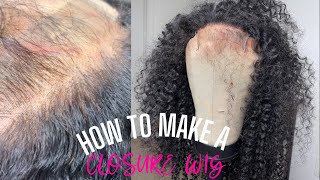
Diy Lace Closure Using Expression Braid Extension //How To Make A Lace Closure For Crochet Wig
- Posted on 28 September, 2020
- Lace Closure
- By Anonymous
DIY CLOSURE
#laceclosure #wig #diylaceclosure
Tool used
-Dummy head 2124" pink Canvas Block Head Training Mannequin Head Mannequin Manikin Head Wig Stand wig head stand
https://a.aliexpress.com/_mMKYzgX
-Ventilating neddle Professional Bronze Wig Ventilating Holder with 3 Pcs Pin ventilating needle for wig making Crochet Hook tools
https://s.click.aliexpress.com/e/_mMKF...
Swiss lace 1/4 Yard Swiss Lace Net For Making Lace Wig Foundation Hairnet Accessories Weaving Tools Hair Net 7 Colors Available
https://a.aliexpress.com/_m0HuCp9
Instagram: @glow_ch1
Tik tok: glow_ch
Product nilizotumia
--------------------------------------------
Labda kuna mtu atataka kujua:
Camera ninayotumia : Canon 80D
Software ya kueditia video : imovie
Taa ninayo tumia : Ring light
Kamera ya kufanyia vlog: iphone xs
Kwa, sponsorhip, product review, jisikie huru kunitafuta katika barua pepe: [email protected]
Maoni yote katika video zangu ni yangu mwenyewe, bila kujali ikiwa video imefadhiliwa au la. Hivyo basi, bidhaa ambayo nimejaribu ikanifaa mimi inaweza isikufae wewe.
Wenu,
Gloria
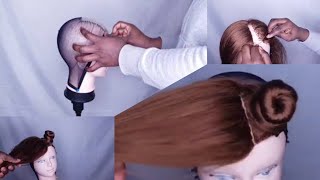
Hey guys welcome back to my channel if you're new to this channel you're welcome and if you're returning subscriber hi. Thank you so much for watching my videos and on today's video i'll be showing you how to make this closure. It'S really simple! The hair that i've used in this video is um expression, so without further ado, let's get to the video, but before we start this video, please, if you haven't subscribed to this channel, i would ask you please subscribe and voila. So when making your closure, you need the following: first, you need a dummy head. Then you will need a less, so i'm actually using the swiss one. Also you need attachment. These pins are really useful. This will help you not to move when you are plugging in the hair, and then you also need this ventilating needle. It comes with three pins, one that peaks one to two hair, two to three hair and three to four hair. So i will be using the 2 3 pin. As you can see, it's really tiny so be careful that when it falls down, you might not see it again and you also need some water, i'm using water, because i think it's really easier when you put some water in your hair and then you bend your Hair, as you can see this way, and i will place it on my hand - my fingers, the tips of my fingers. Actually, this way this makes it more like it simplifies the whole process when you put it that way in your fingertips and voila you're ready to start it's not a game 2 foreign to so it's not a game foreign! Thank you. It'S not a game! Do you? It'S not a game. Well, thank you. It'S not a game. I hope you really enjoyed this video and if you really enjoyed the video, please don't forget to give me a like. Also, leave me a comment down below and share this video with your friends and we'll see each other in the next one. Bye, yoho


Comments
Ttk (Talktokemi): That closure looks so good and natural, well done
Lyne M: Being a wig maker I know the struggle to seat and make that simple but not so simple closure you did an amazing job dear
Sameer Pelwan: How long did it take you to make this closure?
Sameer Pelwan: How long does it take to make this hand tied 4inch closure?
Vincent koymans: WOW
Dolphine 254: First one here ❤️
Juliana Brulhart: Mambo moto moto