How To Fix Part 2 | Hair Ventilation On A Small T Part Lace Front Wig | Very Detailed Tutorial
- Posted on 21 April, 2022
- Lace Closure
- By Anonymous
Hello guys, welcome back to my channel!
Thanks for watching
How To Fix Part 1| Plucking And Prepping The Hair 4 ventilation https://youtu.be/mFmQNpQp9FQ
CLOSE-UP/Slow down speed: How To Ventilate A Natural Looking Hairline https://youtu.be/rj5Rf1OLx-c
Please LIKE, SHARE, COMMENT, and SUBSCRIBE for more videos!
How To Fix unnatural Knots On A T-part Closure https://youtu.be/CPIpoLDSUig
✨IG: https://instagram.com/vivianbeautyands...
✨ Email: [email protected] (For business inquiries)
✨ Based in Abu Dhabi (UAE)
✨ My second channel https://youtube.com/c/StylebyViv (Sewing channel)
How-to Sew A Closure On A Wig Cap For Beginners
CLOSE-UP: How-to Ventilate Hair Lace Closure/Frontal wig Using Ventilating Needle
$15 Hair | How To Make A Beautiful Wig Using One Pack Of Kinky Straight Hair https://youtu.be/Lg9RFZ9A4UU
Where I purchase my materials/tools (Aliepxpress Links )
Wig mannequin head https://s.click.aliexpress.com/e/_9uCo...
Adjustable Wig Stand https://s.click.aliexpress.com/e/_9uim...
✨SWISS LACE NET FOR WIG MAKING✨
1/4 Yard Swiss Lace For Wig Making https://s.click.aliexpress.com/e/_9Ig5...
Closure/Frontal Lace https://s.click.aliexpress.com/e/_AEHO... (4x4'' 13x4'' 2x4'' 2x6 and more)
3 Pcs Pin ventilating needle https://s.click.aliexpress.com/e/_AsjO...
Small/ Tiny Latch Hook https://s.click.aliexpress.com/e/_9vGh...
✨✨CAPS✨✨
Mesh Dome Caps (Small-Large Size) https://s.click.aliexpress.com/e/_9HcT...
Spandex Dome Cap (Small-Large Size) https://s.click.aliexpress.com/e/_ArVx...
Thick Mesh Dome Cap (Net Free Size) https://s.click.aliexpress.com/e/_A9X5...
AMAZON LINKS
Swiss Lace For Wig Making https://amzn.to/33JaChD
4 Pcs Pin ventilating needle https://amzn.to/3IfIfXw
Spandex Dome cap & Mesh Caps For Wigs Making (Small-Large Size) https://amzn.to/3BFOKAp
Black Elastic Band For Wigs https://amzn.to/3LW3FLy
This video is not sponsored. The links above are affiliate links. This means I'll make a small commission if you make a purchase using any of the links
Part 2 How To Fix/Ventilate On A Small T Part Lace Front Or Closure Wig | Hair Ventilation Tutorial
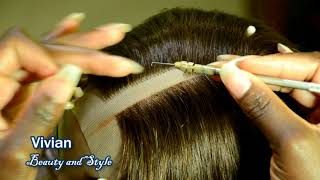
Hello guys and welcome back to my channel if you're new, here you're welcome, and i hope you are doing well so in today's video - i'm going to be transforming this wig right here and also i'm going to be showing you how to face or ventilate on a Small lace, closure or lace front or t-part lace, frontal wig. So with that said, let's jump right into the video. So if you haven't seen the part one of this whole process, i'll put the link in the description box down below so be sure to check out the pattern of the video so on the original lace for this wig right, the middle part of the lace uh. The knots were looking way too unnatural and also the hairs weren't enough to cover the tracks at the back. So you could see the track through the ventilated hair, so i decided to um transform a to re ventilate the hairs on the middle part of the lace and also do a little bit on the front so, like i said on the video part, one of this Video, i told you guys i was going to move the middle part a bit forward to uh, to to allow me to have enough hair to cover the the back of the track. So i've already did that off camera. So i ventilated about an inch they almost almost one inch on the back part of the lace, as you can see right here to cover the back uh the track at the back right there. So to start, you need to take the amount of hair you're going to be working with, and next you need to take that hair and fold it over in order to create a loop okay. So for this whole process, uh we're not going to be spacing out. The hair, because it's not enough lace on the on the on here to be spacing it out. So we're not going to be spacing out the hair on the middle part of the uh of the wig right. So, to start to make sure that you will have that full um, full hair on the middle path, and also you also want to make it look natural so to do that right. So on the first two rows or three rows close to the track. We'Re going to be using four strands of hair again on the first three rows or two rows close to the track, we're going to be using four strands of hair, not two strands four strands of hair, and also you can also use three strands of hair. If you want, but for me, i'm going to hate to use four strands of hair, because i want this middle part of the wig to look uh to be full okay, especially close to the track. I want enough hair a lot enough hair right there to cover the track. So that's why i'm using four strands of hair on the first three rows close to the track, so you need to go ahead and count how many rows you have on each side of the lace on each side of the middle part of the lace. So that way, you know how you're going to be distributing the hair, okay, so to ventilate the hair. You need to take your ventilating needle and pass it through the hole on the lace. Take your time. The one very close to the track is difficult to pass. You need a tray because it's kind of hidden so once you pass the ventilating needle through the hole you need to hook, four four or three strands of hair, so using the ventina needle wrap the hair around the needle and rotate the needle upside down and pull It through the loop, so when pulling the head through the loop, you need to make sure that in the hair, when pulling it, you need to make sure that the knot is secured tight at the roots. You don't want to lose if it's. If it's loose you're going to have a bit of a bit a little bit of an issue when it comes to bleaching the knot, so the hair will come out from the other side of the lace. If you don't do this properly, so you need to maintain a tight tension, wipe pulling the hair. You don't want it. You don't want to have a loose tension on the hair. As you can see right here, i'm using my finger to guide the hair to place it down while pulling on the hair to help tighten the roots of the hair to help tight, tighten the knot at the roots. So here's that it's looking after um ventilating on the first row using the four strands of hair, as you can see right there so right now, i'm going ahead to walk on the second row or the second line doing the same thing, i'm using four strands of Hair on the second row also, so this is to help to to make this part of the of the lace full enough to cover the tracks at the back. So getting close to the middle part, are they yeah very clearly getting close to the middle part? I'M going to be reducing the amount of hair i use on the lace, but first my main focus now on these three rows is to make sure that the hairs are enough enough. Okay to cover the track at the back. I don't want to see the trade connecting the the weft to the cap. That is what i'm trying to cover right here. So here's how the very session is looking after ventilating on the second row, so i'm going to repeat the same thing on the third row and um yeah. So after the third row, using the uh four strands of hair on the fourth row, i'm going to be reducing the hair from four strands of hair to two strands of hair uh. Also, i, like i said i won't be spacing out the hair, even though i'm using two strands on the fourth on on the fourth row, like i'm not going to be spacing it out at all, because i want this hair to be full using two strands. Ah, that's at this point will also give you that natural looking pad without spacing it out in as far you reduce the hair from four strands to two strands of hair, again getting close to the middle line. To get that neat middle part, you need to reduce the hair from four strands of hair to two strands of hair ways to figure out the middle part of the hair on the small lace right start by ventilating the using the method. I just told you guys, ventilate on on two rows on each side: first, okay, ventilate, two rows on the right side and two rows on the left side of it; okay, so that gives you both sides right so of the foundation to work with so from there. You ventilate another row on one side and another row on the other side, so you come close to the middle part. Okay, that way you can be able. You will be able to count how many rows you have on each side of the lace in order to find the middle point of your lace. Okay, so right here at the front of the the middle part, i'm going ahead to use just two strands of hair and also for the hairline. I only use one strand of hair to create the natural looking hairline. So i have a separate video showing you guys how to ventilate the hairline on your lace, frontal or your lace, closure i'll, put the link in the description box down below so be sure to check out that video. So here is how the wig is looking. So far, i still need to um dye the roots, so that way it will blend well with the rest of the hair. So i'm going to dye the roots using the black hair color to dye it. So here is the final result of the transformation on the wig looks beautiful. As always. If you find this video helpful, please give it a big thumbs up and also, if you're new to my channel, please go ahead and hit the subscribe button down below and turn on the notification bell. Thank you all so much for watching. Thank you. So much for subscribing and i'll see you all in my next one. You


Comments
Miss Tiffany Galore: Oh this is excellent information thank you Miss Vivian
Fatima Silva: Olá querida tudo bem Você corta os fios de retorno?
Gloray: I love you.. Thanks for the video ♥️