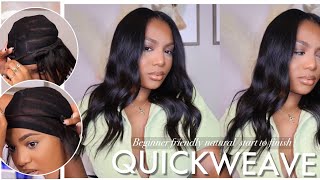
How To: Middle Part Quick Weave With Minimal Leave Out| Ash Blonde Hair Color Ft.Megalook Hair
- Posted on 29 June, 2022
- Lace Closure
- By Anonymous
This video details how I install a quick weave via the wig cap method using hair protector. The hair I'm installing is Megalook's highlight straight hair in 22 inches.
●▬▬▬▬▬▬▬▬▬✤#MegalookHair✤▬▬▬▬▬▬▬▬●
The biggest unlimited coupon code for any items 16% off (exclude flash sale):Dion
♥Same Hair I’m Using in the video:https://bit.ly/3xRFw2g
➤➤Hair Info: Highlight Straight Bundles 22inch+22inch+22inch
#balayage wig:➤https://bit.ly/3Ns4IlY
#Top selling:➤https://bit.ly/3y5vgnw
Buy one get one free:➤https://bit.ly/3ypGdS2
Contact us:
Contact us: E-mail: [email protected]
Whatsapp: +8618903741680
YTB : https://goo.gl/8xk6nX
INS:https://www.instagram.com/megalookhair...
Supplies Needed:
Hair
Hair glue
weave cap/ stocking cap
hair protectant or Got 2b glued hair spray
blowdryer
scissors
White eyeliner/lipliner pencil
Steps to install quick weave:
PREP:
1. Braid down your hair (optional, can pull into ponytail/slick down), and make sure to leave out enough hair at the top to cover your tracks.
2. Put on the wig cap (any color)
3. Use a white eyeliner/lip liner pencil to mark the area around your leave out
3. Apply hair protectant to cap avoiding areas of leave out , can use gorilla snot hair spray or morning glory hair protectant
4. Blow dry hair protectant making sure it is COMPLETELY dry
INSTALL
1. Measure the track hair against your head from ear to ear
2. Cut the weft that you measured
3. Apply hair glue to track and allow to dry for no longer than 30 seconds
4. Lay the track onto your cap beginning at the bottom working your way up
5. Repeat the above steps until you reach your leave out
6. cut off the remaining cap that's exposed (be careful!!)
7. Style your leave out as desired
Watch my other videos!!
How to Takedown your quick weave:
For Business Inquiries ONLY:
Psalm 27:12 The LORD is my light and my salvation; whom shall I fear?
So jumping right into the video i'm going to start sectioning out my hair, so i can go ahead and braid it back. This is probably one of the most important parts of your install because you want to make sure it's super flat underneath your wig cap just to make sure your hair lays flat so right now i honestly i'm not the best braider. So i'm just parting, my hair and doing some like plaits going towards the back and i'm leaving out only a little bit of my edges, because this is colored hair and i don't have a closure. So i'm going to leave out as less hair or as minimal hair as possible. Right now, i'm just parting out my leave out, which again is a small section of hair, and then i'm just going to continue to part my hair and braid it going straight back after that, i'm just going to take the ends of my braids and bobby pin Them flat against my head and now i'm just braiding down the middle part of my hair that i'm using as my leave out and then i'm just going to bobby, pin it to kind of hold it in place because i'm getting ready to apply my wig cap When applying my wig cap, i'm going to stop at the end of my hairline, just leaving out only my edges and then i'm going to take a white. I think it's an eyeliner pencil and i'm going to outline where my part is around my leave out. Just so, i know where to stop and like how far up to go when i'm applying my tracks. Next, i'm taking the morning glory, hair protector, hair bone protector and a little brush, and i'm applying that all over my wig cap. I know a lot of people always ask why i don't apply it directly to my hair and honestly, it's because i really hate washing that stuff out of my hair. Putting it on the wig cap is just a lot easier like i could just take off the wig cap or wash out the wig cap without having to just take it out my hair and i still feel like i get the same amount of protection. So i really don't mind if you want to put it on your hair. You you can like i've, put it on my hair before, but i just prefer putting it over the wig cap also because i also mix it with the got to be free spray to kind of create like a solid mold around my head and then i'm going To take my blow dryer and blow dry everything into place, and the reason that i use the got to be free spray mixed in with the hair protectant is because i feel, like the freeze spray, makes the cap hard and helps prevent my cap from sliding. So i really make sure to spray a lot of hairspray around my hairline and blow dry, that into place the hair that i'm installing today is from mega look hair. All their information will be in the description box below they sent me three bundles of 22 inch. Like a highlight blonde um straight hair and it looks super pretty and super silky um - i don't have a closure with this, so i will have leave out, but it's okay, because i've done styles with black roots before and you can use this hair without a wig Cap, like you, you don't have to have i'm not a wig cap. You don't have to have um a closure or anything like that. Now, the install is super simple, you're, really just gon na measure, the hair from one end of the wig cap to the other. Using your fingers to like feel how much hair you need and then i hold the other end and cut it. You know where my where it ends and then i just measure it again to make sure it fits properly and make sure i didn't mess up. My measurement or anything, and if you do you can just go back and like cut off the rest, i'm using the 30 second hair bond remover, because i feel like it's the most sturdy hair bond personally and i'm just going to apply it to the weft. I don't apply a ton of glue um, but i also don't apply like the bare minimum apply like a good amount of glue honestly and then i just blow it and let it sit for about 30 seconds. And then i apply it to the back of my head now, of course, i can't see what i'm doing so. I really just depend on my fingers, like i hold the track in my fingers, and i use my index finger to feel um. The bottom of the cap, and then i just place it or put the track into place um the good thing about this is: if you don't put the track in the right place, you can shift it around. Just make sure you don't press it in right away. Make sure you like, where it's sitting and then you can use your fingers to shift it into place when you start moving up rows, you're going to use your fingers to feel where the last track was and then you're just going to place the new track right. Above that, the spacing that you leave is up to you, the bigger the gaps, the thinner, your style will be the closer together, the more hair you'll have to use and the thicker your style will be. You can go back later and fill in gaps if you want to i've done that before, but i always just start off with wider spaces as opposed to thinner, just in case i run out of hair just to be safe and then, like i said, i can Always go back and fill it in later. If i need, if need be, um and then yeah, i just seal everything into place with my fingers and then after a couple of tracks or two i'll always blow dry, it um just to help seal the bottom part into place. As you move further up, you want to start curving your ends, um upwards or, like start doing like a u-shape um, as you can see that last track right there. I didn't do that and i stuck it to the side of my head. Like an idiot. Don'T do that because i actually wound up cutting that later. I don't know what i was thinking. I don't know i just stop at the ends of your track. This i mean not the track, stop at the ends of the wig cap, like that is your marker, where the wig cap ends is where your track should end. Don'T go past it because it won't look right, especially if you have like a like a little bit of leaf out like this, like you won't be able to pull your hair back um yeah, so i just started curving it upward just so. You can't see anything so the first bundle got me about halfway through my head again. This is about with, like one inch or half inch spacing between each track. Um. I did decide to do a little bit of a thinner style, which i really could have put my tracks closer, but i just didn't feel like this time. I just wanted something: thinner, um and now i'm going to get ready to jump into bundle. Number two. When i get towards the top of my head, i start using smaller tracks going horizontally just from back to front, as opposed to creating, like u-part shape, tracks um. This is just a personal preference. Honestly, you don't have to do that. You can continue doing the usa. U-Shape track all the way around. I just feel like this kind of saves a little bit of hair. For me i don't know um, and it makes it fit a little bit flatter, just in my opinion, but that hasn't been proven. It'S just what i think now i'm stopping right before that white line, because i'm going to be cutting that off um being very careful not to cut my hair, but i'm just going to cut off all the excess track. I could have gone all the way to the white line um, but i decided to stop because the white line is actually where my part is kind of um, and i didn't want to cover that up. So i'm just gon na go ahead and cut the track off. Once that's done, i'm going to go ahead and pull my hair back and begin laying down my edges, i'm using my edge booster edge control, but i didn't completely lay down my edges. I only started laying down my edges a little bit because i did go back and touch it up a little bit later, because i didn't like how they looked right here: um, but yeah, i'm just starting to do. Do the like finishing touches on my hair. Now i absolutely could have used all of this hair that i have out as my leave out um, but i felt like i left out just a little bit too much hair for my liking, because i really didn't want to have this big old gap in between Tracks so i'm going to add a track onto my sk, like my natural hair right there just to kind of fill in the gaps. This is a complete personal preference. I know a lot of people don't like adding glue to their hair. That subject is very taboo by all means, don't feel like you have to um, but i did uh and that actually made me have to break into the last bundle just to finish that last piece on the left hand side. But after that, i'm just going to go ahead and blend the rest of my hair into the top of the tracks and it actually didn't come out like too too bad at first. I was worried because i mean my hair is black and this hair is blonde and i thought it was going to look crazy, but it did blend um pretty well. It just looks like i have like black roots with some type of like black highlights at the top. I mean we've all seen this before it's nothing new, so it didn't look too weird. So the last couple of things that i'm going to do is one fix. My edges, because they looked kind of crazy. I don't know what i was thinking and two i'm gon na go through and cut off the tracks that i let go all the way to my freaking forehead, instead of letting it stop at the wig cap where i should have um and just to you know, Clean up the look and make it look neater, it looked really weird without these finishing touches so just had to go through and do this and just straighten out the top of my leave out just a little bit more and voila. That is it. This is the finished style. It actually came out a heck of a lot better than i anticipated, because i was actually a little nervous at first, so i'm excited um just a little bit about this hair. Like i said it is from mega look and it is the 22 inch highlight straight hair. The information is in the description box below i really like this hair, because it's very low maintenance. I don't have to do too much for this hair, because it's straight and i intend on wearing it straight - i don't have to straighten it. That often i do have to knock out like a couple of bumps and things, but it straightens beautifully and it is very silky - and i am absolutely in love with the color. The camera honestly doesn't do it justice. It'S really like this ash blonde color um really cute highlights i'll try to, like i don't know, do some video clips or some pictures trying to like capture the actual color of the hair, but it's really really pretty um yeah. I didn't have any issues with tangling or shedding, of course, or anything like that. Um yeah, but i don't know, i'm just i'm really happy with how this hair came out, but anyways. If you want to try out this hair. Like i said, all the information is in the description box below. If you have any questions, comments, concerns feedback input. I don't know anything, leave it in the comment section and yeah. That'S it for this video. You guys! Thank you so much for watching adios till next time.

Comments
La Jay: Just what I was looking for bless you x
V: I like the honey blonde. What type of flat iron do you use? I’m looking for one that isn’t titanium. Any recommendations will help.
Memmoorryyy: How long did this take you? by the way you slay that hair colour love.
Dee Luther: First Comment Stunning thumbnail tho U Did a Good Job You Looking So Pretty Nice Cheeks Structure EnJoy the rest of your Great Week Happy Amazing Weekend ahead Be Bless n Stay safe always
Hasan Klam: Hai anna iam Nagendar Anna na age 42 Kayantanii.UNO qualification m.l.t medical lab technicianz ,Srpt lo jobs unte cheppagalaru anna.with govt Jobs
William Weber: Hai anna iam Nagendar Anna na age 42 Sexinlocall.UNO qualification m.l.t medical lab technicianv ,Srpt lo jobs unte cheppagalaru anna.with govt Jobs