7X7 Glueless Lace Closure| How To.. Red Hair Water Color Method
- Posted on 16 May, 2019
- Lace Closure
- By Anonymous
Hi Divas, in this tutorial I’m going to introduce you to the GLUELESS 7x7 lace closure, as well as show you how I color my hair a vibrant cherry red using the water color method.
14” 7x7 lace closure/transparent lace
2- 12” virgin bundles from my hair collection
Products:
EvalynRose light honey lace mask
Kiss- crimson
Adore - intense red
IC heat protectant spray
EvalynRose Wig grip band
Bed head wax stick
Bomb Goo hair gel
Bw2 bleaching powder
Salon care 20 & 30v developer
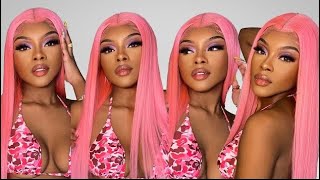
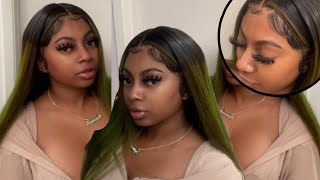
Hello divas, I'm back again with another tutorial, don't forget to Like comment and subscribe as well as follow me on my Instagram jumping right into the tutorial, I'm showing you all the products that I'm using. I will have them down below in the description box to make this wig, I'm gon na start off with two bundles of my 12 inch Brazilian straight and then a 7x7 transparent lace, free plug closure to achieve the color. I want I'm going to start up by bleaching the hair and I'm gon na use the bw2, Clairol bleach powder and then 30 and 20 volume developer, both of those you can find out any of your hair stores and I'm just going to mix them up into A thick pancake consistency, I have them both separated into two different sides and that's what I'll be using. So I'm gon na start out by spraying the hair, it's just water and conditioner, I'm not making the hair wet and drenched. But I am just doing it because it will help not use as much product. So now what you see me doing is putting the bleach on the hair, I'm first going in with my 30 volume developer and I'm skipping a few sections here and there, because I do not want the hair to process all. At the same time, I've been trying to create a little bit of dimension in the hair, so that I'll have some light tones. Some dark tones of the color when I put when I do put the color on also that is exactly what I'm not using 6:13 hair. Yes, I could go in with 6:13 hair and just color the hair, with just the hair color and not have to go through this step, but I don't want it to all be the same color I want to have some lighter and darker tones in it. We all know that it's hard for bleach to process all at the same time, so I want the unevenness of the color and also I like how the regular 1b hair feels versus how 6:13 hair feels the 1b hair will last longer than 613. So this is exactly why I'm using this method, instead of just going in with color on the 6:13 hair, so yep, I'm just gon na, do this on the front in the back and I'm gon na. Do it to both bundles once I'm done with the dirty volume, I'm gon na place it to the side and then do the next bundle in the dirty volume once that has processed, then I'm going to go back to the first bundle and then add my 20 Volume developer and then, basically repeat so now you see here that the hair has already turned colors. It'S already brown, I'm gon na go in with the 20 on the rest of it and then finish it up and doing the same to both bundles. So now that I'm finishing up, you can now see how the hair has already started turning colors, which is exactly what I want it so now the rest of the hair will start to turn and then the part that's brown will now be lighter and then the Part, that's not. Brown will end up being brown if you get what I'm saying so this is how I'm creating my dimension. I also could have done this multiple ways. I could have just put two different color Reds in at different points, but this is what I wanted to do. So you do whichever way works, for you just make sure that you're covering it all the way and then I'm going to wrap it in foil to help process the bleach faster. Now I'm going to go ahead and do the closure to do the closure. I usually like to pin it on the mannequin head, so I know exactly how I'm bleaching it I hate when you have unevenness as far as in the roots, and only that I can tell how I'm doing my roots is, if I parted in section eight like As if it was on someone's head, I can't do it while it's laying down because you'll have like unevenness. I don't want that, so I'm basically going to do the same thing by skipping some sections color and then go back and put it all over. So yeah. Basically, the same thing as you can see, I'm making my roots even and I'm making sure that I am combing through to make sure that I'm doing everything even and worked through with the bleach. I'M not gon na stay on this too much longer, because I think you kinda get the memo here so yeah, I'm gon na do it over the whole closure and then let it process the same way while foiling it and then I'm gon na rinse it out Wash and shampoo so now that the hair is all washed and shampooed I'm going to use the water color method to dye this hair. Using this method is not my favorite way of coloring, but a lot of people have asked me about it, so I decided to go ahead and incorporate it into this video. But again it is not my favorite way. It'S a color hair, so I'm starting off with a bucket of boiling hot water that I bought on the stove and then I'm going to add two colors to achieve the color that I'm looking for I'm using kiss in the color, crimson and then intense red and The color in the brand adore so off-camera. I went ahead and mix these two colors together and tested out a little small piece which I always recommend, because once you dip it in there's no going back. So I'm just going to go ahead and dip. My entire closure into the mixture and get that cherry red that I was looking for, one red would have made it too bright and then the other one was made it more black on the burgundy side, so mixing them together. It gives me the color that I wanted so now, I'm going to just place this whole thing in there. I know y'all are like super nervous watching this, like what's gon na happen to this closure, being that it is a transparent lace, but it'll be okay. I would say that the darker colors, like red blues - and you know things like that - does sort of stain the lace, but not that much it will wash out and then there's also a method that can help you get color out of your lace that I will Do another video on later but yeah, so I'm just going to dip the whole thing in making sure that I'm massaging the hair through to make sure I get every strand with color on in I'm going back in with a little bit more of the adorn color. I did put some kiss into just with off camera, and I'm gon na do the same thing with the bundles and the reason why you have to add more color, as you go, is because the first closure was soaking up some of the color. So you do have to add more and again I am just massaging all the color through the hair opening up the bundles. Don'T forget to do that, so make sure you get every strand with color on me really quickly. Ladies, I wanted to just show you the coverage of the 7x7 closure compared to the 4x4. It is literally like three times the size with a lot of Harding space. It'S huge off line. I went ahead and constructed the unit with my sewing machine, but I wanted to go ahead and show you that the lace is still very much transparent and the color did not bother it next, I'm gon na go ahead and take the lace I'm gon na, be Using my Evelyn Rose custom, wigs lace, mass in the color light honey, I'm gon na go ahead and spray it from the top of the closure to the back all over. As I start to spray, you will see the lace turning a brown color like a light brown color. So if you're my skin tone, then the light honey is the one that you would need to order. I myself do not like to use makeup on my lace. I will sometimes use it on my bald cap, but never on my lace. Next you're gon na just go ahead and blow-dry it and we're gon na move on to plucking, even though the lace is pre plucked, which you saw that you could just honestly not pluck it. But I do go in and use it just a little bit here and there. I didn't really do too much plucking into this unit, honestly, because the pre pluck looked really good y'all. I love my bundles. Look how super silky it is even after being bleached and dyed. The only spray that I use or product that I use on my hair is the heat protecting spray and it's just a bomb. So, as you can see, when I'm curling, you can see the dimension in the hair, where there's some light, colors some dark colors of the red and not just all so much of warm color but yeah. So now, what I'm doing is I'm just gon na curl. It very loosely I do not have a rhythm that I'm to do here. I just want the hair to look kind of like like free and flowy, but not nappy. You know so anyways. You know by now. If you've watched my videos, I do not live, I mean I live for using my wax stick. This helps flatten the hair, of course, with my electric hot comb, I'm going to flatten out the closure as much as possible and then go ahead and finish. Curling get all up once I get to the closure. This is a technique that I do live by on a curl backwards to create that big flamboyant bang kinda. So that is one technique style that I do use the rest of it. I just curled any kind of way all different ways, because I did want it to look like very loose and free so quickly. I'M gon na give my review on this seven by seven lace closure. This was my first time making it or using this to make a wig and right now, it's not so much my favorite. I think I'm gon na make another one and just play around with it. I'M not a fan of how it curves to the back of your head, so the closure will really be like in the middle to the back of your head, and so it doesn't always allow it to lay flat back there. But I'm gon na work on it before I start selling 7x7 lace closure wigs. I will definitely perfect this because I do love the look of the frontal, but with it being completely glueless. I am in love with this color and look at those roots. She is perfectly rooted, ladies okay. Next I'm going to install this wig and today I'm going to use my wig grit band and play at about two inches back from my hairline and then securing it. I'M going to place the wig on that now perfectly matches my skin color. Thanks to my lace, tent spray. The wig ribbon is one of the ways that I like to wear my wigs. Sometimes I will wear elastic band, but I don't like that tension sometimes either. So nine times out of 10, I'm wearing a wig band, which you cannot see at all underneath. So you can purchase those online on my website at WWF, lol, calm as well and try them out. Now I'm going to cut the lace and a zigzag motion close to the hairline. There'S really no perfect way, just make sure you don't cut it straight across just zigzag and you make it look and leave it kind of jagged. So yes divas! This is a completely clueless unit. I love how this unit gives you so much coverage and it's completely clueless to be able to take on and off every day and not having to use any adhesive is like a major plus with a 7x7 closure. The only part, that's missing is the ear tabs right there, which is about what an inch and a half I'm sorry one to two inches. But honestly, I don't care for the ear tabs on the front. So that's actually what makes me not like the front salute, because the ear tabs always come up the most I use frontals only online vacations or weekends. So it's not everyday where type thing, but this unit definitely is everyday wear with and gives you that frontal look. Also, I like how it looks without having any baby hairs. This week is just bomb like the loose curls. The 12 inch is just perfect. It'S super cute classy flirty sexy, I don't know just all of the above. Obviously I'm ranting because I love this closure yeah. So make sure you tell me what you guys think about it. Let me know if you guys want me to add these to the website, because I'm feeling it even though this unit does not need baby hair, it is perfect without it I'm going to just go ahead and add a few baby hairs, because that is my preference. That'S how I like to wear my hair. I don't want to have them like super thick, but I do like a few here and there again, it just helps with the whole frontal look yeah. So it's up to you, your preference and voila. Ladies, she is completely installed. I love this unit, it's so cute. It'S super pretty. The color is vibrant, overly in love with the style. I'M happy that it's glueless and still gives me that frontal look like I can't get enough of it. The hair is still bouncy full of life silky. It'S just everything. It'S secured. Thanks to my wig rip band, I mean I just love it. It'S comfortable anywho, don't forget to Like comment and subscribe. Please let me know what you think about it and follow me on Instagram love. You


Comments
Tray Tray: God bless u sissy ..I have learnt a lot from u ...u are the best wig maker I have ever met...✅✅
Kya Shaw: Nice work
Erica Cutno: Beautiful
Jessica: How did you lay down the closure flat during the sewing process?
Goddess B: Is this wig for sale on the website?? this would be perfect for fall
MichellePierre: Thank you for mentioning it’s everyday necessity
Victoria A: where can i find this closure?
Latyia Ware: Where can I get the closure?
Sherese Love: I wear a 5x5 closure wig everyday and it snags with jus the elastic band. I want to get a 7x7 closure wig glueless as well. Will it snag on your the same way and feel secure?
DezJanea Jones: I loveeee
Corlette K. Jones: i did not see the 7x7 closures on your website. Are you sold out?
Ms.Dimples 1969: Really nice do you sell the closure a. The hair
Anika Starseed: We’re did you buy this closure