Beginner Friendly: How To Bleach And Sew On Your Lace Closure | Asteria Hair Company
- Posted on 29 June, 2018
- Lace Closure
- By Anonymous
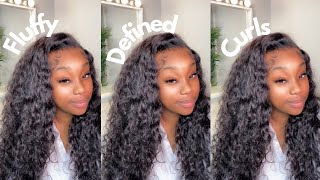
Hey guys welcome back to my channel! Here is a requested video of how I NOT ONLY bleach but sew on my lace closures. I hope you guys find it helpful! If you have any questions LMK down below! Also if you guys would like a FULL DETAILED video of how I create my wigs comment down below!
Please don't forget to subscribe !
Instagram: https://www.instagram.com/allureibk
Business Inquiries: [email protected]
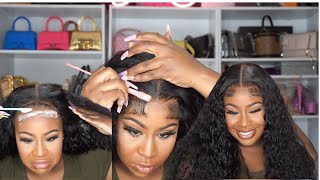
Hey everybody welcome back to my channel, it's a law. I became thank you so much for tuning in to this video. Today'S video is going to be a tutorial of how I believe it's so low on my closures, featuring Asterius hair company from Aliexpress, so you're going to need bleach developer. I use 40, but you can use whatever you have. Then you are going to need shimmer light. Shampoo AB D powder bleach, so the utensils you're going to be using it's going to use a bowl of some sort and something to mix your mixture with. So I usually go in with about a cup full of powder. You can definitely use less, but I like to use this much because I'd rather have more than less when I'm bleaching my closures or fertile. So what you're gon na do is you're gon na pour that developer into that powdered bleach. But the trick is. Take your time I like to go little by little and just mix it and keep adding until I get the perfect consistency that I want. The consistency that you want is going to be of something like whip cream like something that's really really thick and not liquidy. But definitely blended and big stuff together. If your mixture is liquidy, is going to bleed through the lace that you're definitely gon na bleach your hairs and that's something that you do that. What so just keep mixing it till you get what you need. So, as you can see, I'm pretty much done into fixing my mixture and it's actually really really thick and it's hard to fall off the knife. So then I go on and spread that mixture onto my closure, so I'm not pressing, really really hard. I'M going with a light head and I'm just really delighted it on to my closure as even as possible. I definitely want to make sure that the bleach is reaching every part of the closure, so there isn't any like sparse heads that are not bleach or something like that. So, like I said, if you want your hair to come out how you want it, take your time like if you are a beginner, definitely just take your time. There'S no rush. So I'm done applying the bleach to my closure. I'M just gon na turn it over and lay it flat on my aluminum foil, so I'm gon na leave the bleach on for about thirty minutes. I definitely will probably leave it all for less, so I have about ten minutes left in the bleaching process, and this is how it looks so far, and this is actually how you would want it to look. So I'm just gon na wash it out. So I'm gon na use my sugar light shampoo, but first I'm going to actually wash off all that bleach. I kind of feel like this stops the bleaching process. I don't know if it does, but I just feel like that. Then I'm going to apply a generous amount of the shampoo or to the closure. It just really scrub it and really get that shampoo into the closure this actually erase any brassiness or any like our edginess that you may have had for bleaching. Definitely if you have over bleach, this is something that you can use to kind of tone it down. So that's pretty much how I bleach my soldier and it's looking so natural and I'm really satisfied with how the results key ball, and hopefully we can guys do that. Do this. It comes out just like this. So, let's get on to how I saw in my closures too, so in my wig I use a don't mesh cap and I use T pins along with nylon sewing thread and a weaving needle. I also have my canvas head with me, so the first thing I like to do is actually place. My closure on to my metal cap and I like to take the ends and place them exactly directly onto the wig cap. But the things that I also like to do is I kind of like to have the front of the hairline to be a little bit over the cap, and that makes sense, but you guys can see so getting your closure too late flat, sometimes take time. Even for me, as you can see like I'm just going around making sure it is as flat as possible. This is an important step to do before. You start sewing, so make sure that your closure is completely fat. So when I'm done, I like to just tie up the hair, so that's out of place, I'm not in my way. So the first thing I do is actually take my needle from underneath my mesh cap into my closure, the beginning of my closure. Then I take my needle through that first loop. I spread it out and I slide my needle right through that loop and then I pull it. This is going to be your first knot that secures your entire sewing process, so I sew directly through the mesh and the elastic band as well. The reason why I sew through the elastic band when I'm sewing on my closure. It is because that what I've done with my wig, I actually cut off that excess lace from underneath the closure. So when I do cut it off, I kind of don't want my wig to fall apart or like get a little bit loose, because I just only sold on to that mesh, so it kind of creates a strong foundation. So the way that I sew is that I just go through the entire bash and then I put the beatle through the loop and I take it and I just keep going the entire sowing process just like that. So I sped up the video, but I definitely took my time with this and, like I said, if you want your hair to come out how you want it, definitely just dedicate the time to making sure you do it right you. So I'm going to be finishing up sewing on my closure, so I take the needle right through that mesh and directly through the elastic band and do that looping method that I showed you guys again. So I put the needle through the loop and then I twist it and do it one more time and I seal that knot. So then, when I'm done, I just cut off a needle from the thread and then I create a couple more knots. The regular way, like tying your shoe, I do this because it keeps my hair really secured and I make sure that you know it's not gon na like fall apart over time. So that's pretty much how I saw my lace closures onto my wig cap and how I bleach it as well. I hope you guys find this video any sort of helpful and if you want a detailed tutorial of how I make my wigs please let me know - please don't forget to Like comment and subscribe and I'll see you in my next video bye, guys


Comments
Ashley Osias: Patiently waiting for you to drop a full detailed video on how you make the rest of the wig ♀️