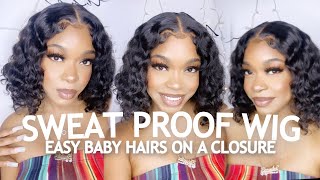
5X5 Lace Closure Wig Install✨| Middle Part & Wand Curls Ft. Luvme Hair✨
- Posted on 26 July, 2022
- Lace Closure
- By Anonymous
Direct Link for the wig: https://bit.ly/3cDhvoQ
Length: 22 inches
Code 20% off: TV20
LuvmeHair Website: https://bit.ly/2YwAdYy
Instagram: http://www.instagram.com/luvmehair/
Facebook: http://www.facebook.com/luvmehair/
YouTube: http://bit.ly/2OCjZrr
Welcome to My Channel
Be sure to SUBSCRIBE & TURN ON YOUR ALERTS
HAIR CHANNEL @iambeautifulhustlertv
——————————————————
MY PERSONAL YOUTUBE CHANNEL : @Life with ShaeTV
https://www.youtube.com/channel/UCB9xX...
——————————————————
Follow My Socials:
PERSONAL
@iambeautifulhustler
BUSINESS
Instagram:_Beautifulhustler
@thebhslay
@girlsniteoutapparel
Twitter:_Beautifulhustl
YouTube :IAmBeautifulHustlerTV
✨For Sponsorships ,Reviews,& Questions
Email:[email protected]
786-571-1313
To Purchase Hair & Products Www.ibhslays.com
Allow 3-14 Business Days For All Orders
#miamihairstylist,#miamihair,
#browardhair,#browardhairstylist, #Atlanta #atlantahair,#atlantahairstylist #reels, #explore #trending #tiktok #viral #miamimakeup #miamimua #miaminails
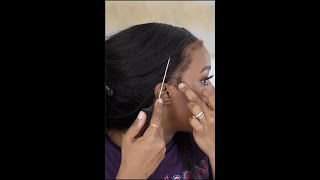
Hey beauties and welcome back to, i am beautiful, hustling tv. Today we are back with a new video and today's hair is provided by love. Me hair love me hair, sent me over this 5x5 a glueless lace, closure wig, and it is a 22 inch and it's kind of like a body wavy type of wig, so today i'll be doing a simple middle part with uh some baby hair and some wand. Curls, because i never really do one curls on my channel, so i wanted to you know, do some today, but including in your packaging. Your love me box. Of course you get that informational card about what to do with the hair. You get your caps, you get your edge brush, get your little um cute little pouch um, you know or whatever inside your packaging. And of course you know, you get the wig itself, and this is a 5x5 lace closure wig. As i mentioned already, you guys, the knots are already bleached and the hairline is already pre-plucked, but i am going to do a little bit more plucking. However, this wig does feature elastic band in the insides and does have these combs, and today i will be using my mua as my model for today. Y'All know, y'all always see me with the beat face and when i tell y'all my mua do her big one. She do her big one and i decided to use her today as our model and besides, she loves closures and she loves lace. Closures like wigs, regular, quick weave so wins like she's a closure type of girl. So i knew she would be perfect for this video. So she went ahead, of course, and she'd be her own face and now i'm going to slay her hair. So for starters, i start off with the ball cap method. You know you just only apply your ball cap area to just to wherever you're going to lay that lace, closure and then, after that you know, we cleaned the hairline with alcohol and everything like that and just jumping straight into the video. I will be applying three layers of my lace: meat, adhesive onto her cap and hairline and um. Once we're done with all three layers, uh three layers. You know we will go ahead and begin to tack down the wig blow dry. It melt it in place and proceed on with the styling, so i hope you guys enjoyed this video and, let's get to it. So now that i have applied all three layers, it's time to place that lace into the glue and i'm then once i do that, i'm going to take my fingertips and apply a little bit of pressure. Then go in with my comb and, of course, the blow dryer on the heat setting to melt that lace in some more and then i'm going to take the melt belt and tie down that lace for about 10 minutes but um. While that melt. That is sitting. I did go ahead and sew the closure wig all around to her head um wow. You know like off camera, unfortunately guys but um. Once we remove that milk belt y'all know, we would go in and cut the extra lace and tack down whatever's still lifting so um. Now that it is time to remove that milk belt y'all know we're gon na take that off and then go in and cut off the extra lace using the eyebrow, razor and um. She didn't want me to cover most of her forehead up today, so i'm not going to cut off um. You know like i'm, going to keep pretty much the whole hairline. You know, in other words um. She did want me to cover up. You know most of her forehead space, but you know foot is still looking natural and realistic. Of course you don't want to look like it's too far down, but if you do have a larger forehead, the best thing about it is. You can really make your wigs as low as you wan na. You know you want them to be so i kept everything on. I kept all of the hairline on the wig, but i just you know, removed the extra lace, but now i'm going to go in and tack down, um those little cracks that i did not glue down um. You know the first time and just make sure i slide enough glue under those places and then i will push that glue right down, we'll push that lace into that glue and begin to prep it for the baby hairs and then i'll do you know show you Guys briefly, how i do the wand girls, so now i'm going to go ahead and pull down that sections for the baby hairs on the side of the closure. Y'All know i like to do like a little bean in the middle and then pull it down on both sides and just put those out the way. So i will go ahead and do that on both sides and, of course, um add a little more foundation to the lace. So we are completely melted and blended and then spray it and tie it down once again. So, as you guys seen, i did a few more steps before actually spraying the holding spray. So i did um sew in between the wigs, so the closure kind of lay much flatter because you know sometimes when you have that glue. That'S been on, the inside creates a lot of air space in the wig, so just to make sure that your wig is still going to be flat. You can actually um sew the wig, not only you know around the edges, but you can actually sew it across the middle. You know top area to where you stretch the weight down flat and you sew it down. So it's not so much every space. So, that's why i did that stitching um, like a little below where the closure was and then of course, um. I parted the hair in the back of the closure area, so we can have um some hair to cover up the back section as well, but um now that we have sprayed um the hairline down and tied it with the mailbelt. I'M gon na go ahead and start um wand curling this hair up and i just will be using the really really tall like hair curler um. It'S not an actual one, but you know you can. You know create your warm curls with whatever you choose, so i'm just taking my real tiny little curl and i'm just going to wrap the hair around the barrel to create my wand, curls and of you. As usual, i like to curl the hair in this natural state. You know i like to um, keep it nice and soft, so i don't really add any sprays or anything to it to make it harder crunchy. I just like my curls, where i can just rub. My fingers through them, if i want to and flip them out more or you can leave it tight, it's up to you, but for today we just pretty much left the curls, nice and tight, but however um i will just be. You know one curling, all this hair piece by piece do and i pretty much want to curl all the back right side of it. So now, i'm just going to show you guys how i curl the top area uh for the front on both sides. I do still um, you know, curl everything away from the face, and this is what it's looking like so far. I have curled the whole um a little right side area, but i've seen a little few straight strands here. So i'm gon na just go back in and curl that piece again and i just do add a little holding spray towards the top to just smooth everything down it's in into place, but i didn't, i did not call them out to pearls today. Y'All. I just wanted to leave them in their tight state, and then you know over time she can comb it out like she said she has a dinner tomorrow. She could you know comb through it and just leave it tight for today or whatever the case is, but once i finish, curling everything i just smooth it all together, but this is what it looks like so far. Okay, i did the whole back. I did that right side. This is what it looks like: keeping the curls tight, okay and now, i'm just going to finish up here on the left side of the head finish up still doing the same thing: curling the hair away from the face, and now it's time to go ahead and Remove that melt bell - and i'm just going to oh so cute yo, so this is what the curls look like and i just removed that milk belt. So what i'm gon na do now is just go ahead and comb those biggest hairs out um. You know just two basic little swoops, nothing too major um and i will be using my baby hair gel for the baby hairs and after i do that i will go ahead and you know just touch up the curls that need to be smoothed out. The top um, you know black spray concealed the part up and all that push the hair more towards the face. You know you know the basic finishing touches of a style, so um first step, baby, hair, gel suit, their baby hair and then do the finishing touches, and now i'm just going to go ahead and comb. The hair. You know down smooth it out comb out the holding spray that was on the hairline, make it soft make it smooth, and then i'm going to. Of course, you know go back in with the concealer set up the part black spray it apart and make it nice and clean, and this will pretty much sum up the style so just stay tuned for the finishing um, touch-ups and yeah. Let me know what you guys think down below once again. This wig is from love me hair. I decided to do a wand, curl style uh, make sure you do check out the description box details below so you can get any coupon codes to order. Did y'all know, love me, hair, like literally, has like some of the best quality wigs out. Y'All should notice by now, but if you don't know make sure you check them out, did the baby hairs cleaned up the part, give it a nice little fluff, and here is the finishing look. I hope you guys enjoyed this video. Let me know what you think down below very quick, very simple, very easy. Thank you guys for watching and see you in the next video
Comments
Stephan Rainey: Don’t play with Shay! I LOVE that you always show you going back and applying glue to the areas that didn’t get tacked down the first time. Because that literally alwaysss happens to me!
Jamilla Worsley: Your MUA beat beat beat her face. Absolutely phenomenal.. and the hair is even better, you always slay boo!!!
nikkistayfocused: the slayage is unmatched congratulations on 180+k subbies ✌
Princess Toyia: It's ALWAYS a slay from Shae!!!❤❤❤❤
O'Shea Brown: I’m loving the back to back to back videos ♥️♥️♥️♥️ #uderratedgoat
ItsNeicy: I look forward to your content. It’s always . Shoutout to your MUA, beat on point.
Lillian Powell: Beautiful
Shaimoni: Yesss finally a closure❤️❤️❤️
Mathias Favour: Nice one You just got me
sweet dimond: Congratulations on 180k
Britney Hopkinson: Been waiting for u to post
deseraymiles87:
Queenizzygetbusy:
O'Shea Brown: When is the restock
Lucas Lima: Cmonn