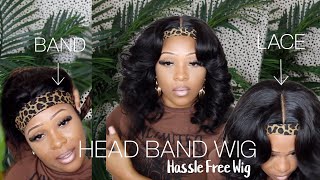
How To: Lace Closure Quick Weave Ft. Klaiyi Balayage Quickweave
- Posted on 20 July, 2022
- Lace Closure
- By Anonymous
Quickweave install tutorial using closure How to: lace closure quick weave ft. KLAIYI BALAYAGE QUICKWEAVE
Get 25% off Off Use Special Code: MY25
●▬▬▬▬▬▬▬▬▬♛#KlaiyiHair ♛ ▬▬▬▬▬▬▬▬▬●
Direct Hair Link:➤https://st.klaiyihair.com/b796n
Hair Info: balayage 3 bundles with closure body wave, 20"22"24"+Closure 18"
Top Selling Bundles:➤https://st.klaiyihair.com/b796o
Highly Recommendations For New Season:➤https://st.klaiyihair.com/b796r
Affordable Natural Density Lace Front Wigs:➤https://st.klaiyihair.com/b796q
https://www.klaiyihair.com/ ➤#VPart Wigs:https://st.klaiyihair.com/b796s
Klaiyi Hair Official Website:➤https://st.klaiyihair.com/b796t
Aliexpress Klaiyi Hair Store:➤https://s.click.aliexpress.com/e/_opNA...
Amazon Klaiyi Hair Store:➤https://amzn.to/3OLRlhL
YouTube "Klaiyi Hair": http://bit.ly/2zpjQhu
TikTok"@klaiyi hair": https://www.tiktok.com/@klaiyihair
Instagram "@Klaiyihair_no1": https://www.instagram.com/klaiyihair_n...
Facebook "@NO1KLAIYIHAIR": https://www.facebook.com/NO1KLAIYIHAIR...
Contact for Wholesale: +8618337492297 Email: [email protected]
#klaiyiwig #lacefrontwig
Supplies Needed:
Hair
Hair glue
weave cap/ stocking cap
hair protectant or Got 2b glued hair spray
blowdryer
scissors
White eyeliner/lipliner pencil
Steps to install quick weave:
PREP:
1. Braid down your hair (optional, can pull into ponytail/slick down), and make sure to leave out enough hair at the top to cover your tracks.
2. Put on the wig cap (any color)
3. Use a white eyeliner/lip liner pencil to mark the area around your leave out
3. Apply hair protectant to cap avoiding areas of leave out , can use gorilla snot hair spray or morning glory hair protectant
4. Blow dry hair protectant making sure it is COMPLETELY dry
INSTALL
1. Measure the track hair against your head from ear to ear
2. Cut the weft that you measured
3. Apply hair glue to track and allow to dry for no longer than 30 seconds
4. Lay the track onto your cap beginning at the bottom working your way up
5. Repeat the above steps until you reach your leave out
6. cut off the remaining cap that's exposed (be careful!!)
7. Style your leave out as desired
Watch my other videos!!
How to Takedown your quick weave:
Follow me on IG https://www.instagram.com/dionalatia/
For Business Inquiries ONLY:
Psalm 27:12 The LORD is my light and my salvation; whom shall I fear?
So i'm going to start by sectioning out just a little bit of my edges on each side, because i'm going to leave this out and then i'm going to go ahead and part my hair and begin braiding, my hair, just in braids, going straight to the back, Because i'm using a closure, i don't have to leave any leave out of course, so i'm just going to go ahead and put my hair in berets really like these giant plaits, but i'm just making sure that i make the braids towards the top of my head. Just more flatter or as flat as i can, so that the closure lays flat. So for this install, i use the tan wig cap because i'm using a closure - and so i just wanted to make sure you wouldn't see the wig cap underneath if i decided to like part my hair in the closure um. So i'm just making sure to pull my cap down as far as i can on the sides right up until they meet my edges um. But honestly, i wish i would have used the black wig cap because i feel, like the tracks, stick a little bit better to the black wig caps as a as opposed to this tan one. I think, because the tan one was so thin it just it didn't. Stick that well, so i had trouble with my track sliding this install so just a heads up, but i'm gon na go ahead now and apply my protective shield all over to the wig cap and i'm mixing it with the got to be free spray um. This one protects your hair from the glue when you apply the glue, and it also helps prevent the wig cap from sliding. So once you put this like all over your wig cap and you blow dry it it kind of makes it like solid and so that it's not you know like thin and slippery and it stays in place. Also, i forgot to mention that i'm skipping a couple of inches in the front because that's where the closure is going to go, so i don't need to put any product right there, but i am making sure that i apply it on the sides, because the sides Is where i want it the most secure the hair that i'm installing today is from clay hair. I have in three we'll have three bundles and a closure they're all i believe, 22 inches, but all the information will be in the description box below for the install. I'M using my 30 second glue and just right out the back. What i'm going to do is pull my wig cap down at the back and just measure the track from side to side making sure i have enough track and then i'm going to cut it. Put the glue on it and apply it to the wig cap, now a trick that i use to make sure i'm applying it in the right place, because of course, i can't see the back of my head is to use my fingers to really just feel where I'M going because you can't see anything so first, i'm just going to make sure i pull it down enough and then i'm going to put the track, lay the track onto the wig cap and then once i feel like it's in a good spot. I'M gon na use my fingers to kind of seal it in place um and then just feel again to make sure it feels like that's where it should be, basically for every track that i apply up until i get to the top of my ears, i'm going To use this exact same method, so i'm just going to use my fingers to feel where the last track was and then measure from side. One side of my head to the other side cut the track glue and repeat: once you start applying tracks near the top of your ears. Once you reach the top of your ears, you just want to make sure that the tracks come all the way to the front of that cap and stop right at the cap. Don'T go beyond it and don't stop behind it. You just want to make sure that you don't see the cap at all um and that the cut that the track is completely covering that cap, because the wind blows you will see it. I do this method up until i get up to about like my eyebrows or right above my eyebrows, and that's when i start curving the track a little bit upwards um just to hide the rest of the tracks. That'S underneath it! Now. I don't do like a complete. U, but i just curve the ends upwards, a little bit so now i'm starting on the second bundle. The first bundle got me pretty far. It got me over half of my head complete and it looks pretty full and that's sep like putting my tracks about a fingertips, a fingertips, width apart. So basically i can just place a finger in between each track, but now i'm just going to continue to place. My tracks going in the? U motion making sure that the track goes all the way to the end of the cap and, as you can see, there are a couple of tracks where it didn't go to the very end of the cap, and you can see it. Um you can, especially you can see the tan cap. I wound up having to go through with like a black marker and like coloring it in black, so you can see it, but just to avoid the mistake that i made just make sure it goes to the very very end before i'm completely finished with my head. I'M going to start applying my closure, so i'm just taking my makeup right now and putting it all over the wig cap to try and make it somewhat the similar complexion as my scalp, even though it's way too light um. So i did not bleach my knots in this closure, so that's another reason why i'm just going through here trying to make it blend and then i'm going to pull the closure forward and, as you can see there, you can see the front of the wig cap. Like that harsh line, so i'm actually going to go through and cut that off. That'S why i was saying: don't um put that hard stuff like don't put the protective shield or anything right there, because i wound up cutting that off anyway, um and it helps make your closure look seamless without having that there. So when i pull it forward now, all you see is hairline or scalp, so i gathered all the hair to the top of the closure with a clip so that i can make sure so i can really see what i'm doing, and so i can make sure. I'M placing my closure in the right place, then i'm just going to put the glue on that thick line all around the closure, as you can see here, but i'm actually going to stop right where my hairline starts to taper off in the front of the closure. Like i'm not going to put it all the way to the front, as you can see, i stopped like halfway there only because, like that part is not going to be glued down to my forehead, i'm actually going to use wig glue to glue the front part. So you just want to stop right by the hairline and being very careful, i'm laying the closure um, where i see fit, making sure everything lines up. This is kind of like a tricky part um only because like keeping the hair at the top of the closure from like sliding all over the place, and it kind of lifts up a little bit in the back, so you kind of have to like tug it To make sure it like lays flat, so you kind of have to maneuver it, but i mean it's not that hard, but you just kind of have to take your time with it. If you don't lay it in the correct place, you can always move it around, but just make sure you don't press it down right away until you make sure it's like laying correctly, and then you just want to take your fingers and press firmly all around the Perimeter to make sure it's locked in place, and once my closure is laid down to how i want it, i'm just going to go through and fill in the rest of the gaps in the back. Now that the hard part is over now, it's time for the fun part, which is touching up my hair and styling it. So the first thing i'm going to do is take my black eyeliner marker and i'm actually gon na go through and cover up all the little white spots that you see there like. I was saying earlier because i failed to make sure that my track met. All the way to the end, that's what happened so you just fill it in with a marker and now i'm going to take my hair glue and put it right in front of my hairline or like right on my hairline, where i know the closure will be Stopping in the front and i'm just going to smooth out the glue and blow dry it until it's super clear and then i'm going to lay down my clothes closure. So first i thought i wanted a middle part. So i'm just going through parting that out using my got to be free spray and my wax stick and i'm just making it flat because, as you can see it's bumpy but then, as i was doing all that i decided i wanted a side part. So i actually went through and moved my part to the side after i made my part, i took off my elastic band and now i'm going through my razor blade and i'm cutting the lace at first. I started cutting the lace like sideways with my razor blade, but i remembered i should cut downward to create more of a natural cut in the lace. So that's what i started doing and i'm going to remember to do that in the future. But after i did that my lace lifted a little bit in the front, so i just took some of my glue and laid it back down. Lastly, i'm going to go through and do my edges since i have both natural edges and weave edges, i'm first going to use the edge booster edge control on my natural edges and i'm going to lay that down. Then i'm going to go through and cut out. The edges that i'm going to take out from the from the closure i'm going to cut that and then i'm going to lay that down with the edge foam and then i'm going to curl that little piece. And then i'm going to wrap it and then really quickly. While my edges are setting i'm just taking some scissors and cutting some layers around the front of my face just to frame my face, because i just like how my hair looks better like that. I feel like it makes it fall better. I decided to leave the hair in its natural curl pattern, like, i didn't, add any heat to it for this style, because i actually like the natural curl pattern, at least for a couple days. While it lasted um - and i kind of just didn't want to mess with it anymore, i definitely could have put some heat on it, but i actually wound up just putting some foam on the ends and getting about my business. But overall i really really love this hair. It is super nice light and fluffy, but it's still full. This install is probably one of my favorites that i've done. I was actually really really excited for this one. The hair is great. The color is great. I have no issue with it. I get lots of compliments on this hair. I love it so much but um yeah, like i said this hair is from clay hair. All the information for this hair will be in the description box below. If you have any questions, go ahead and leave it in the comments section, but that is pretty much pretty much it for this video. You guys, thank you so much for watching adios till next time.

Comments
Tina White: Gorgeous!! It looks so easy when you do it!! Do you see any difference in your hair after you remove the quick weave? I would looove to try it but I always wonder if there are any issues with the hair underneath. I used the bold cap method a few times and I only kept it on for 5 days max but I saw that I was loosing the hair on the edges that was covered with the freeze spray.
RaiRaiBrown: That is perfection!!!
M i z i b è l l e: Stunning!!!!
Dee Luther: First Comment Very Cute thumbnail tho You Looking So Pretty Nice Cheeks Structure EnJoy the rest of your Great Week Happy Fabulous Weekend ahead Be Bless n Stay safe always