Easiest Wig Install Ever! No Work Required Ft. Idn Hair
- Posted on 02 August, 2022
- Lace Closure
- By Anonymous
~~~~~~~~~~~~~~~♥#IDNHAIR wig details ♥~~~~~~~~~~~~~~~
IDNhair means "I Define Natural".
Our mission is to give natural products that are practical, beginner-friendly, and natural.
▶ Hurry Up!! 20% off anniversary sale, Code: IDN20, Limited Time & Biggest sale of the year!!!
▶ Free shipping & Free return !!!
▶ Same Wig in the Video :
Wig Link: https://bit.ly/3PbSHT3
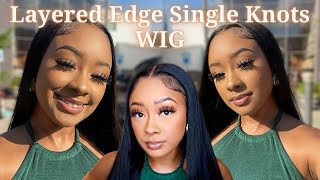
April Glueless Straight Scalp Knots 13X4 Full Frontal Wig HD Lace
▶Alesha Special Coupon Code: Alesha20, Get 20$ Off
Wig Cap Construction: Full Frontal 13X4 Clean Bleached Scalp Knots Wig
Length: 20 inches
Density: 180%
Hair Texture: Yaki Straight
Color: Natural Black
Lace Type: REAL HD Lace (Melt Into all Skin)
Hairline: Clean Hairline ( No need to pluck anymore)
Bleach Knots: Clean Bleached knots
Cap Size: Medium
~~~~~~~~~~~~~~~♥#IDNHAIR Collections ♥~~~~~~~~~~~~~~~
Website: https://idnhair.com/ ( I Define Natural)
Glueless Scalp Knots Wigs: https://bit.ly/3bRSQwc
Glueless HD Lace Wigs: https://bit.ly/3bQ5bBl
Glueless Bob Wigs: https://bit.ly/3AqPfzF
Glueless Celebrity Wigs: https://bit.ly/3NLBizc
~~~~~~~~~~~~~~~~♥Let’s Be Friends on ♥~~~~~~~~~~~~~~~~~
Instagram: https://www.instagram.com/idnhair/
TikTok: https://www.tiktok.com/@idnhair
Facebook: https://www.facebook.com/IDNHAIR/
YouTube: https://bit.ly/3yInzoO
Amazon storefront link:
https://www.amazon.com/shop/influencer...
Connect With Me!
Instagram|Tiktok @lesshhab
Products used in this video:
Curling iron : https://amzn.to/3zn4mrS
Hot comb: https://amzn.to/3tUrcFd
Spritz: https://amzn.to/3nddwkZ
Lace glue: https://amzn.to/3zrMGv9
Lashes: https://amzn.to/3uQWiy7
DISCLAIMER:
Some links may be affiliate links where I receive a small commission from you clicking on the link and purchasing anything I have listed. No purchase is necessary.
Shop my wig collection SHOPALESHAB
Website link : https://shopaleshab.com
Instagram : @shopaleshab
Email: [email protected] for sponsorships, collaborations, and business opportunities.
About Me:
From: Virginia
Age: 24
Camera: Sony ZV-E10
Sign: Gemini
I did not do any plucking to this wig. It looks like it is growing on my scalp straight still press it's gorgeous absolutely gorgeous. She look like ladies are in me, is: what's up welcome back to my channel if you're new, i'm alicia, today's video is going to be on this wig that was sent to me from id and hair idn stands for. I define natural and i will be getting into all the details as we go along in this video, but for now let's get into the install. So the first thing that i'm doing here is i'm separating out the um ear tabs on the wig. So i like to take the end of my comb and just part as close to my ear as possible, to give me a guideline, so i'm not cutting out so much extra hair and i just cut on that line on both sides. Again, you see me placing my comb and parting out directly in front of my ear like as close as i can get it. This just helps so you don't have a whole bunch of extra flyaway hairs, just falling around and falling out the wig, and then i cut from the opposite direction around the ear, because i just find it to be a lot easier. So after i've done that, i'm just holding the wig and making sure that it is fitting well and that i don't need to cut anything additional and i like to put slits in my lace. This just makes the process a lot cleaner. These little light spots. I went over this in my last video on what this was for, so it's just some light, concealer some light foundation that i use to give myself a guideline on how far to spread the glue down this way, your insole will end up being a lot cleaner And you won't have so much excess glue just hanging on past the hairline, which i tend to do a lot if you're just eyeballing it. So i found this to be very helpful and i got it from miss. Friendly junior on tick tock definitely go watch her she's, really really good and um yeah. I get a lot of tips from her, so i'm just spreading out the glue. I ended up doing three layers and i went in sections the first time and then i went back in again with my glue the second time, but y'all can just watch me as i continue this process either after i'm finished with all the layers or my first Layer i go in with alcohol and i just clean up that concealer base, so it's not sitting up underneath my lace and i'm not able to get to it. I like to clean up before i actually pull the lace down. So that's what i'm doing there. Then. I'M taking my lace in the sections that i cut and going ahead and melting it down. One of the things that i would say about this wig is that you need to make sure that you're pulling it when you're installing it. I had some rippling in the middle of my wig. That was hard for me to get out, but once i do a re-install, i feel like i'll be able to adjust that, but just make sure that you're pulling your weight tight or else you'll get that rippling. Um, you can fix it by sewing down the wig in the back, but um. I don't sweat it on my wig, so yeah just keep that in mind, but other than that. I really really love this wig. This was a 20 inch yaki texture wig. So, like a kinky straight type of wig, i really really like that. I'M into that type of texture, i feel, like you get a lot of body from it. It gives very much still press like your natural. It looks like real hair. This wig came pre-plucked which they plucked this wig so good. I feel like they hooked it really really good um. I did not touch this wig. I did not do anything to it. It came out the box like this. It was already bleached. I found this to be very, very helpful, especially if you're a beginner or, if you just like installing your wigs, but you don't like doing all the extra stuff this wig came with everything already done. It could be a little pricey, however you're paying for what's already done for you, so you have to keep that in mind. This wig also has like a certain type of special to it. Like a little specialty, it's called scalp knots so in in detail. What that is, is normal, wigs have three to four strands of lace, every three to four strands of hair in every lace, hole and that's why you have those big knots because there's a lot of strands of hair in each little hole. And then you have invisible knots which have two to three strands, which is like your normal nice hd lace, type of wig um. When you see the small knots, that's what they're doing it's less hair in each strand, but this wig in particular only pulls through one to two strands of hair in every hole. So it just makes it give a lot natural. Or is that even a word? It gives them much more of a natural look when you're installing your wig as far as the hairline and the scalp goes, because it's not as bulky in those lace holes. I thought that was cute and different. You know that they're offering that. So i definitely would say that it added to the wig um here i am sectioning out just a section of hair and cutting um that part off. I did feel like my wig was down a little bit too far on my hairline. I have a small forehead. So we don't want that, so i just went ahead and cut it back a little bit so yeah um. I just thought this wig was very interesting. I had never heard of that before and i was very open to trying it so yeah in comparison to other wigs. You can definitely tell that the knots are way smaller and you would have to be really careful when bleaching it. So the fact that it comes already bleaches, it's really really nice um. I decided to do a clean, install, no baby hairs. You know just very natural, that's the look i was going for and i think it came out beautifully, keep on watching to the end. So y'all can see the full look. I did go ahead and put some curls in it, but again with the install um. I just went ahead and added in some extra glue to go on the edges and spraying on my spritz before i melt the wig down, and this is what we're at here adding my front layers in. I don't go super into detail on these, but i will be making a video soon. I don't always say that, but i will be making a video soon. It'S just so much work, y'all, so much work when it comes to layers and it's hard to record everything and get it to fit on the screen so yeah it will be coming soon, but yeah. All right, y'all have the wig on now i'm about to go in and put some curls in it. I went ahead and did my layers already in the front. I just showed y'all a little bit of that, not too much because um, it's just a lot. It'S a lot i feel like. I have to make a video separate when i'm doing layers but yeah i'm about to go ahead, and i just did some real choppy front type of layers. That'S how i like to have mine and yeah i'm about to go ahead and just put some big curls in the front and then some big curls in the back just for like body and then i'll show that part and then we'll come back at the end. This wig did come with a edged wax stick in the box. It actually came with a lot of goodies. I don't know what happened to the footage of me pulling the wig out the box. I wish i had it for you guys, but it came with the edge wax. Stick: a comb ball uh, wig cap excuse me, and i think that was it yeah. It just came with a lot of nice little things as well as like an informational little tidbit on what invisible knots are and scalp knots. Excuse me what they are and just giving you some background on the wig, which i thought was really nice. So i take my wax stick and i go all across my hairline as well as in the middle, and i also take the brush that i use for my wig cap and i just take the excess makeup that was already on it and rub it across the Hairline, i don't add anything additional but like once i did this. It was like so melted. I couldn't believe it like. It looks so freaking good and i hadn't even done a whole lot yet then i'm going to go ahead with my hot comb and continue styling. This wig so keep on watching to the end, to find out my final thoughts on this unit, as well as to see how the curls turned out. I already like the way that this looks without the curls. The hairline is, i mean so realistic y'all. It is plucked so good. I did not do any plucking to this wig. It looks like it is growing on my scalp straight still, pressed it's gorgeous absolutely gorgeous i'll, go ahead and put the curls in and get along to. The finish. Look i'll be using my fabulous curling iron, this one right here. This is my tatiana curling iron. This thing is the goats, so definitely go pick her up if y'all are looking for a really good curling iron and it's a really affordable price. I have it in my amazon storefront. I will be making a video soon on my amazon beauty gym so stay tuned. For that this is definitely one of them, but stay tuned for that going forward here, uh go god! So all right, i have my girl sitting there for a minute. Now we got ta go ahead and take the curls down. I absolutely love this hair. I don't even want to finish before i say i love this. Hair is gorgeous. It holds curls so beautifully like come on, where we're at i'm getting ready to take this part out and get ready to comb the girls out so - and this is where we're at with the hair gorgeous, i mean just gorgeous. This is how i like to wear my hair. I love body, i love curls. This hair is holding the curls so well. The hairline is so natural y'all. I did not do any work to it, lace, front, wear and what lace? What lace i didn't pluck this wig! I didn't do nothing to this wig, except for stylish, no bleaching. Nothing like this is one of the best wigs i've ever gotten. It is a luxury to get a box uh. Oh, we got the box like this. I see why people like make ready to wear wigs. That'S why i make ready to wear wigs. It'S the process so easy if you're someone who wants to put their wig on but just feel like everything else is just a little bit too much. This is the wig for you, because i literally didn't have to do nothing but put the wig on. Of course, i added my layers in because what are curls without layers y'all know me. I got ta put my layers in and yeah yeah, so it's giving very effortless blowout hair like i just, went and got my hair done or tapings or something i cannot believe they this hairline. This good, like i, am truly truly amazed, but if y'all are interested in this wig, all the info will be down in my description box down below. Let me know what y'all think i love the clean, install look, no baby hairs, i mean like it really looks so natural like that was the look i was going for, so i don't even want to take it off. I have to do a sew in like i don't even want to take this out and do a sew in. I will be putting this wig back on. It is absolutely gorge. I wish i would have wore this to dallas like thanksgiving, make sure y'all come back for another video, nothing bad to say about this wig it only when i cut it. It only shared when i put when it only shed when i cut the ear tabs off. It didn't shed at any other part, no tangling, thus far um, which holds heat very well, and i love the yaki texture because it gives it a lot more body. It'S not just so like flat, but at the same time it's very shiny. It just looks like healthy hair, so yeah. If y'all enjoyed this video, make sure to hit that subscribe button. For me and i'll see y'all in my next one bye, you
Comments
Cynthia Patton: Just ran across your video.. the hair is gorgeous! It looks jet black which I absolutely love! Thank you.
IDNHAIR: Thanks a lot for your sharing, You are soo GORGEOUS!!!
Totally UNĒK: Makeup flawless
Alesha B. 🦋: Use my code “Alesha 20” to get $20 off