Beginner Friendly Knot Bleaching Tutorial Ft Donmily Hair
- Posted on 02 August, 2022
- Lace Closure
- By Anonymous
Hello my beautiful subscribers (and non subs) ☺️
Wig sales page - @CAwigss
Personal instagram- @holaa_caro
EMAIL- [email protected]
❤------------------- ❤#DonmilyHair ❤------------------❤
I'm wearing this in the video: https://st.donmily.com/b61rv
Enjoy Special Discount By Using the Coupon!
https://www.donmily.com/ ➤Top Selling Wigs: https://st.donmily.com/b61nk
Click To Enjoy Biggest Discount: https://st.donmily.com/b61nl
Hair Info: Donmily 5×5 HD Lace Straight Wig 200% Density 28”
Donmily Summer’s Sale is Rocking On the Way!!!
Save $2 Off Over All Wigs Online!
Save $6 Off Over $99 With Donmily Coupons!
Save $29 Over $229 With Donmily Coupons!
Save $60 Over $500 With Donmily Coupons!
——————————————————————
➤ Great Discount Ginger Brown Jerry Curly Wig https://st.donmily.com/b61nr
➤ Great Discount Reddish Brown Body Wave https://st.donmily.com/b61ns
➤ Great Discount 613 Blonde Color Wig https://st.donmily.com/b61nu
➤ Great Discount Highlight Color Straight Wig https://st.donmily.com/b61o1
➤ Great Discount Auburn Brown Water Wave https://st.donmily.com/b61r2
➤ Great Discount Natural Jerry Curly Wig https://st.donmily.com/b61rg
➤ Great Discount HD Invisible Lace Wig https://st.donmily.com/b61rj
Choose Your Favorite Lace Part Wig☛https://st.donmily.com/b61rk
Big Discount Bundles with Closure/Frontal☛https://st.donmily.com/b61rl
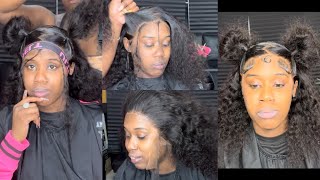
That'S my baby, hello. Everyone welcome welcome back to my channel classes back in session. In today's lesson, i'm gon na be showing you guys how to get perfectly bleached invisible knot as well as give you guys some tricks on how to tackle those hard to bleach thick fat ass knots. Okay, because if your end goal for your install is to give scalp, then those big fat ass knots definitely got ta go with. That said, get your pen and paper and let's get right into today's lesson. If you're a beginner, you're, probably wondering what exactly or not, then what's the whole purpose of bleaching them knots are basically the little black things that you see at the bottom of the lace. These are literal knots that have been tied by the wig maker for tying in each strands of hair. Some are bigger than others, and the bigger they are. The harder they are to bleach purpose of bleaching is to turn those black knots at the bottom of your lace, to a more blonde brown shade to make it kind of look like it's coming right out of your scalp versus coming out of a gridlock you get. I hope that makes sense, so that is why we bleach our knots, make it look more like it's coming out of the scalp before i start bleaching the knots on my lace, i like to just kind of do a little physical examination assessment of the knots. So i have noticed sometimes deeper in the back of the wig of the knots i mean of the lace. The knots are usually double tied, meaning they are bigger, thicker, the thicker. The knots are the more processing time they need and just the more harder they can be to look scalp like you know, and as you come towards the front of the lace towards the like the peak of the hairline. The knots are a lot smaller and these are single knotted, and these, usually you know, bleach pretty easily. I don't apply too much. Pressure like these are easy. So what i do now is i like to get a markers, preferably something that can be easily seen in the lace, and i just draw like a rough, not perfect, outline of where the knots start to be the thickest. So that way, i know to bleach this part first and i save the single knotted knots in the front, for you know, blast after i've mapped out where the knots are. I can go ahead and start mixing together. My bleaching solution for bleaching i like to use just bw carol's bleach. This is very generic standard. I'M sure everyone has seen this if you haven't hi hello to her and i like to mix it in with a 40 volume developer um. I use free volume developer because i feel like it's fast enough and strong enough to lift the knots to the color that i'm looking for. If you're a beginner, i feel like you can go with 30 volume developer because it's not going to be as fast as 40.. You can also use 20 if you're really scared, but personally, i feel, like 20, doesn't really lift it to the blonde color that i'm going. I feel like with 20 volume developer. I probably have to like bleach it twice. Mixing i like to use a hair. Coloring brush, like you know, and sometimes i'll use a popsicle stick. The popsicle stick is mainly for spreading my bleach. You can use a plastic knife plastic fork. Anything that you want to mix as long as it is not metal. Metal is a catalyst in this reaction from my science babes out there, but just know metal is going to cause the solution to react which is going to affect how well your bleach works. So, plastic, no metal cool next tip when it comes to mixing, is you want to slowly pour in your developer? It is not a one to one ratio, so don't just pour it in and mix it. No. I just like to pour a little bit. Do a little stirring action and keep adding until it gets to the consistency that i want it to be. The easiest way to mess up your solution is by having it way too watery, because if it's too runny and watery it's going to start bleaching, the actual hair. You want the solution to be thick enough, where it just sits on top of the knots and not the hair, because now you've, bleached your hair and unless you're going for blonde roots, yeah you're going to be very upset. So i like to make sure that my i like to make sure i'm going for a creamy and spreadable consistency. That is a little bit thick right, but at the same time it's still spreadable. So you should not be able to turn your mixing brush upside down and you know your product is dripping kind of like frosting. Usually i just flip my little brush over and it's dripping off. I know it's too runny. If it's not dripping. I know it's good to go before i start applying the bleach onto the lace. I have to make sure i either spray with water hairspray anything just to help spray the front of the hair and push back all the hairs. That way, i don't mistakenly bleach. You know any of the baby hairs or something like that. Now we can go ahead and apply our bleach. I am starting it from the back back back of the lace and that's because the knots in the back are bigger, which is why you know it did a whole little, not mapping session earlier, i'm using a wooden popsicle stick to help me spread the bleach on Here i like using this versus the actual mixing brush that i use, because i feel like it just kind of helps me get a nice even spread, and i can also control how much pressure i'm using better by using this speaking of pressure when it comes to Really big knots, i found that you kind of have to slightly over bleach the knots meaning that, like i, have to put a little bit of pressure and push this bleach past, just the tip of the knot. Okay, i don't know if this makes sense verbally, but i'm gon na flip the wig over to show you guys what i'm saying, but just push a little bit of pressure to really get that bleach to peek through to cover those really big knots in the back. So here i'm just flipping the wig over to make sure i'm applying enough pressure to push that bleach through for you to cover those big knots. It is important to make sure you take little periodic, stop and checks to make sure you haven't over bleached the knots in a way where you have bleach on your actual hair, and if that happens, it's okay. All i do is go ahead and spray a little bit of water on the section that i over bleached or got bleach on mistakenly and just wipe that off water just helps. You know, stop the reaction and neutralize it. I noticed i wasn't pushing the bleach through enough for it to really cover up the knot, so here i'm just using my popsicle stick to really push that bleach through, which is why it's important that you have thick bleach, because since it's thick enough and me pushing It it's not going to cause it to actually start running and dripping into the hair. Here you can see. The bleach has really seeped through it like it's covering over those knots, which is what we want, because that way, it's going to really give it more of a invisible look, since they are so big. Now i'm going in and i'm just finishing up the rest of the hair up to the point of um, where i mark the knot start to get smaller and become single knots. Once i have finished covering this part, i'm going to go ahead and get some full paper and let the back of the back of the glaze just process for about i let it sit for about, i would say, 10-ish minutes 10 to 15.. I feel like when it comes to timing. You can't really put time on these types of things, because every wig and every hair kind of bleach is different depending on what it's been through, processing wise. So i usually just start to do the next section of the hair. Once i see it turn like a copper like a brown color once i just see the hair starting to lighten to from black to brown. That'S what that's why i'm like? Okay, now i can start doing the front because the front is not going to take that much time to process, so i would say honestly give it 10 minutes if you've seen it lift to a brown color. Then you can go ahead and start doing. You know the front for this unit. After about 12-ish minutes, i've noticed this. The hair was already starting to lift so okay cool and i can go ahead and just use a light amount of pressure. Much lighter than i did earlier for the back of the knots on these single knots. I can use just a slightly light pressure to go ahead and finish bleaching, the rest of the wig after finishing off the single knots in the front. I realized that i didn't push enough of the bleach through for the back like i needed to so i just went ahead with that same little. Popsicle, stick and just you know, push push push all that bleach to make sure it was really getting up to the roots of the hair. Like i'm going to show you guys once i finish this exactly what i'm saying hope that makes more sense. So here is more of a close-up of what i'm saying, as you can see, towards the back. That bleach is really pushed up a lot out of the hair and that's fine, because i really want to cover those big big knots and here towards the front. I tried my best to be very gentle without applying too much pressure, since these are single knotted. I don't need to push through too much because they will take the bleach very easily and with that said, i put the foil back on and i'm gon na. Let the hair fully process all together, and i believed it took about 30-ish minutes finally like after this step, for it to bleach to the color that i want it. As far as what color do i stop at, i usually once i can see a little bit of yellow peeking through in the color. That'S when i know when to stop, but i will say anything over an hour. Even an hour is a bit risky. I stop the hair at no matter what color it is because now i'm going to risk damaging my hair, so you get all the balding and shedding of your frontal closure whatever it may be, because bleaching does kind of damage the hair a little bit just saying, But yeah once i see a little bit of yellow peek through it's been about 40 30ish minutes, i'm ready to go ahead and wash out the bleach when it comes to washing out the bleach. I don't have any special procedure besides, i just like to wash it with the wig open up towards me so, like the bleach can kind of just run downwards, and sometimes, if you know you did a really good job bleaching, you can already see the orange yellowish Color under the lace but i'll, try and show you that there, all i'm doing is making sure i'm really washing off all of that bleach and i'm using a neutralizing shampoo to help just you know, stop all the reaction and make sure everything is nice and washed Out, typically after you bleach the knots, it's normal for your lace to look a bit orangey or the roots of it to look a bit orangey and that's cool. That'S why i'm going to be using a blue and purple shampoo combination to help take these orange knots to a much more neutral natural color, because my scalp is not orange, and neither is yours if it is no comment. I don't judge here it's okay in the past i used to just use purple shampoo, because that's what i was told from the internet, like you guys to do, but i've realized i need to use a combination of purple and blue shampoo on the color wheel. Orange is canceled out by blue and yellow is cancelled out by purple. So i don't know why. We'Ve always thought that we had to use just purple shampoo here, i'm just going in first with my purple shampoo and i'm letting this sit on the lace for about 10-ish minutes, sometimes maybe even longer, but not too long like 10 to 15, and when i'm using This i make sure i'm really lathering that pigment, because you want to get that purple color all over the lace. So i make sure i saturate the hair with it lather it in and i let it sit for about 10 to 15 minutes. Then i come back wash that completely out and i go in with my blue shampoo and i let this you know saturate lather and also sit for another 10 to 15 minutes, and here we are after i have washed out all the shampoos and y'all see that Scalp, okay, compared to what the lace is looking like before these knots, they're, giving very much disappearing into your scalp. Look how good this hairline is looking, but the combination of my plucking and my not bleaching. This wig was set up for a successful scalpiana install while, yes, you could definitely go ahead and install this wig without doing any bleaching. Plucking and just you know, finesse it that way, but i find that, especially when it comes to doing like side parts or just extra styling having those really properly bleached knots like i'm, showing you right here. It just makes the wig look a lot more realistic than it would if you didn't do any of the work, but i went ahead and did my little regular installation of glueless. As always, i have detailed videos on those if you're interested - and here we are with the final look of the hair - and you can see it's giving very much my hair, my scalp. How many times will i say scalp while i understand all these steps might be a bit extra and very detailed, but, as you can see, it really does pay off in the final results. This hair is looking a lot better than it would have looked. If i just went ahead and didn't bleach the knot or do those extra steps really get it to look, you know scalp, like as i use that word for the time. Thank you guys so much for watching. I hope you found this to be a very helpful and useful video, and you know, comment down below. I love talking to you guys, make sure you like the video, because that helps me know that you enjoyed it and you want more content like this and make sure you subscribe if you haven't subscribed, because what do you hate me or something anyways i'll see you Guys another one make sure you like comment and subscribe, and peace out girl scouts goodbye


Comments
EssenceofOma: Bleached the knots on my closure replacement and babyyyy SCALP! Your videos deffs gave me the confidence!
Jodie Smith: How did you know I needed this? You are so awesome
Kountrigirl Lexx: Hey sis I don’t know if it’s just on my end but the volume is a bit low but other than that this video was supppeeerr helpful thank you. ❤️
Yuppy: I definitely needed tutorial!
ItsQueendom: RIGHT ON TIME !!! My wig came today
Toni-Ann: Very detailed. Ty!
shaunesty89: thank you for this! ive been missing out with the blue shampoo!! what brand do you use?
Jess Nechelle: It’s definitely Giving scalp. I’m gonna have to try the blue shampoo too
ebony dudley: Thank you so much for this
Jailyn Lett: Is it a difference if I don’t tone my knots with blue shampoo ?
Monica Jones: So I’m a beginner so what can I do to make it look scalp other than bleaching
Marvelously Maya: Thank you!!
Tammy Jones:
Sh 🌹Sh 🌹Sh:
Sh 🌹Sh 🌹Sh:
iiamgavii: So I got 20….is there a difference ? Because I didn’t get 40
Ctrldeletealt: First